Casio EX Z85 Owners Manual - Page 23
Snapshot Tutorial, Using the Control Panel
 |
UPC - 079767624071
View all Casio EX Z85 manuals
Add to My Manuals
Save this manual to your list of manuals |
Page 23 highlights
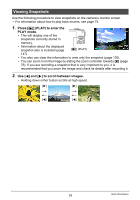
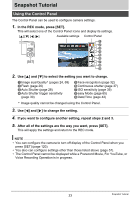
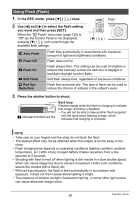
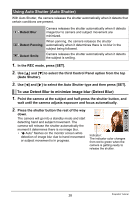
Snapshot Tutorial Using the Control Panel The Control Panel can be used to configure camera settings. 1. In the REC mode, press [SET]. This will select one of the Control Panel icons and display its settings. [8] [2] [4] [6] Available settings Control Panel 1 2 3 4 5 6 [SET] 7 8 9 2. Use [8] and [2] to select the setting you want to change. 1Image size/Quality* (pages 24, 69) 2Flash (page 26) 3Auto Shutter (page 28) 4Auto Shutter trigger sensitivity (page 30) 5Face recognition (page 32) 6Continuous shutter (page 37) 7ISO sensitivity (page 39) 8easy Mode (page 65) 9Date/Time (page 42) * Image quality cannot be changed using the Control Panel. 3. Use [4] and [6] to change the setting. 4. If you want to configure another setting, repeat steps 2 and 3. 5. After all of the settings are the way you want, press [SET]. This will apply the settings and return to the REC mode. NOTE • You can configure the camera to turn off display of the Control Panel when you press [SET] (page 120). • You also can configure settings other than those listed above (page 57). • The Control Panel cannot be displayed while a Prerecord Movie, For YouTube, or Voice Recording Operation is in progress. 23 Snapshot Tutorial
-
 1
1 -
2
-
3
-
4
-
5
-
6
-
7
-
8
-
9
-
10
-
11
-
12
-
13
-
14
-
15
-
16
-
17
-
 18
18 -
 19
19 -
 20
20 -
 21
21 -
 22
22 -
 23
23 -
 24
24 -
 25
25 -
 26
26 -
 27
27 -
 28
28 -
29
-
30
-
31
-
32
-
33
-
34
-
35
-
36
-
37
-
38
-
39
-
40
-
41
-
42
-
43
-
44
-
45
-
46
-
47
-
48
-
49
-
50
-
51
-
52
-
53
-
54
-
55
-
56
-
57
-
58
-
59
-
60
-
61
-
62
-
63
-
64
-
65
-
66
-
67
-
68
-
69
-
70
-
71
-
72
-
73
-
74
-
75
-
76
-
77
-
78
-
79
-
80
-
81
-
82
-
83
-
84
-
85
-
86
-
87
-
88
-
89
-
90
-
91
-
92
-
93
-
94
-
95
-
96
-
97
-
98
-
99
-
100
-
101
-
102
-
103
-
104
-
105
-
106
-
107
-
108
-
109
-
110
-
111
-
112
-
113
-
114
-
115
-
116
-
117
-
118
-
119
-
120
-
121
-
122
-
123
-
124
-
125
-
126
-
127
-
128
-
129
-
130
-
131
-
132
-
133
-
134
-
135
-
136
-
137
-
138
-
139
-
140
-
141
-
142
-
143
-
144
-
145
-
146
-
147
-
148
-
149
-
150
-
151
-
152
-
153
-
154
-
155
-
156
-
157
-
158
-
159
-
160
-
161
-
162
-
163
 |
 |