Casio EX Z85 Owners Manual - Page 26
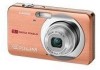
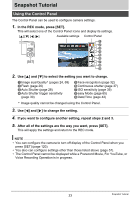
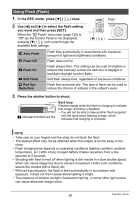
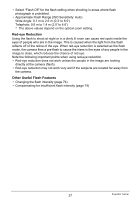
Using Flash (Flash), In the REC mode, press, once., to select the flash setting - orange
 |
UPC - 079767624071
View all Casio EX Z85 manuals
Add to My Manuals
Save this manual to your list of manuals |
Page 26 highlights
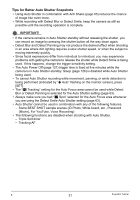
Using Flash (Flash) 1. In the REC mode, press [2] ( ) once. Flash 2. Use [4] and [6] to select the flash setting you want and then press [SET]. When the "R Panel" menu item (page 120) is "Off" (so the Control Panel is not displayed), pressing [2] ( ) will cycle through the available flash settings. [2] ( ) > Auto Flash ? Flash Off < Flash On _ Soft Flash ¥ Red Eye Reduction Flash fires automatically in accordance with exposure (amount of light and brightness) conditions. Flash does not fire. Flash always fires. This setting can be used to brighten a subject that normally comes out dark due to daylight or backlight (daylight synchro flash). Soft flash always fires, regardless of exposure conditions Flash fires automatically. This type of flash can be used to reduce the chance of redness in the subject's eyes. 3. Press the shutter button to shoot. 2N < indicates the flash will fire. Back lamp Flashes orange while the flash is charging to indicate that image recording is disabled. • You will not be able to take another flash snapshot until the lamp stops flashing orange, which indicates that charging is complete. NOTE • Take care so your fingers and the strap do not block the flash. • The desired effect may not be obtained when the subject is too far away or too close. • Flash charging time depends on operating conditions (battery condition, ambient temperature, etc.) With a fully charged battery it takes anywhere from a few seconds to 5 seconds. • Shooting with flash turned off when lighting is dim results in a slow shutter speed, which can cause image blur due to camera movement. Under such conditions, secure the camera with a tripod, etc. • With red eye reduction, the flash is fired automatically in accordance with exposure. It does not fire in areas where lighting is bright. • The presence of outdoor sunlight, fluorescent lighting, or some other light source can cause abnormal image colors. 26 Snapshot Tutorial
-
 1
1 -
2
-
3
-
4
-
5
-
6
-
7
-
8
-
9
-
10
-
11
-
12
-
13
-
14
-
15
-
16
-
17
-
18
-
19
-
20
-
 21
21 -
 22
22 -
 23
23 -
 24
24 -
 25
25 -
 26
26 -
 27
27 -
 28
28 -
 29
29 -
 30
30 -
 31
31 -
32
-
33
-
34
-
35
-
36
-
37
-
38
-
39
-
40
-
41
-
42
-
43
-
44
-
45
-
46
-
47
-
48
-
49
-
50
-
51
-
52
-
53
-
54
-
55
-
56
-
57
-
58
-
59
-
60
-
61
-
62
-
63
-
64
-
65
-
66
-
67
-
68
-
69
-
70
-
71
-
72
-
73
-
74
-
75
-
76
-
77
-
78
-
79
-
80
-
81
-
82
-
83
-
84
-
85
-
86
-
87
-
88
-
89
-
90
-
91
-
92
-
93
-
94
-
95
-
96
-
97
-
98
-
99
-
100
-
101
-
102
-
103
-
104
-
105
-
106
-
107
-
108
-
109
-
110
-
111
-
112
-
113
-
114
-
115
-
116
-
117
-
118
-
119
-
120
-
121
-
122
-
123
-
124
-
125
-
126
-
127
-
128
-
129
-
130
-
131
-
132
-
133
-
134
-
135
-
136
-
137
-
138
-
139
-
140
-
141
-
142
-
143
-
144
-
145
-
146
-
147
-
148
-
149
-
150
-
151
-
152
-
153
-
154
-
155
-
156
-
157
-
158
-
159
-
160
-
161
-
162
-
163
 |
 |