Casio PCRT275 Owners Manual - Page 9
Removing the switch PCB E270-PR, Disassembling the display unit - printer
 |
View all Casio PCRT275 manuals
Add to My Manuals
Save this manual to your list of manuals |
Page 9 highlights
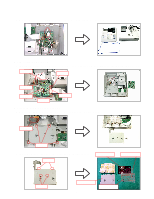
s Removing the switch PCB (E270-PR) 9. Remove the two screws. Lift up the PCB and remove the FPC and then the PCB. s Disassembling the display unit 10. Remove the display cover. Hooks 3 Hooks 1 Hooks 4 Hooks 2 (1) Open the printer cover and remove Hook1 and Hook2. (2) Remove Hook3 and Hook4. 11. Remove the blind sheet. * When reassembling, insert the blind sheet under the hooks. - 7 -
-
 1
1 -
2
-
3
-
 4
4 -
 5
5 -
 6
6 -
 7
7 -
 8
8 -
 9
9 -
 10
10 -
 11
11 -
 12
12 -
 13
13 -
 14
14 -
15
-
16
-
17
-
18
-
19
-
20
-
21
-
22
-
23
-
24
-
25
-
26
-
27
-
28
-
29
-
30
-
31
-
32
-
33
-
34
-
35
-
36
-
37
-
38
-
39
-
40
-
41
-
42
-
43
-
44
-
45
-
46
-
47
 |
 |

— 7 —
■
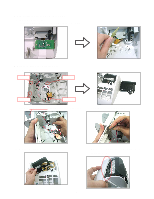
Removing the switch PCB (E270-PR)
9. Remove the two screws.
Lift up the PCB and remove the FPC and then the PCB.
■
Disassembling the display unit
10. Remove the display cover.
Hooks 1
Hooks 3
Hooks 2
Hooks 4
(1) Open the printer cover and remove Hook1 and Hook2.
(2) Remove Hook3 and Hook4.
11. Remove the blind sheet.
* When reassembling, insert the blind sheet
under the hooks.