Casio PX 100 User Guide
Casio PX 100 - Privia Digital Piano Manual
 |
UPC - 079767360924
View all Casio PX 100 manuals
Add to My Manuals
Save this manual to your list of manuals |
Casio PX 100 manual content summary:
- Casio PX 100 | User Guide - Page 1
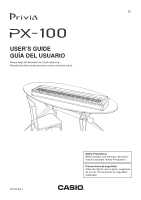
ES USER'S GUIDE GUÍA DEL USUARIO Please keep all information for future reference. Guarde toda información para tener como referencia futura. PX100-ES-1 Safety Precautions Before trying to use the piano, be sure to read the separate "Safety Precautions". Precauciones de seguridad Antes de intentar - Casio PX 100 | User Guide - Page 2
THE RISK OF FIRE OR ELECTRIC SHOCK, REFER SERVICING TO QUALIFIED SERVICE PERSONNEL. Important! Please note the following important information before using this product. • Before using the optional AD-12 Adaptor to power the unit, be sure to check the AC Adaptor for any damage first. Carefully - Casio PX 100 | User Guide - Page 3
Contents General Guide E-2 Playing Back All the Music Library Tunes .. E-3 Power Supply E-4 Using the AC Adaptor E-4 Connections E-5 Connecting Headphones E-5 Connecting to a PEDAL Jack E-5 Playing with Different Tones ... E-6 Selecting and Playing a Tone E-6 Using Tone Effects E-6 Layering - Casio PX 100 | User Guide - Page 4
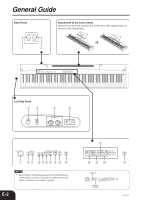
General Guide Back Panel Attachment of the Score Stand Insert the score stand into the slot at the top of the digital piano as shown in the illustration. 1 2 Left Side Panel 34 5 6 7 89 0ABC D E F NOTE • Each chapter of this manual starts with an illustration of the piano's console, which - Casio PX 100 | User Guide - Page 5
DAMPER jack 2 PEDAL SOFT/SOSTENUTO jack 3 POWER button 4 DC 12V jack 5 MIDI OUT/IN terminals 6 PHONES jacks 7 VOLUME knob 8 CONTROL button 9 REVERB CHORUS button 0 INTRO/ENDING button A SYNCHRO/FILL-IN button B PLAY/STOP, START/STOP button C MUSIC LIBRARY, RHYTHM button General Guide D LEFT/TRACK - Casio PX 100 | User Guide - Page 6
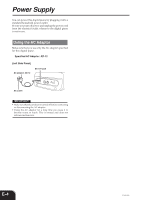
Power Supply You can power this digital piano by plugging it into a standard household power outlet. Be sure you turn off power and unplug the power cord from the electrical outlet whenever the digital piano is not in use. Using the AC Adaptor Make sure that you use only the AC adaptor specified - Casio PX 100 | User Guide - Page 7
level too high when using headphones. [Back Panel] PEDAL jacks [Left Side Panel] PHONES jacks SP-3 Headphones Accessories and Options Use only the accessories and options specified for this digital piano. Use of non-authorized items creates the danger of fire, electric shock, and personal - Casio PX 100 | User Guide - Page 8
and Playing a Tone The piano comes with eight built-in tones. 1 Press the POWER button. POWER button 2 Use the VOLUME knob to adjust You can select from among four reverb effects and four chorus effects by pressing the keyboard keys shown below. 1 Reverb Effect Keys Room 2 Hall 2 Room 1 Hall - Casio PX 100 | User Guide - Page 9
You can assign different tones to keys on the left side and the right side of the keyboard. Split Point STRINGS GRAND PIANO 2 GRAND PIANO 2 STRINGS • The tones are now layered. 2 After you are finished using the layered tones, press the one of the TONE buttons again to unlayer them. Adjusting the - Casio PX 100 | User Guide - Page 10
also affects the sizes of the accompaniment keyboard and the melody keyboard. Using the Piano's Pedals The digital piano is equipped with two pedal jacks, one for a damper pedal and one for a soft/sostenuto pedal. Pedal functions • Damper pedal Pressing this pedal causes notes to reverberate and to - Casio PX 100 | User Guide - Page 11
worrying about how many beats there are in each measure. 3 While holding down the CONTROL button, use the TEMPO [ ] and [ ] buttons to change the tempo (speed) of the metronome. • You can also use keyboard keys to change the tempo setting (see page E-11). 4 Press the METRONOME button again to stop - Casio PX 100 | User Guide - Page 12
down the CONTROL button and pressing the SONG/RHYTHM SELECT [ ] or [ ] button. 2 While holding down the CONTROL button, use the keyboard keys shown below to input a two-digit rhythm number. • If you want your accompaniment rhythm to include percussion instrument sounds, select a rhythm in the range - Casio PX 100 | User Guide - Page 13
button. (2) While keeping the CONTROL button depressed, use the keyboard keys shown below to input a three-digit number. * Tempo Range: 030 to 255 CASIO CHORD mode. • See page E-12 for information about how to use the chord modes. 2 Press the SYNCHRO/FILL-IN button. • This configures the piano so - Casio PX 100 | User Guide - Page 14
auto accompaniment, so you can play all of piano's keys for standard-fingering chords or melody notes. I CASIO CHORD This method of chord play makes it CASIO CHORD "Accompaniment keyboard" and "Melody keyboard", and tells you how to play CASIO CHORDs. NOTE • The accompaniment keyboard can be used - Casio PX 100 | User Guide - Page 15
by playing them as you would on a piano, inside the accompaniment keyboard range. To specify a C-chord, you would play C-E-G. FINGERED Accompaniment Keyboard and Melody Keyboard Accompaniment keyboard Melody keyboard NOTE • The accompaniment keyboard can be used for playing chords only. No sound - Casio PX 100 | User Guide - Page 16
Perform the following operation to change the volume level of the rhythm and chord accompaniment. 1 While holding down the CONTROL button, use the keyboard keys shown below to raise (+) or lower (-) the accompaniment volume. - + L L L L L L L L C1 C2 C3 C4 C5 C6 C7 C8 + : Raises the - Casio PX 100 | User Guide - Page 17
piano comes with 30 Music Library tunes built in. See the Song List on page A-1 of this manual key and then the 5 key. Always input two digits for the tune number. 3 Press the PLAY/STOP slow tempo is probably best. 1 Use the LEFT/TRACK 1 RIGHT/TRACK missing part on the piano's keyboard. 4 Press the - Casio PX 100 | User Guide - Page 18
This digital piano has a lithium battery to supply power to retain memory contents even while power is off.* The life of the lithium battery is five years after the date of manufacture of the digital piano. Be sure to contact your CASIO service provider about having the lithium battery replaced - Casio PX 100 | User Guide - Page 19
to flash, which indicates that the piano is standing by for recording to Track 2. • Select the tone and effects you want to use in your recording, and configure the in the accompaniment range of the keyboard. • Press the INTRO/ENDING button to put the piano into synchro start standby. Recording will - Casio PX 100 | User Guide - Page 20
/ TRACK 2 indicator lamp to flash, which indicates that the piano is standing by for recording to Track 2. • Select the tone and effects you want to use while recording. 4 Press the START/STOP button or play something on the keyboard to start simultaneous playback from Track 1 and recording to Track - Casio PX 100 | User Guide - Page 21
to raise or lower the overall key of the keyboard in semitone steps. Changing the Pitch of the Piano to Match Another Instrument 3 Use this setting to raise or lower the overall pitch of the piano. The setting range is plus or minus 50 cents (100 cents = 1 semitone) from the standard pitch of A4 - Casio PX 100 | User Guide - Page 22
and sound source. Turning off Local Control cuts off power to the keyboard and source, which means that the piano does not produce any sound when played. This comes in handy when you want to turn off the piano's keyboard and use its auto accompaniment feature to accompany an external sequencer or - Casio PX 100 | User Guide - Page 23
30 through 39. For SMF data you purchase or create, you need to use special CASIO conversion software to convert it to CASIO format before transferring it to the piano. You can obtain a copy of the special CASIO conversion software by downloading it at the Web page shown below. After downloading - Casio PX 100 | User Guide - Page 24
Page E-5 Memory contents deleted. Lithium battery is dead. Contact your CASIO Service Page E-24 Provider for replacement of the lithium battery. No sound produced by connected external MIDI sound source when the digital piano keys are pressed. 1. The digital piano Send Channel does not match - Casio PX 100 | User Guide - Page 25
Specifications Models: Keyboard: Polyphony: Tones: Digital Effects: Metronome: Auto Accompaniment: Music Library: Lesson Function: Song Memory: Pedals: Other Functions: MIDI: Input/Output: Speakers: Power Supply: Power Consumption: Dimensions: Weight: PX-100 88 piano keys (with touch response) 32 - Casio PX 100 | User Guide - Page 26
was installed. Be sure to periodically contact your retailer or authorized service provider to have the lithium battery replaced. Note that you will be charged separately for lithium battery replacement. • Note that CASIO COMPUTER CO., LTD. shall not be held liable for any damages or losses or - Casio PX 100 | User Guide - Page 27
Strong) 3 Chord Mode (Normal, CASIO CHORD, Fingered, Full-Range Chord) 4 Accompaniment Volume (-, +) 5 Layered Tones Volume (-, +) 6 Piano Key (F to C to F) 7 Reverb Effect (1 to 4) 8 Chorus Effect (1 to 4) 9 Pitch Setting (-, +) 0 Pedal Function (Soft, Sostenuto) A MIDI (see page E-20) 412A-E-027A - Casio PX 100 | User Guide - Page 28
sonidos GRAND PIANO 1 GRAND PIANO 2 ELEC PIANO 1 ELEC PIANO 2 HARPSICHORD VIBRAPHONE PIPE ORGAN STRINGS ACOUSTIC BASS RIDE ACO BASS Maximum Polyphony/ Polifonía instrumentos de percusión. Estos ritmos no suenan a menos que CASIO CHORD, FINGERED o FULL RANGE CHORD se encuentren seleccionados como el - Casio PX 100 | User Guide - Page 29
412A-E-054A A-2 Fingered Chord Chart Cuadro de acordes digitados (Fingered) Chord Type M m 7 m7 dim7 M7 dim m7 5 Root C C /(D ) D (D )/E E F F /(G ) G (G )/A A (A )/B B Chord Type aug sus4 7sus4 m add9 mM7 75 add9 Root C C /(D ) D (D )/E E F F /(G ) G (G )/A A (A )/B - Casio PX 100 | User Guide - Page 30
Model PX-100 MIDI Implementation Chart Version: 1.0 Function ... Basic Channel Default Changed gruesa, RPN nulo y recepción de captación de inflexión de altura tonal. *2 In accordance with pedal *2 De acuerdo al pedal. *3 • Reverb type [F0][7F][7F][04][05][01][01][01][01][01][00][vv][F7 - Casio PX 100 | User Guide - Page 31
conforms to the environmental protection legislation in Germany. Esta marca de reciclaje indica que el empaquetado se ajusta a la legislación de protección ambiental en Alemania. CASIO COMPUTER CO.,LTD. 6-2, Hon-machi 1-chome Shibuya-ku, Tokyo 151-8543, Japan P MA0311-B Printed in China
-
 1
1 -
 2
2 -
 3
3 -
 4
4 -
 5
5 -
 6
6 -
 7
7 -
8
-
9
-
10
-
11
-
12
-
13
-
14
-
15
-
16
-
17
-
18
-
19
-
20
-
21
-
22
-
23
-
24
-
25
-
26
-
27
-
28
-
29
-
30
-
31
 |
 |
PX100-ES-1
ES
USER’S GUIDE
GUÍA DEL USUARIO
Please keep all information for future reference.
Guarde toda información para tener como referencia futura.
S
afety Precautions
Before trying to use the piano, be sure to
read the separate
“
Safety Precautions
”
.
Precauciones de seguridad
Antes de intentar usar el piano, aseg
ú
rese
de leer las
“
Precauciones de seguridad
”
separadas.