Casio QV-10 Owners Manual
Casio QV-10 Manual
 |
View all Casio QV-10 manuals
Add to My Manuals
Save this manual to your list of manuals |
Casio QV-10 manual content summary:
- Casio QV-10 | Owners Manual - Page 1
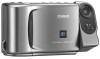
Digital Camera. The QV-10 comes with its own built-in liquid crystal color monitor that let's you instantly view the pictures you take. To get the most out of the QV10, be sure to carefully read this manual and follow the instructions contained in it. Please refer to this manual for the QV-10, QV - Casio QV-10 | Owners Manual - Page 2
special cable and software 81 Computer (Video Capture 82 Reference 83 Troubleshooting 84 Specifications 88 About the camera's backlight 89 LQiquVid-C1ry0staFl eDaigittaul rCeamsera QV-10 Lightweight and compact design The QV-10 is the first camera to incorporate a built-in monitor into - Casio QV-10 | Owners Manual - Page 3
this happens, all of the digital images stored in the camera's memory will be lost. You will not be able to view stored images or record new ones. Take your camera to your dealer or an authorized CASIO service provider as soon as possible after the MEMORY ERROR message appears. Operating conditions - Casio QV-10 | Owners Manual - Page 4
case QV-10 Alkaline batteries (AA-size × 4) Cleaning Cloth Special video cable Wrist Strap • See page 17 for instal- lation instructions. 14 Manual and warranty AC adaptor AD-C60 General Guide The following illustrations show the names of each component, button and switch on the camera. Top - Casio QV-10 | Owners Manual - Page 5
camera a shown in the illustration. General Guide 2 1 Using the Cleaning Cloth Use the cleaning cloth to wipe fingerprints and smudges from the LCD The camera can hold up to 96 images in memory 18 Operation Reference To view images stored in memory You can recall images and view them on the LCD. - Casio QV-10 | Owners Manual - Page 6
page whose contents are currently shown on the LCD. Memory page number Multi-Page Display (Page 53) This function lets you view four or nine memory pages at the same time. Getting Acquainted Zoom (Page 57) This function lets you enlarge a specific part of an image to twice its original size. Auto - Casio QV-10 | Owners Manual - Page 7
A low battery indicator ( ) appears on the LCD whenever remaining battery power drops below a certain level. Memory The QV-10 features flash memory for storage of images. Flash memory does not require electrical power to store data, so image data is retained in memory even when you turn camera - Casio QV-10 | Owners Manual - Page 8
computer connected to the camera via the camera's DIGITAL terminal (page 81). Getting Acquainted Using AC Power To power the camera from standard AC adaptor (not the cord). • Avoid an undue bending, pulling, and twisting of the AC adaptor's cord, and never try to lengthen the cord by splicing it - Casio QV-10 | Owners Manual - Page 9
Camera's LCD 49 Displaying Images on a TV Screen 51 Displaying the Memory Note • The QV-10 is designed to refresh the image on the LCD about seven times camera indoors under such lighting, you may experience some brightness or color problems with recorded images. The actual extent of the problems - Casio QV-10 | Owners Manual - Page 10
you are recording. The following table describes the conditions covered by each switch setting. A A LCD when shutter button is pressed (in the Record Mode) B LCD when image is played B back from camera memory Important! • Do not apply excessive force when rotating the lens body. Doing so can - Casio QV-10 | Owners Manual - Page 11
and [-] buttons to manually adjust the exposure. • Pressing [+] makes the image on the LCD brighter. Use it camera's lens appears on the LCD. The QV-10 is designed to refresh the image on the LCD recorded. Up to 96 images can be stored in camera memory. 1. Enter the Record Mode. • Set the function - Casio QV-10 | Owners Manual - Page 12
range of the camera. In such a case, changing the aperture will not clear the indicator from the LCD. • The manual exposure adjustment to replace batteries. Memory Full Message The message "MEMORY FULL" appears on the LCD whenever you press the shutter button while camera memory is full. If - Casio QV-10 | Owners Manual - Page 13
on the LCD first. • The message "MEMORY EMPTY" appears on the LCD if there are no images stored in memory when you enter the Playback Mode. 49 50 Playing Back Images Displaying Images on a TV Screen Use the special video cable that comes with the camera to connect the QV-10 to a television - Casio QV-10 | Owners Manual - Page 14
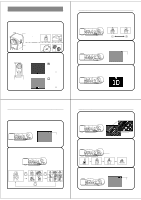
can be displayed at the same time. This feature can be used to display multiple memory pages on the camera's built-in LCD, or on the screen of a connected TV. 1. Enter the Playback Mode and turn on the camera. 2. Switch to multi-page display. • Press the MODE button to change between the different - Casio QV-10 | Owners Manual - Page 15
is replaced by a zoom area indicator. This indicator shows you what part of the image is currently enlarged on the display. You can turn Back Images Using Auto Play Auto play lets you automatically scroll through the camera's memory pages quickly and easily. You can specify the speed of the scroll - Casio QV-10 | Owners Manual - Page 16
operation is in progress. 1. Enter the Playback Mode and turn on the camera. 2. Start the auto play operation. 3. Press the MODE button to display abort the auto play feature setting procedure without changing anything, turn the camera off and on again, or change the position of the function switch - Casio QV-10 | Owners Manual - Page 17
Pages You can protect specific memory pages to ensure that they are not accidently deleted. To protect a page 1. Enter the Playback Mode and turn on the camera. • Slide the function switch to the PLAY position. • Slide the POWER switch in the direction indicated by the arrow. • If the page number - Casio QV-10 | Owners Manual - Page 18
pages you are deleting. Be especially careful when you are using the all delete operation. To delete a single memory page 1. Enter the Playback Mode and turn on the camera. • Slide the function switch to the PLAY position. • Slide the POWER switch in the direction indicated by the arrow. 2. Scroll - Casio QV-10 | Owners Manual - Page 19
79 Video Printer 80 Video Phone 81 Computer (Using special cable and software 81 Computer (Video Capture 82 CCononenctnineg ctotOiothner GDeuvicidese The QV-10 is equipped with two terminals for connection to other devices: VIDEO OUT and DIGITAL. Connect to a TV and view images on a big screen - Casio QV-10 | Owners Manual - Page 20
page 51 of this manual for details about connecting to a television and displaying images from camera memory on a TV screen. Video Tape Deck VIDEO You can use the video tape deck to record images from the QV-10. To record QV-10 images on video tape 1. Use the special video cable that comes with the - Casio QV-10 | Owners Manual - Page 21
Device Computer (Using special cable and software) DIGITAL This package includes special software (two versions, for Windows and the Macintosh) and a special cable that allow you to transfer images from the QV-10 to a personal computer. Images are transferred as digital data, which ensures minimum - Casio QV-10 | Owners Manual - Page 22
further recording is possible. MEMORY EMPTY No images are stored in memory. MEMORY ERROR CALL TECH SUPPORT Problem with internal memory. Contact your dealer or an authorized CASIO service provider. 87 RSefpereencceifications General Recording System ... Digital (JPEG based)/Field recording - Casio QV-10 | Owners Manual - Page 23
the back lighting for its LCD. • The normal service life of the backlight is approximately six years, when the camera is used for about two hours a day. • Should the LCD image appear abnormally dark, take the camera to your dealer or an authorized CASIO service provider to have the light source
-
 1
1 -
 2
2 -
 3
3 -
 4
4 -
 5
5 -
 6
6 -
 7
7 -
8
-
9
-
10
-
11
-
12
-
13
-
14
-
15
-
16
-
17
-
18
-
19
-
20
-
21
-
22
-
23
 |
 |

1
Liquid Crystal Digital Camera
QV-10
B
Owner’s Manual
英
Introduction
Congratulations upon your se-
lection of the QV-10 Liquid Crys-
tal Digital Camera. The QV-10
comes with its own built-in liquid
crystal color monitor that let’s
you instantly view the pictures
you take.
To get the most out of the QV-
10, be sure to carefully read this
manual and follow the instruc-
tions contained in it.
Please refer to this manual for the QV-10, QV-10A & QV-11 models
2
■
Before using the QV-10...
Note the following precautions before attempting to use the QV-10.
• CASIO COMPUTER CO., LTD. assumes no responsibility for any
damage or loss resulting from the use of this manual.
• CASIO COMPUTER CO., LTD. assumes no responsibility for any
loss or claims by third parties which may arise through the use of
the QV-10.
• CASIO COMPUTER CO., LTD. assumes no responsibility for any
damage or loss caused by deletion of data as a result of malfunc-
tion, repairs, or battery replacement. Be sure to back up all impor-
tant data on other media to protect against its loss.
Windows is a trademark of Microsoft Corporation.
Apple and Macintosh are registered trademarks of Apple Computer, Inc.
3
QV-10 Features
.....................................................
6
General Precautions
............................................
8
Other Precautions
..............................................
10
FCC Guidelines
..................................................
12
Getting Acquainted
13
Unpacking
...........................................................
14
General Guide
....................................................
15
Opening the Terminal Panel Cover
...............................
16
Connecting the Wrist Strap
............................................
17
Using the Lens Cloth
.....................................................
17
Using the Soft Case
.......................................................
17
Operation Reference
..........................................
18
To record an image
.............................................................
18
To view images stored in memory
......................................
19
To delete images stored in memory
...................................
20
Function Referense
...........................................
21
Record Functions
................................................................
21
Playback Functions
.............................................................
23
Power Supply
.....................................................
25
To load batteries
.................................................................
25
Standard Battery Life
.....................................................
27
Low Battery Indicator
.....................................................
28
Flash Memory
................................................................
28
Auto Power Off
..............................................................
29
Using AC Power
.................................................................
30
Contents
Liquid Crystal Digital Camera QV-10
4
Operation
33
Recording Image
................................................
34
To record an image
.............................................................
34
How to avoid hand movement
... .........................................
36
Flourescent Lighting
...........................................................
36
Infrared Light
.......................................................................
37
Changing the Lens Orientation
...........................................
38
NORMAL/MACRO Switch
..................................................
40
Exposure Adjustment
..........................................................
41
Changing the Aperture Setting
...........................................
42
Record Mode Displays
........................................................
43
Image Display
................................................................
43
Displaying the Image Number
.......................................
43
Exposure Warning Indicators
.........................................
45
Low Battery Indicator
.....................................................
46
Memory Full Message
...................................................
46
Using the Self-Timer
...........................................................
47
Playing Back Images
.........................................
49
Displaying Images on the Camera's LCD
...........................
49
Displaying Images on a TV Screen
....................................
51
Displaying the Memory Page Number
................................
52
Producing a Multi-Page Display
..........................................
53
Using the Zoom Function
....................................................
57
Using Auto Play
..................................................................
59
Protecting Memory Pages
..................................................
67
Deletting Memory Pages
...................................
70
To delete a single memory page
........................................
70
To delete all unprotected memory pages
...........................
73