Casio YP-100 Getting Started
Casio YP-100 - Presentation Support Tool Manual
 |
UPC - 079767176488
View all Casio YP-100 manuals
Add to My Manuals
Save this manual to your list of manuals |
Casio YP-100 manual content summary:
- Casio YP-100 | Getting Started - Page 1
English English Multifunctional Presentation Kit YP-100 Getting Started with the Multifunctional Presentation Kit • Be sure to read the "Safety Precautions" on page E-3 and "Operating Precautions" on page E-6 before trying to use this product. • This manual provides a general overview and covers - Casio YP-100 | Getting Started - Page 2
., LTD. shall not be held liable for any lost profits or claims from third parties arising out of the use of this product or this manual. • CASIO COMPUTER CO., LTD. shall not be held liable for any loss or lost profits due to loss of data due to malfunction or maintenance of - Casio YP-100 | Getting Started - Page 3
to use this product. About safety symbols Various symbols are used in this manual and on the product itself to ensure safe use, and to protect you 1. Unplug the AC Adaptor. 2. Contact your original dealer or authorized CASIO service center. G Malfunction Never try to use the product while it is - Casio YP-100 | Getting Started - Page 4
apart or modify it in any way. Be sure to leave all internal inspection, adjustment, and repair up to your original dealer or authorized CASIO service center. G Dropping and impact Continued use of the product after it has been damaged by dropping or other mistreatment creates the risk of fire - Casio YP-100 | Getting Started - Page 5
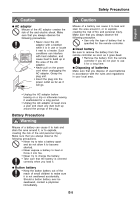
Safety Precautions English Caution G AC adaptor Misuse of the AC adaptor creates the risk of fire and electric shock. Make sure that you always observe the following precautions. • Never cover the AC adaptor with a blanket while it is in use or locate it next to a heater. Such conditions can - Casio YP-100 | Getting Started - Page 6
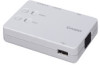
power supply noise: Noise from the speakers of a projector or from a speaker with built-in amplifier that is present. z Multifunctional Presentation Kit YP-100 z Remote controller (Pre-loaded with a test battery.) z AC adaptor, power cord z Soft case z Anchor screws × 2 z CD-ROM × 1 z This manual - Casio YP-100 | Getting Started - Page 7
device from the projector also connected to the YP-100. XJ-S30, etc. YP-100 USB memory device z For information about basic YP-100 operations, see "Using a USB Memory Device with the YP-100" on page E-16 of this manual. z For detailed information about operations, see the User's Guide on the CD - Casio YP-100 | Getting Started - Page 8
LAN makes it possible to project the display contents of the computer's screen from the projector connected to the YP-100. XJ-S30, etc. YP-100 CASIO YW-2 You can have up to four computers connected to the YP-100 over a wireless LAN at the same time. Use the remote controller that comes with the - Casio YP-100 | Getting Started - Page 9
on the document stage of the YC-400. YC-400 XJ-S30, etc. YP-100 z For information about basic YC-400 operations, see "Using the YP-100 with a YC-400 Document Camera" on page E-19 of this manual. z For detailed information about operations, see the User's Guide on the CD-ROM that comes with the - Casio YP-100 | Getting Started - Page 10
manual to differentiate between the YP-100 and computer. projection area This is the entire rectangular area that is projected by the projector connected to the YP-100. Certain YP-100 to use the YP-100 can be found in the User's Guide PDF file on the CD-ROM that comes with the YP-100. Your computer - Casio YP-100 | Getting Started - Page 11
English General Guide YP-100 LINE OUT terminal AC adaptor terminal [POWER] indicator [ ] (Power) key [ ] (Hold) key [HOLD] indicator Remote Controller [MENU] key [FUNC] key [ ] key [ ] key Introduction RGB OUT - Casio YP-100 | Getting Started - Page 12
remote controller is for test purposes. RISK OF EXPLOSION IF BATTERY IS REPLACED BY AN INCORRECT Caution TYPE. DISPOSE OF USED BATTERIES ACCORDING TO THE INSTRUCTIONS. Caution Misuse of a battery can cause it to leak and stain of the area around it, or to explode, creating the risk of fire and - Casio YP-100 | Getting Started - Page 13
3. Slide the battery holder back into the remote controller. Connecting a Projector z Make sure that the YP-100 and the projector are both turned off before connecting them. YP-100 RGB OUT terminal LINE OUT terminal Projector To RGB IN terminal Audio cable (commercially available) To LINE IN - Casio YP-100 | Getting Started - Page 14
Turning On Power To turn on the YP-100 1. Connect the projector to the YP-100, referring to "Connecting a Projector" (page E-13). 2. Turn on the projector and/or audio equipment that is connected to the YP-100. 3. Connect the AC adaptor that comes with the YP-100 to the AC adaptor terminal, and plug - Casio YP-100 | Getting Started - Page 15
YC Camera application setup menu. For detailed information about menu settings, see the User's Guide on the CD-ROM that comes with the YP-100. Installing YP-100 Software You will need to install YP-100 software on your computer in order to perform the following operations. z Convert files created - Casio YP-100 | Getting Started - Page 16
project images from files stored on the USB memory device. z Basic operation for using a YC-400 document camera with the YP-100 You can use the projector connected to the YP-100 to project images of documents whose images were recorded with the YC-400 document camera. Using a USB Memory Device with - Casio YP-100 | Getting Started - Page 17
sure to copy only JPEG (jpg, jpeg or jpe) or BMP (bmp) format image files into the folder. Other formats are not recognized by the YP-100. 6. On the taskbar, click the (Safely Remove Hardware) icon. On the menu that appears, click "Safely remove USB mass storage device - Drive(X)". z This will - Casio YP-100 | Getting Started - Page 18
E-14 to turn on the YP-100. z This will cause the YP-100's [POWER] indicator to light green. The YP-100 logo screen also will be projected by the connected projector. 4. Plug the USB memory device you prepared in step 1 into the YP-100's USB port. z Once the YP-100 recognizes the USB memory device - Casio YP-100 | Getting Started - Page 19
"Turning On Power" on page E-14 to turn on the YP-100. z This will cause the YP-100's [POWER] indicator to light green. The YP-100 logo screen also will be projected by the connected projector. 3. Connect the document camera to the YP-100 using the USB cable that comes bundled with the document - Casio YP-100 | Getting Started - Page 20
the YC Camera application automatically. When the YC Camera application starts up, the YP-100 will project an image of the document stage along with a dialog box for the document camera position will appear. Follow the instructions shown in the message to adjust the document camera position. E-20 - Casio YP-100 | Getting Started - Page 21
English Basic YP-100 Operations 5. Place the document whose image you want to project onto the document camera's document stage. z Be sure to place the document in the center - Casio YP-100 | Getting Started - Page 22
Specifications Specifications Model Name: YP-100 USB Port: USB TYPE A Audio Out Terminal: Stereo mini jack × 1 RGB Out Terminal: RGB mini D-Sub 15-pin × 1 Operating Temperature: 5 to 35°C (41 to 95°F) Operating Humidity: 20 to 80% (non-condensation) Power Requirements: 100 to 240 V AC,
-
 1
1 -
 2
2 -
 3
3 -
 4
4 -
 5
5 -
 6
6 -
 7
7 -
8
-
9
-
10
-
11
-
12
-
13
-
14
-
15
-
16
-
17
-
18
-
19
-
20
-
21
-
22
 |
 |

E-1
English
English
Multifunctional
Presentation Kit YP-100
Getting Started with the Multifunctional Presentation Kit
• Be sure to read the “Safety Precautions” on page E-3 and “Operating Precautions” on page
E-6 before trying to use this product.
• This manual provides a general overview and covers basic operations of the YP-100. For more
information about operations, see the User’s Guide on the bundled CD-ROM.
Contents
Safety Precautions
.....................................
E-3
Operating Precautions
...............................
E-6
Unpacking
...................................................
E-6
Introduction
.................................................
E-7
What you can do with the YP-100
............
E-7
About this manual
...................................
E-10
General Guide
........................................
E-11
Getting Ready
...........................................
E-12
Preparing the Remote Controller
............
E-12
Replacing the
Remote Controller Battery
......................
E-12
Connecting a Projector
...........................
E-13
Turning On Power
...................................
E-14
Installing YP-100 Software
.....................
E-15
Using the Hold Key
.................................
E-15
Basic YP-100 Operations
.........................
E-16
Using a USB Memory Device
with the YP-100
......................................
E-16
Using the YP-100
with a YC-400 Document Camera
..........
E-19
Specifications
...........................................
E-22