Celestron Omni CG-4 Telescope Mount Astronomy Basics
Celestron Omni CG-4 Telescope Mount Manual
 |
View all Celestron Omni CG-4 Telescope Mount manuals
Add to My Manuals
Save this manual to your list of manuals |
Celestron Omni CG-4 Telescope Mount manual content summary:
- Celestron Omni CG-4 Telescope Mount | Astronomy Basics - Page 1
System and Motion of the Stars sections below are applicable to all types of telescopes, and if you have a non-computerized altazimuth telescope, these are the only sections that apply to your telescope. The sections about Latitude Scale/Pointing at Polaris/Finding the North & South Celestial Poles - Celestron Omni CG-4 Telescope Mount | Astronomy Basics - Page 2
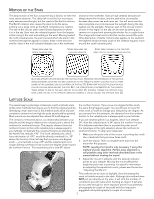
Latitude Scale The easiest way to polar align a telescope is with a latitude scale. Unlike other methods same thing happens again. You would have to travel 70 miles north or south to change your latitude by using other methods described later in this manual without leveling the tripod. 3. Adjust - Celestron Omni CG-4 Telescope Mount | Astronomy Basics - Page 3
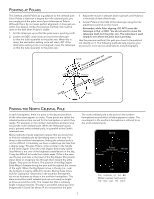
as a guidepost to the celestial pole. Since Polaris is less than a degree from the celestial pole, you can simply point the polar axis of your telescope at Polaris. Although this is by no means perfect alignment, it does get you within one degree. Unlike the previous method, this must be done - Celestron Omni CG-4 Telescope Mount | Astronomy Basics - Page 4
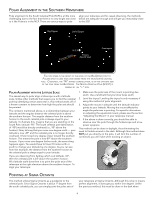
degree further north, the same thing happens again. You would have to travel 70 miles north or south to change your latitude by one degree. As you can the equatorial mount, please see the section "Adjusting the Mount" in your telescope manual. 4. If the above is done correctly, you should be able to - Celestron Omni CG-4 Telescope Mount | Astronomy Basics - Page 5
the cross hairs so that one is parallel to the declination axis and the other is parallel to the right ascension axis. Move your telescope manually in R.A. and DEC to check parallelism. First, choose your star near where the celestial equator and the meridian meet. The star should be approximately - Celestron Omni CG-4 Telescope Mount | Astronomy Basics - Page 6
the sky. If you don't, they can be learned by using the Celestron Sky Maps (#93722) or consulting a current astronomy magazine. To align the of the R.A. setting circle, then that is the coordinate the telescope is pointing at. The problem arises when the R.A. indicator (zero mark) is in between - Celestron Omni CG-4 Telescope Mount | Astronomy Basics - Page 7
2. Release the R.A. clamp and rotate the telescope until the R.A. indicator is between the 18h 50m the R.A. clamp to hold the telescope in place. 4. Move the telescope in R.A. using the slow motion the R.A. setting circle! 5. Look through the telescope and the Ring Nebula should be within the field - Celestron Omni CG-4 Telescope Mount | Astronomy Basics - Page 8
Notions fondamentales d'astronomie FRANÇAIS Le système de coordonnées célestes et le mouvement des sections Stars ci-dessous sont applicables à tous les types de télescopes, et si vous avez un télescope altazimuth non informatisé, ce sont les seuls articles qui s'appliquent à votre télescope. Les - Celestron Omni CG-4 Telescope Mount | Astronomy Basics - Page 9
nord. Si vous vous déplacez d'un degré plus au sud, le même phénomène se produit. Il vous faudrait vous déplacer de 112 km (70 milles) vers le nord ou vers le sud pour changer votre latitude d'un degré. Comme vous pouvez le constater avec cet exemple, la distance entre - Celestron Omni CG-4 Telescope Mount | Astronomy Basics - Page 10
3. Ajustez l'altitude de la monture jusqu'à ce que l'indicateur de latitude soit orienté sur votre latitude. Le déplacement de la monture affecte l'angle sur lequel l'axe polaire est dirigé. Pour des informations détaillées sur la manière de régler la monture équatoriale, veuillez consulter la - Celestron Omni CG-4 Telescope Mount | Astronomy Basics - Page 11
sud. Si vous vous déplacez d'un degré plus au nord, le même phénomène se produit. Il vous faudrait vous déplacer de 112 km (70 milles) vers le nord ou vers le sud pour changer votre latitude d'un degré. Comme vous pouvez le constater avec cet exemple, la distance entre - Celestron Omni CG-4 Telescope Mount | Astronomy Basics - Page 12
3. Ajustez l'altitude de la monture jusqu'à ce que l'indicateur de latitude soit orienté sur votre latitude. Le déplacement de la monture affecte l'angle sur lequel l'axe polaire est dirigé. Pour des informations détaillées sur la manière de régler la monture équatoriale, veuillez consulter la - Celestron Omni CG-4 Telescope Mount | Astronomy Basics - Page 13
brillantes du ciel. Si vous ignorez quelles sont ces étoiles, vous pouvez apprendre à les repérer en utilisant les cartes du ciel Celestron (Réf. 93722) ou en consultant un magazine d'astronomie actuel. Pour aligner le cercle gradué d'ascension droite : 1. Recherchez une étoile lumineuse près de - Celestron Omni CG-4 Telescope Mount | Astronomy Basics - Page 14
l'Anneau doit se trouver dans le champ de vision si vous utilisez un oculaire de faible puissance (en supposant que la déclinaison ait déjà été réglée). ©2011 Celestron • Tous droits réservés. 7 - Celestron Omni CG-4 Telescope Mount | Astronomy Basics - Page 15
Información básica sobre astronomía ESPAÑOL El sistema de coordenadas celestes y de movimiento de las secciones estrellas a continuación son aplicables a todos los tipos de telescopios, y si tiene un telescopio altacimutal no está informatizado, estas son sólo las secciones que se aplican a su - Celestron Omni CG-4 Telescope Mount | Astronomy Basics - Page 16
a 89° sobre el horizonte boreal. Esto se repite si se desplaza un grado más hacia el sur. Para cambiar un grado de latitud tendrá que desplazarse 70 millas (113 Km) hacia el norte o hacia el sur. Como se puede apreciar en este ejemplo, la distancia desde el horizonte boreal al polo celeste - Celestron Omni CG-4 Telescope Mount | Astronomy Basics - Page 17
perfecta polar todavía es posible al utilizarse otros métodos descritos más adelante en este manual sin nivelar el trípode. 3. Ajuste el montaje en latitud hasta que el indicador de latitud apunte a la latitud donde usted se encuentra. El movimiento - Celestron Omni CG-4 Telescope Mount | Astronomy Basics - Page 18
a 89° sobre el horizonte austral. Esto se repite si se desplaza un grado más hacia el norte. Para cambiar un grado de latitud tendrá que desplazarse 70 millas (113 Km) hacia el norte o hacia el sur. Como se puede apreciar en este ejemplo, la distancia desde el horizonte austral al polo celeste - Celestron Omni CG-4 Telescope Mount | Astronomy Basics - Page 19
sobre el ajuste del montaje ecuatorial, vea la sección "Ajuste del montaje" en el manual de su telescopio. 4. Si hace correctamente lo anterior, podrá entonces ver cerca del polo a través del telescopio buscador y un ocular de baja potencia. Este método - Celestron Omni CG-4 Telescope Mount | Astronomy Basics - Page 20
de algunas de las estrellas más brillantes del firmamento. Si no sabe sus nombres, los podrá aprender con los mapas del firmamento de Celestron (Nº 93722) o en revistas actuales de astronomía. 5. Busque las coordenadas de la estrella. 6. Gire el calibrador hasta que las coordenadas apropiadas se - Celestron Omni CG-4 Telescope Mount | Astronomy Basics - Page 21
Nebulosa del Anillo deberá estar dentro del campo visual si está utilizando un ocular de baja potencia (suponiendo que ya haya establecido la DEC.). ©2011 Celestron • Todos los derechos reservados. 7 - Celestron Omni CG-4 Telescope Mount | Astronomy Basics - Page 22
Grundlagen der Astronomie DEUTSCH Die Celestial Koordinatensystem und Bewegung der Sterne folgenden Abschnitten gelten für alle Arten von Teleskopen, und wenn Sie ein Nicht-EDV-Altazimut Teleskop haben, sind dies die einzigen Bereiche, die Ihr Teleskop zutreffen. Die Abschnitte über Breitenskala / - Celestron Omni CG-4 Telescope Mount | Astronomy Basics - Page 23
der Pol jetzt 89° über dem nördlichen Horizont ist. Wenn Sie noch einen Grad weiter nach Süden gehen, passiert das Gleiche noch einmal. Sie würden 70 Meilen nach Norden oder Süden fahren müssen, um Ihren Breitengrad um einen Grad zu ändern. Wie Sie aus diesem Beispiel ersehen, ist die Distanz vom - Celestron Omni CG-4 Telescope Mount | Astronomy Basics - Page 24
Hinweis: Die Nivellierung des Stativs ist nur erforderlich, wenn dieses Verfahren zur Polausrichtung verwendet wird. Die perfekte Polausrichtung ist immer noch mit anderen Methoden, ohne Nivellierung des Stativs, möglich, die an späterer Stelle in diesem Handbuch beschrieben werden. 3. Justieren Sie - Celestron Omni CG-4 Telescope Mount | Astronomy Basics - Page 25
der Pol jetzt 89° über dem südlichen Horizont ist. Wenn Sie noch einen Grad weiter nach Norden gehen, passiert das Gleiche noch einmal. Sie würden 70 Meilen nach Norden oder Süden fahren müssen, um Ihren Breitengrad um einen Grad zu ändern. Wie Sie aus diesem Beispiel ersehen, ist die Distanz vom - Celestron Omni CG-4 Telescope Mount | Astronomy Basics - Page 26
3. Justieren Sie die Höhe der Montierung, bis die Breitenanzeige auf Ihre Breite zeigt. Die Verschiebung der Montierung wirkt sich auf den Winkel aus, in den die Polachse zeigt. Nähere Informationen zur Einstellung der äquatorialen Montierung finden Sie im Abschnitt „Justierung der Montierung" Ihrer - Celestron Omni CG-4 Telescope Mount | Astronomy Basics - Page 27
Um den RA-Einstellring auszurichten, müssen Sie die Namen von einigen der hellsten Sterne im Himmel kennen. Sie können diese Namen mit Hilfe der Celestron-Himmelskarten (Sky Maps, Bestell.-Nr. 93722) lernen oder indem Sie eine aktuelle Astronomiezeitschrift einsehen. ablesen. Der Stern, den Sie zur - Celestron Omni CG-4 Telescope Mount | Astronomy Basics - Page 28
RA-Einstellkreises ist, ist das die Koordinate, auf die das Teleskop gerichtet ist. Ein Problem tritt auf, wenn die RAAnzeige (Null-Markierung) zwischen den beiden Markierungen auf dem RA-Einstellkreis , Sie haben die Deklination bereits eingestellt). ©2011 Celestron • Alle Rechte vorbehalten. 7 - Celestron Omni CG-4 Telescope Mount | Astronomy Basics - Page 29
Nozioni basilari sul telescopio ITALIANO Il sistema di coordinate celesti e movimento di stelle sotto le sezioni sono applicabili a tutti i tipi di telescopi, e se avete un telescopio altazimutale non automatizzato, queste sono le parti che si applicano solo al telescopio. Le sezioni su Latitude - Celestron Omni CG-4 Telescope Mount | Astronomy Basics - Page 30
usa questo metodo di allineamento polare). Un perfetto allineamento polare è comunque possibile usando altri metodi descritti successivamente in questo manuale, senza mettere a livello il treppiedi. 3. Regolare l'altezza della montatura finché l'indicatore della latitudine non risulta puntato sulla - Celestron Omni CG-4 Telescope Mount | Astronomy Basics - Page 31
Lo spostamento della montatura influisce sull'angolo di puntamento dell'asse polare. Per informazioni specifiche sulla regolazione della montatura equatoriale, si prega di leggere la sezione "Regolazione della montatura". Questo metodo può essere usato durante il giorno, eliminando così la necessità - Celestron Omni CG-4 Telescope Mount | Astronomy Basics - Page 32
Tracciare una riga immaginaria attraverso di esse verso il Piccolo Carro. Esse puntano alla stella Polaris . La posizione del Gran Carro (Orsa Maggiore) cambia durante l'anno e durante l'arco della notte. Quando il Gran Carro è basso nel cielo (cioè vicino all'orizzonte), potrebbe essere difficile - Celestron Omni CG-4 Telescope Mount | Astronomy Basics - Page 33
di leggere la sezione "Regolazione della montatura" nel manuale del telescopio. 4. Se la procedura indicata sopra viene eseguita in modo corretto, si dovrebbe essere in grado di eseguire le osservazioni vicino al polo attraverso - Celestron Omni CG-4 Telescope Mount | Astronomy Basics - Page 34
conoscono i loro nomi, si possono imparare usando le Mappe stellari Celestron (N. di catalogo 93722) oppure consultando una rivista aggiornata di necessaria. 2. Consultare le coordinate in un atlante stellare o un manuale di riferimento. 3. Tenere fermo il telescopio e rilasciare il morsetto - Celestron Omni CG-4 Telescope Mount | Astronomy Basics - Page 35
ad anello dovrebbe trovarsi entro il campo visivo se si sta usando un oculare a bassa potenza (presumendo che si sia già impostata la DEC). ©2011 Celestron • Tutti i diritti sono riservati. 7
-
 1
1 -
 2
2 -
 3
3 -
 4
4 -
 5
5 -
 6
6 -
 7
7 -
8
-
9
-
10
-
11
-
12
-
13
-
14
-
15
-
16
-
17
-
18
-
19
-
20
-
21
-
22
-
23
-
24
-
25
-
26
-
27
-
28
-
29
-
30
-
31
-
32
-
33
-
34
-
35
 |
 |

1
A
STRONOMY
B
ASICS
ENGLISH
The Celestial Coordinate System and Motion of the Stars
sections below are applicable to all types of telescopes, and if
you have a non-computerized altazimuth telescope, these are
the only sections that apply to your telescope.
The sections about Latitude Scale/Pointing at Polaris/Finding
the North & South Celestial Poles/Polar Alignment in the
Northern & Southern Hemisphere, etc. are basic information for
non-computerized equatorially mounted telescopes — actual
telescope models may differ somewhat from the descriptions
about basic functions.
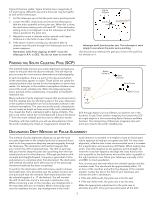
To help find objects in the sky, astronomers use a celestial
coordinate system that is similar to our geographical co-
ordinate system here on Earth. The celestial coordinate system
has poles, lines of longitude and latitude, and an equator. For
the most part, these remain fixed against the background stars.
The celestial equator runs 360 degrees around the Earth and
separates the northern celestial hemisphere from the southern.
Like the Earth’s equator, it bears a reading of zero degrees. On
Earth this would be latitude. However, in the sky this is referred
to as declination, or DEC for short. Lines of declination are
named for their angular distance above and below the celestial
equator. The lines are broken down into degrees, minutes
of arc, and seconds of arc. Declination readings south of the
equator carry a minus sign (-) in front of the coordinate and
those north of the celestial equator are either blank (i.e., no
designation) or preceded by a plus sign (+).
The celestial equivalent of longitude is called Right Ascension
(or R.A. for short). Like the Earth’s lines of longitude, they run
from pole to pole and are evenly spaced 15 degrees apart.
Although the longitude lines are separated by an angular
distance, they are also a measure of time. Each line of longitude
is one hour apart from the next. Since the Earth rotates once
every 24 hours, there are 24 lines total. As a result, the R.A.
coordinates are marked off in units of time. It begins with an
arbitrary point in the constellation of Pisces designated as 0
hours, 0 minutes, 0 seconds. All other points are designated by
how far (i.e., how long) they lag behind this coordinate after it
passes overhead moving toward the west.
T
HE
C
ELESTIAL
C
OORDINATE
S
YSTEM
2
1
0
3
20
19
18
17
21
22
23
60
-60
-40
40
20
0
T
HE
CELESTIAL
SPHERE
SEEN
FROM
THE
OUTSIDE
SHOWING
R.A.
AND
DEC