Cisco 1760 Hardware Installation Guide - Page 88
Installing a SIMM - flash
 |
UPC - 746320684857
View all Cisco 1760 manuals
Add to My Manuals
Save this manual to your list of manuals |
Page 88 highlights
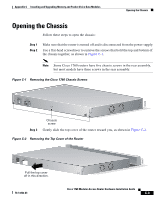
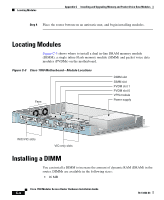
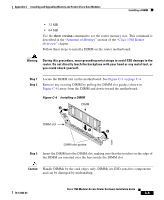
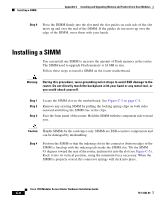
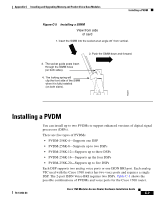
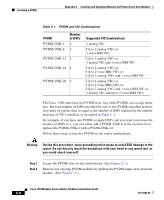
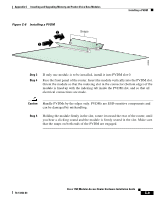
Installing a SIMM Appendix C Installing and Upgrading Memory and Packet Voice Data Modules Step 4 Press the DIMM firmly into the slot until the slot guides on each side of the slot move up and over the end of the DIMM. If the guides do not move up over the edge of the DIMM, move them with your hands. Installing a SIMM You can install one SIMM to increase the amount of Flash memory in the router. The SIMM used to upgrade Flash memory is 16 MB in size. Follow these steps to install a SIMM on the router motherboard. Warning During this procedure, wear grounding wrist straps to avoid ESD damage to the router. Do not directly touch the backplane with your hand or any metal tool, or you could shock yourself. Step 1 Step 2 Step 3 Locate the SIMM slot on the motherboard. See Figure C-3 on page C-4. Remove any existing SIMM by pulling the locking spring clips on both sides outward and tilting the SIMM free of the clips. Face the front panel of the router. Hold the SIMM with the component side toward you. Caution Handle SIMMs by the card edges only. SIMMs are ESD-sensitive components and can be damaged by mishandling. Step 4 Position the SIMM so that the indexing slot in the connector (bottom edge) of the SIMM is lined up with the indexing tab inside the SIMM slot. Tilt the SIMM 45 degrees toward the rear of the router, and insert it into the slot (see Figure C-5). Rock it into its vertical position, using the minimum force necessary. When the SIMM is properly seated, the connector springs will click into place. Cisco 1760 Modular Access Router Hardware Installation Guide C-6 78-13342-03
-
 1
1 -
2
-
3
-
4
-
5
-
6
-
7
-
8
-
9
-
10
-
11
-
12
-
13
-
14
-
15
-
16
-
17
-
18
-
19
-
20
-
21
-
22
-
23
-
24
-
25
-
26
-
27
-
28
-
29
-
30
-
31
-
32
-
33
-
34
-
35
-
36
-
37
-
38
-
39
-
40
-
41
-
42
-
43
-
44
-
45
-
46
-
47
-
48
-
49
-
50
-
51
-
52
-
53
-
54
-
55
-
56
-
57
-
58
-
59
-
60
-
61
-
62
-
63
-
64
-
65
-
66
-
67
-
68
-
69
-
70
-
71
-
72
-
73
-
74
-
75
-
76
-
77
-
78
-
79
-
80
-
81
-
82
-
 83
83 -
 84
84 -
 85
85 -
 86
86 -
 87
87 -
 88
88 -
 89
89 -
 90
90 -
 91
91 -
 92
92 -
 93
93 -
94
-
95
-
96
-
97
-
98
-
99
-
100
-
101
-
102
-
103
-
104
-
105
-
106
-
107
-
108
-
109
-
110
-
111
-
112
 |
 |