Cisco 3825 User Guide - Page 25
CABLE, Ethernet Connection, ETHERNET, Wireless, POWER, ONLINE, Con Wireless Settings - manual
 |
UPC - 746320981505
View all Cisco 3825 manuals
Add to My Manuals
Save this manual to your list of manuals |
Page 25 highlights
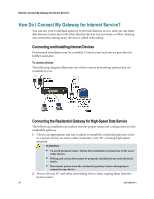
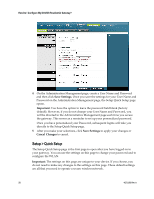
How Do I Connect My Gateway for Internet Service? 3 Connect the active RF coaxial cable from your service provider to the coax connector labeled CABLE on the back of the residential gateway. Note: To connect a TV, DHCT, set-top, or VCR from the same cable connection, you will need to install a cable signal splitter (not included). Always check with your service provider before using a splitter as a splitter may degrade the signal. 4 Connect your PC to the residential gateway using either of the following methods. „ Ethernet Connection: Locate the yellow Ethernet cable, connect one end of the Ethernet cable to the Ethernet port on your PC, and connect the other end to the yellow ETHERNET port on the back of the residential gateway. Note: To install more Ethernet devices than ports provided on the residential gateway, use an external multi-port Ethernet switch(s). „ Wireless: Make sure that your wireless device is powered up. You will need to associate your wireless device with the wireless gateway once the gateway is operational. Follow the directions provided with your wireless device for associating with a wireless access point. More information about the factory default configuration of your wireless gateway can be found later in this user guide in Configure Wireless Settings (on page 35). 5 Locate the AC power cord provided with your residential gateway. Insert one end of the power cord into the AC connector on the back of the residential gateway. Then, plug the AC power cord into an AC outlet to power-up the residential gateway. The residential gateway will perform an automatic search to locate and sign on to the broadband data network. This process may take up to 25 minutes. The modem will be ready for use when the POWER, DS, US and ONLINE LEDs on the front panel of the residential gateway stop blinking and remain on continuously. 6 Plug in and power on your PC and other home network devices. The LINK LED on the residential gateway corresponding to the connected devices should be on or blinking. 7 Once the residential gateway is online, most Internet devices will have immediate Internet access. Note: If your PC does not have Internet access, refer to Frequently Asked Questions (on page 91) for information on how to configure your PC for TCP/IP. For Internet devices other than PCs, refer to the DHCP or IP Address configuration section of the User Guide or Operations Manual for those devices. 4021196 Rev A 25
-
 1
1 -
2
-
3
-
4
-
5
-
6
-
7
-
8
-
9
-
10
-
11
-
12
-
13
-
14
-
15
-
16
-
17
-
18
-
19
-
 20
20 -
 21
21 -
 22
22 -
 23
23 -
 24
24 -
 25
25 -
 26
26 -
 27
27 -
 28
28 -
 29
29 -
 30
30 -
31
-
32
-
33
-
34
-
35
-
36
-
37
-
38
-
39
-
40
-
41
-
42
-
43
-
44
-
45
-
46
-
47
-
48
-
49
-
50
-
51
-
52
-
53
-
54
-
55
-
56
-
57
-
58
-
59
-
60
-
61
-
62
-
63
-
64
-
65
-
66
-
67
-
68
-
69
-
70
-
71
-
72
-
73
-
74
-
75
-
76
-
77
-
78
-
79
-
80
-
81
-
82
-
83
-
84
-
85
-
86
-
87
-
88
-
89
-
90
-
91
-
92
-
93
-
94
-
95
-
96
-
97
-
98
-
99
-
100
-
101
-
102
 |
 |