Cisco 3825 User Guide - Page 55
Security VPN Tunnel Description
 |
UPC - 746320981505
View all Cisco 3825 manuals
Add to My Manuals
Save this manual to your list of manuals |
Page 55 highlights
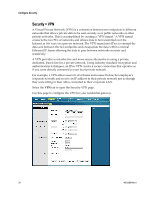
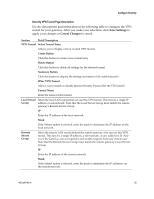
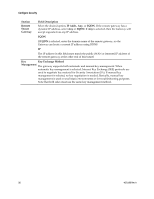
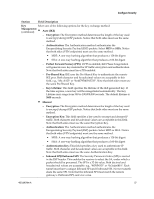
Configure Security Security VPN Tunnel Page Description Use the descriptions and instructions in the following table to configure the VPN tunnel for your gateway. After you make your selections, click Save Settings to apply your changes or Cancel Changes to cancel. Section Field Description VPN Tunnel Select Tunnel Entry Allows you to display a list of created VPN tunnels Create Button Click this button to create a new tunnel entry Delete Button Click this button to delete all settings for the selected tunnel Summary Button Click this button to display the settings and status of all enabled tunnels IPSec VPN Tunnel Allows you to enable or disable Internet Security Protocol for the VPN tunnel Tunnel Name Enter the name for this tunnel Local Secure Select the local LAN user(s) that can use this VPN tunnel. This may be a single IP Group address or sub-network. Note that the Local Secure Group must match the remote gateway's Remote Secure Group. IP Enter the IP address of the local network Mask If the Subnet option is selected, enter the mask to determine the IP address on the local network Remote Secure Group Select the remote LAN user(s) behind the remote gateway who can use this VPN tunnel. This may be a single IP address, a sub-network, or any addresses. If "Any" is set, the Gateway acts as responder and accepts requests from any remote user. Note that the Remote Secure Group must match the remote gateway's Local Secure Group. IP Enter the IP address of the remote network Mask If the Subnet option is selected, enter the mask to determine the IP addresses on the remote network 4021196 Rev A 55
-
 1
1 -
2
-
3
-
4
-
5
-
6
-
7
-
8
-
9
-
10
-
11
-
12
-
13
-
14
-
15
-
16
-
17
-
18
-
19
-
20
-
21
-
22
-
23
-
24
-
25
-
26
-
27
-
28
-
29
-
30
-
31
-
32
-
33
-
34
-
35
-
36
-
37
-
38
-
39
-
40
-
41
-
42
-
43
-
44
-
45
-
46
-
47
-
48
-
49
-
 50
50 -
 51
51 -
 52
52 -
 53
53 -
 54
54 -
 55
55 -
 56
56 -
 57
57 -
 58
58 -
 59
59 -
 60
60 -
61
-
62
-
63
-
64
-
65
-
66
-
67
-
68
-
69
-
70
-
71
-
72
-
73
-
74
-
75
-
76
-
77
-
78
-
79
-
80
-
81
-
82
-
83
-
84
-
85
-
86
-
87
-
88
-
89
-
90
-
91
-
92
-
93
-
94
-
95
-
96
-
97
-
98
-
99
-
100
-
101
-
102
 |
 |