Cisco 3825 Software Configuration Guide - Page 113
Configuring UMTS Congestion Management Control
 |
UPC - 746320981505
View all Cisco 3825 manuals
Add to My Manuals
Save this manual to your list of manuals |
Page 113 highlights
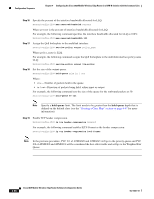
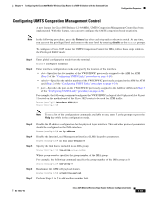
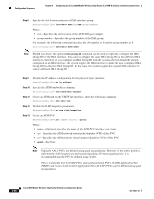
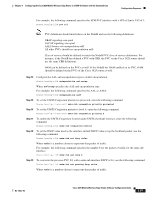
Chapter 4 Configuring the Cisco 3825 Mobile Wireless Edge Router in a RAN-O Solution with the Command-Line Configuration Sequence Configuring UMTS Congestion Management Control A new feature for Cisco IOS Release 12.4(4)MR1, UMTS Congestion Management Control has been implemented. With this feature, you can now configure the UMTS congestion based on priority. Note In the following procedure, press the Return key after each step unless otherwise noted. At any time, you can exit the privileged level and return to the user level by entering disable at the Router# prompt. To configure a Cisco 3825 router for UMTS Congestion Control for IMA, follow these steps while in the Privileged EXEC mode: Step 1 Step 2 Enter global configuration mode from the terminal. Router# configure terminal Enter interface configuration mode and specify the location of the interface. • slot-Specifies the slot number of the VWIC/HWIC previously assigned to the AIM for ATM (Step 2 of the "Configuring UMTS Links" procedure on page 4-24). • subslot-Specifies the subslot number of the VWIC/HWIC previously assigned to the AIM for ATM card (Step 2 of the "Configuring UMTS Links" procedure on page 4-24). • port-Specifies the port on the VWIC/HWIC previously assigned to the AIM for ATM card (Step 3 of the "Configuring UMTS Links" procedure on page 4-24). For example, the following command configures the VWIC/HWIC in logical slot 0 (physical slot 0) port 1 located on the motherboard of the Cisco 3825 router to be used for ATM traffic: Router(config)# interface ATM0/2/0 Router(config-if)# Note To see a list of the configuration commands available to you, enter ? at the prompt or press the Help key while in the configuration mode. Step 3 Step 4 Step 5 Step 6 Step 7 Disable the IP address configuration for the physical layer interface. This and other protocol parameters should be configured on the IMA interface. Router(config-if)# no ip address Disable the Interim Local Management Interface (ILMI) keepalive parameters. Router(config-if)# no atm ilmi-keepalive Specify the link that is included in an IMA group. Router(config-if)# ima-group group-number Where group-number specifies the group number of the IMA group. For example, the following command specifies the group number of the IMA group as 0: Router(config-if)# ima-group 0 Randomize the ATM cell payload frames. Router(config-if)# scrambling-payload Perform Steps 1 to 5 to add another member link. OL-15667-03 Cisco 3825 Mobile Wireless Edge Router Software Configuration Guide 4-55
-
 1
1 -
2
-
3
-
4
-
5
-
6
-
7
-
8
-
9
-
10
-
11
-
12
-
13
-
14
-
15
-
16
-
17
-
18
-
19
-
20
-
21
-
22
-
23
-
24
-
25
-
26
-
27
-
28
-
29
-
30
-
31
-
32
-
33
-
34
-
35
-
36
-
37
-
38
-
39
-
40
-
41
-
42
-
43
-
44
-
45
-
46
-
47
-
48
-
49
-
50
-
51
-
52
-
53
-
54
-
55
-
56
-
57
-
58
-
59
-
60
-
61
-
62
-
63
-
64
-
65
-
66
-
67
-
68
-
69
-
70
-
71
-
72
-
73
-
74
-
75
-
76
-
77
-
78
-
79
-
80
-
81
-
82
-
83
-
84
-
85
-
86
-
87
-
88
-
89
-
90
-
91
-
92
-
93
-
94
-
95
-
96
-
97
-
98
-
99
-
100
-
101
-
102
-
103
-
104
-
105
-
106
-
107
-
 108
108 -
 109
109 -
 110
110 -
 111
111 -
 112
112 -
 113
113 -
 114
114 -
 115
115 -
 116
116 -
 117
117 -
 118
118 -
119
-
120
-
121
-
122
-
123
-
124
-
125
-
126
-
127
-
128
-
129
-
130
-
131
-
132
-
133
-
134
-
135
-
136
-
137
-
138
-
139
-
140
-
141
-
142
-
143
-
144
-
145
-
146
-
147
-
148
-
149
-
150
-
151
-
152
-
153
-
154
-
155
-
156
-
157
-
158
-
159
-
160
-
161
-
162
-
163
-
164
-
165
-
166
-
167
-
168
-
169
-
170
-
171
-
172
-
173
-
174
-
175
-
176
-
177
-
178
-
179
-
180
-
181
-
182
-
183
-
184
-
185
-
186
-
187
-
188
-
189
-
190
-
191
-
192
-
193
-
194
-
195
-
196
-
197
-
198
-
199
-
200
-
201
-
202
-
203
-
204
-
205
-
206
-
207
-
208
-
209
-
210
-
211
-
212
-
213
-
214
-
215
-
216
-
217
-
218
-
219
-
220
-
221
-
222
-
223
-
224
-
225
-
226
-
227
-
228
-
229
-
230
-
231
-
232
-
233
-
234
-
235
-
236
-
237
-
238
-
239
-
240
-
241
-
242
-
243
-
244
-
245
-
246
-
247
-
248
-
249
-
250
-
251
-
252
-
253
-
254
-
255
-
256
-
257
-
258
-
259
-
260
-
261
-
262
-
263
-
264
-
265
-
266
-
267
-
268
-
269
-
270
-
271
-
272
-
273
-
274
-
275
-
276
-
277
-
278
-
279
-
280
-
281
-
282
-
283
-
284
-
285
-
286
-
287
-
288
-
289
-
290
-
291
-
292
-
293
-
294
-
295
-
296
-
297
-
298
-
299
-
300
-
301
-
302
-
303
-
304
-
305
-
306
-
307
-
308
-
309
-
310
-
311
-
312
-
313
-
314
-
315
-
316
-
317
-
318
-
319
-
320
-
321
-
322
-
323
-
324
-
325
-
326
-
327
-
328
-
329
-
330
-
331
-
332
-
333
-
334
-
335
-
336
-
337
-
338
-
339
-
340
-
341
-
342
-
343
-
344
-
345
-
346
-
347
-
348
-
349
-
350
-
351
-
352
-
353
-
354
-
355
-
356
-
357
-
358
 |
 |