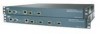
Cisco 4402 Configuration Guide - Page 14
Configuring a controller - wlan controller
 |
UPC - 882658039997
View all Cisco 4402 manuals
Add to My Manuals
Save this manual to your list of manuals |
Page 14 highlights
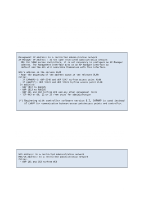
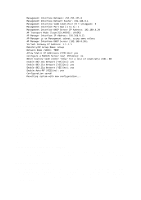
3 Configuring a controller Once one has completed network planning and has one's IP addresses ready (cf. Chapter 1), the controller can be configured. It is even simpler if one also first has the details of the RADIUS server at hand (Chapter 2). This guide applies only to basic functionality and for systems with a single controller. If the system contains several controllers there is more to take into account (distribution of access points, zones/groups, and so on), but in principle this guide will also serve as a basis for such a configuration. Strictly speaking, all configuration work can be performed via the command line (CLI) but the controllers do not use Cisco's IOS, and Cisco recommends the use of the web interface (if necessary via WCS) for most of the configuration. The configuration is performed in the following steps: A. Use of serial cable / console for the initial configuration using the Configuration Wizard in the CLI B. Use of service port / management with a web browser (HTTP) for further configuration. 1. Create virtual interfaces 2. Define RADIUS servers 3. Create a WLAN 4. Connect access points. Note: Some versions of the WLC/WCS web server works best with Internet Explorer. In other words one might find that certain options unfortunately "disappear" or are not correctly displayed in other web browsers. 3.1 Initial configuration on a console Initially a number of questions are asked in the Configuration Wizard when you turn on the controller for the first time. When these have been answered, the configuration should resemble the following example: Welcome to the Cisco Wizard Configuration Tool Use the '-' character to backup System Name [Cisco_34:21:11]: WLC Enter Administrative User Name (24 characters max): admin Enter Administrative Password (24 characters max): ***** Service Interface IP Address Configuration [none][DHCP]: none Enable Link Aggregation (LAG) [yes][NO]: No Management Interface IP Address: 192.168.0.10 14
-
 1
1 -
2
-
3
-
4
-
5
-
6
-
7
-
8
-
 9
9 -
 10
10 -
 11
11 -
 12
12 -
 13
13 -
 14
14 -
 15
15 -
 16
16 -
 17
17 -
 18
18 -
 19
19 -
20
-
21
-
22
-
23
-
24
-
25
-
26
-
27
-
28
-
29
-
30
-
31
-
32
-
33
-
34
-
35
-
36
-
37
-
38
-
39
-
40
-
41
-
42
-
43
-
44
-
45
-
46
-
47
-
48
-
49
-
50
-
51
-
52
-
53
-
54
-
55
-
56
-
57
-
58
-
59
-
60
 |
 |