Cisco AIR-AP1242AG-A-K9 Hardware Installation Guide - Page 45
Securing the Access Point, Using a Security Cable
 |
UPC - 882658021961
View all Cisco AIR-AP1242AG-A-K9 manuals
Add to My Manuals
Save this manual to your list of manuals |
Page 45 highlights
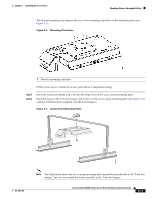
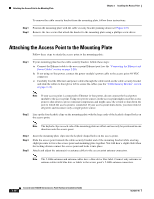
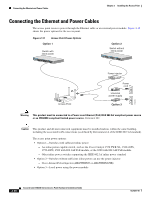
Chapter 2 Installing the Access Point Securing the Access Point Step 6 If your mounting plate does not have the cable security bracket, follow these steps: a. Connect a CAT 5 Ethernet cable to the access point Ethernet port (see the "Connecting the Ethernet and Power Cables" section on page 2-20). b. If using local power, insert the power module's power cable into the access point's 48-VDC power port. Note If your access point is connected to in-line power, do not connect the power module to the access point. Using two power sources on the access point might cause the access point to shut down to protect internal components and might cause the switch to shut down the port to which the access point is connected. If your access point shuts down, you must remove all power and reconnect only a single power source. Securing the Access Point There are two ways to secure your access point: • Using a security cable • Securing the access point to the mounting plate Using a Security Cable You can secure the access point by installing a standard security cable (such as the Kensington Notebook MicroSaver, model number 64068) into the access point security cable slot (see Figure 2-2). The security cable can be used with any of the mounting methods described in this guide. Follow these steps to install the security cable. Step 1 Step 2 Step 3 Step 4 Step 5 Loop the security cable around a nearby immovable object. Insert the key into the security cable lock. Insert the security cable latch into the security key slot on the access point. Rotate the key right or left to secure the security cable lock to the access point. Remove the key from security cable lock. OL-8371-05 Cisco Aironet 1240AG Series Access Point Hardware Installation Guide 2-17
-
 1
1 -
2
-
3
-
4
-
5
-
6
-
7
-
8
-
9
-
10
-
11
-
12
-
13
-
14
-
15
-
16
-
17
-
18
-
19
-
20
-
21
-
22
-
23
-
24
-
25
-
26
-
27
-
28
-
29
-
30
-
31
-
32
-
33
-
34
-
35
-
36
-
37
-
38
-
39
-
 40
40 -
 41
41 -
 42
42 -
 43
43 -
 44
44 -
 45
45 -
 46
46 -
 47
47 -
 48
48 -
 49
49 -
 50
50 -
51
-
52
-
53
-
54
-
55
-
56
-
57
-
58
-
59
-
60
-
61
-
62
-
63
-
64
-
65
-
66
-
67
-
68
-
69
-
70
-
71
-
72
-
73
-
74
-
75
-
76
-
77
-
78
-
79
-
80
-
81
-
82
-
83
-
84
-
85
-
86
-
87
-
88
-
89
-
90
-
91
-
92
-
93
-
94
-
95
-
96
-
97
-
98
-
99
-
100
-
101
-
102
-
103
-
104
-
105
-
106
-
107
-
108
-
109
-
110
-
111
-
112
-
113
-
114
-
115
-
116
-
117
-
118
-
119
-
120
-
121
-
122
-
123
-
124
 |
 |