Cisco AIR-AP1242AG-E-K9 Hardware Installation Guide - Page 38
Before You Start, Resetting the Access Point to Default Settings, Using the Mode Button - default password
 |
View all Cisco AIR-AP1242AG-E-K9 manuals
Add to My Manuals
Save this manual to your list of manuals |
Page 38 highlights
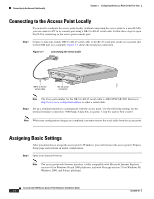
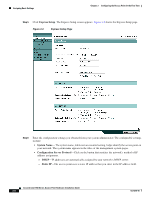
Before You Start Chapter 3 Configuring the Access Point for the First Time Before You Start Before you install the access point, make sure you are using a computer connected to the same network as the access point, and obtain the following information from your network administrator: • A system name for the access point • The case-sensitive wireless service set identifier (SSID) for your radio network • If not connected to a DHCP server, a unique IP address for your access point (such as 172.17.255.115) • If the access point is not on the same subnet as your PC, a default gateway address and subnet mask • A Simple Network Management Protocol (SNMP) community name and the SNMP file attribute (if SNMP is in use) Resetting the Access Point to Default Settings Using the Mode Button If you need to start over during the initial setup process, follow these steps to reset the access point to factory default settings using the access point MODE button: Step 1 Step 2 Disconnect power (the power jack for external power or the Ethernet cable for in-line power) from the access point. Press and hold the MODE button while you reconnect power to the access 2 to 3 seconds), and release the button. All access point settings return to factory defaults. Using a Web-browser Follow these steps to return to default settings using the web-browser interface: Step 1 Open your Internet browser. Note The access point web-browser interface is fully compatible with Microsoft Internet Explorer version 6.0 on Windows 98 and 2000 platforms, and with Netscape version 7.0 on Windows 98, Windows 2000, and Solaris platforms. Step 2 Step 3 Step 4 Step 5 Step 6 Step 7 Enter the access point's IP address in the browser address line and press Enter. An Enter Network Password window appears. Enter your username in the User Name field. The default username is Cisco. Enter the access point password in the Password field and press Enter. The default password is Cisco. The Summary Status page appears. Click System Software and the System Software screen appears. Click System Configuration and the System Configuration screen appears. Click the Reset to Defaults button. Cisco Aironet 1200 Series Access Point Hardware Installation Guide 3-2 OL-4310-05
-
 1
1 -
2
-
3
-
4
-
5
-
6
-
7
-
8
-
9
-
10
-
11
-
12
-
13
-
14
-
15
-
16
-
17
-
18
-
19
-
20
-
21
-
22
-
23
-
24
-
25
-
26
-
27
-
28
-
29
-
30
-
31
-
32
-
 33
33 -
 34
34 -
 35
35 -
 36
36 -
 37
37 -
 38
38 -
 39
39 -
 40
40 -
 41
41 -
 42
42 -
 43
43 -
44
-
45
-
46
-
47
-
48
-
49
-
50
-
51
-
52
-
53
-
54
-
55
-
56
-
57
-
58
-
59
-
60
-
61
-
62
-
63
-
64
-
65
-
66
-
67
-
68
-
69
-
70
-
71
-
72
-
73
-
74
-
75
-
76
-
77
-
78
-
79
-
80
-
81
-
82
-
83
-
84
-
85
-
86
-
87
-
88
-
89
-
90
-
91
-
92
-
93
-
94
-
95
-
96
-
97
-
98
-
99
-
100
-
101
-
102
-
103
-
104
-
105
-
106
-
107
-
108
-
109
-
110
-
111
-
112
-
113
-
114
-
115
-
116
-
117
-
118
-
119
-
120
-
121
-
122
-
123
-
124
-
125
-
126
-
127
-
128
-
129
-
130
-
131
-
132
-
133
-
134
-
135
-
136
-
137
-
138
-
139
-
140
-
141
-
142
-
143
-
144
-
145
-
146
-
147
-
148
-
149
-
150
-
151
-
152
-
153
-
154
-
155
-
156
-
157
-
158
-
159
-
160
 |
 |