Cisco AIR-AP1242AG-E-K9 Hardware Installation Guide - Page 40
Connecting to the Access Point Locally, Assigning Basic Settings
 |
View all Cisco AIR-AP1242AG-E-K9 manuals
Add to My Manuals
Save this manual to your list of manuals |
Page 40 highlights
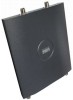
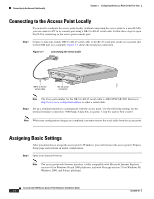
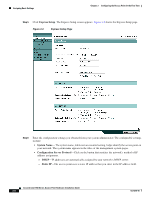
Connecting to the Access Point Locally Chapter 3 Configuring the Access Point for the First Time Connecting to the Access Point Locally If you need to configure the access point locally (without connecting the access point to a wired LAN), you can connect a PC to its console port using a DB-9 to RJ-45 serial cable. Follow these steps to open the CLI by connecting to the access point console port: Step 1 Connect a nine-pin, female DB-9 to RJ-45 serial cable to the RJ-45 serial port on the access point and to the COM port on a computer. Figure 3-1 shows the serial port connection. Figure 3-1 Connecting the Serial Cable 74005 DB-9 to RJ-45 serial cable RJ-45 serial connector Note The Cisco part number for the DB-9 to RJ-45 serial cable is AIR-CONCAB1200. Browse to http://www.cisco.com/go/marketplace to order a serial cable. Step 2 Set up a terminal emulator to communicate with the access point. Use the following settings for the terminal emulator connection: 9600 baud, 8 data bits, no parity, 1 stop bit, and no flow control. Note When your configuration changes are completed, you must remove the serial cable from the access point. Assigning Basic Settings After you determine or assign the access point's IP address, you can browse to the access point's Express Setup page and perform an initial configuration: Step 1 Open your Internet browser. Note The access point web-browser interface is fully compatible with Microsoft Internet Explorer version 6.0 on Windows 98 and 2000 platforms, and with Netscape version 7.0 on Windows 98, Windows 2000, and Solaris platforms. Cisco Aironet 1200 Series Access Point Hardware Installation Guide 3-4 OL-4310-05
-
 1
1 -
2
-
3
-
4
-
5
-
6
-
7
-
8
-
9
-
10
-
11
-
12
-
13
-
14
-
15
-
16
-
17
-
18
-
19
-
20
-
21
-
22
-
23
-
24
-
25
-
26
-
27
-
28
-
29
-
30
-
31
-
32
-
33
-
34
-
 35
35 -
 36
36 -
 37
37 -
 38
38 -
 39
39 -
 40
40 -
 41
41 -
 42
42 -
 43
43 -
 44
44 -
 45
45 -
46
-
47
-
48
-
49
-
50
-
51
-
52
-
53
-
54
-
55
-
56
-
57
-
58
-
59
-
60
-
61
-
62
-
63
-
64
-
65
-
66
-
67
-
68
-
69
-
70
-
71
-
72
-
73
-
74
-
75
-
76
-
77
-
78
-
79
-
80
-
81
-
82
-
83
-
84
-
85
-
86
-
87
-
88
-
89
-
90
-
91
-
92
-
93
-
94
-
95
-
96
-
97
-
98
-
99
-
100
-
101
-
102
-
103
-
104
-
105
-
106
-
107
-
108
-
109
-
110
-
111
-
112
-
113
-
114
-
115
-
116
-
117
-
118
-
119
-
120
-
121
-
122
-
123
-
124
-
125
-
126
-
127
-
128
-
129
-
130
-
131
-
132
-
133
-
134
-
135
-
136
-
137
-
138
-
139
-
140
-
141
-
142
-
143
-
144
-
145
-
146
-
147
-
148
-
149
-
150
-
151
-
152
-
153
-
154
-
155
-
156
-
157
-
158
-
159
-
160
 |
 |