Cisco AIR-AP1242AG-E-K9 Hardware Installation Guide - Page 43
Radio Service Set ID SSID, Role in Radio Network - reset
 |
View all Cisco AIR-AP1242AG-E-K9 manuals
Add to My Manuals
Save this manual to your list of manuals |
Page 43 highlights
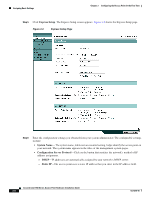
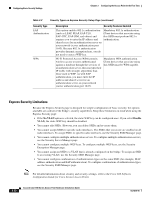
Chapter 3 Configuring the Access Point for the First Time Assigning Basic Settings • IP Address-Use this setting to assign or change the access point's IP address. If DHCP is enabled for your network, leave this field blank. Note If the access point's IP address changes while you are configuring the access point using the web-browser interface or a Telnet session over the wired LAN, you lose your connection to the access point. If you lose your connection, reconnect to the access point using its new IP address. Follow the steps in the "Resetting the Access Point to Default Settings" section on page 3-2 if you need to start over. • IP Subnet Mask-Enter the IP subnet mask provided by your network administrator so the IP address can be recognized on the LAN. If DHCP is enabled, leave this field blank. • Default Gateway-Enter the default gateway IP address provided by your network administrator. If DHCP is enabled, leave this field blank. • Radio Service Set ID (SSID)-Enter the case-sensitive SSID (32 alphanumeric characters maximum) provided by your network administrator. The SSID is a unique identifier that client devices use to associate with the access point. • Broadcast SSID in Beacon-Use this setting to allow devices that do not specify an SSID to associate with the access point. - Yes-This is the default setting; it allows devices that do not specify an SSID to associate with the access point. - No-Devices must specify an SSID to associate with the access point. With No selected, the SSID used by the client devices must match exactly the access point's SSID. • Role in Radio Network-Click the box (for each radio interface) that describes the role of the access point on your network. - Access Point-(Default) click this box if the unit (also called root access point) is connected to a wired LAN. - Repeater- Click this box if the unit (also called repeater non-root) is not connected to the wired LAN and supports wireless clients. - Root Bridge-Specifies that the unit is operating as a root bridge and connects directly to the main Ethernet LAN network. In this mode, the unit accepts an association from another Cisco Aironet non-root bridge. Note In bridge mode (root or non-root), the unit cannot communicate with Cisco Aironet 1400 Series Outdoor Bridges. Note In root bridge mode, only a point-to-point bridge link is supported. - Non-root Bridge-Specifies that the unit is operating as a non-root bridge and connects to a remote LAN network and must associate with a Cisco Aironet root bridge using the wireless interface. - Workgroup Bridge-Check this box if your unit (workgroup bridge) is not connected to the wired LAN and supports wired clients. - Scanner-This setting is enabled when your product is being used by the Cisco WLSE to monitor wireless data traffic. OL-4310-05 Cisco Aironet 1200 Series Access Point Hardware Installation Guide 3-7
-
 1
1 -
2
-
3
-
4
-
5
-
6
-
7
-
8
-
9
-
10
-
11
-
12
-
13
-
14
-
15
-
16
-
17
-
18
-
19
-
20
-
21
-
22
-
23
-
24
-
25
-
26
-
27
-
28
-
29
-
30
-
31
-
32
-
33
-
34
-
35
-
36
-
37
-
 38
38 -
 39
39 -
 40
40 -
 41
41 -
 42
42 -
 43
43 -
 44
44 -
 45
45 -
 46
46 -
 47
47 -
 48
48 -
49
-
50
-
51
-
52
-
53
-
54
-
55
-
56
-
57
-
58
-
59
-
60
-
61
-
62
-
63
-
64
-
65
-
66
-
67
-
68
-
69
-
70
-
71
-
72
-
73
-
74
-
75
-
76
-
77
-
78
-
79
-
80
-
81
-
82
-
83
-
84
-
85
-
86
-
87
-
88
-
89
-
90
-
91
-
92
-
93
-
94
-
95
-
96
-
97
-
98
-
99
-
100
-
101
-
102
-
103
-
104
-
105
-
106
-
107
-
108
-
109
-
110
-
111
-
112
-
113
-
114
-
115
-
116
-
117
-
118
-
119
-
120
-
121
-
122
-
123
-
124
-
125
-
126
-
127
-
128
-
129
-
130
-
131
-
132
-
133
-
134
-
135
-
136
-
137
-
138
-
139
-
140
-
141
-
142
-
143
-
144
-
145
-
146
-
147
-
148
-
149
-
150
-
151
-
152
-
153
-
154
-
155
-
156
-
157
-
158
-
159
-
160
 |
 |