Cisco AIR-AP1242AG-E-K9 Hardware Installation Guide - Page 49
Using the Express Security Cisco IOS Software Configuration Guide for Cisco
 |
View all Cisco AIR-AP1242AG-E-K9 manuals
Add to My Manuals
Save this manual to your list of manuals |
Page 49 highlights
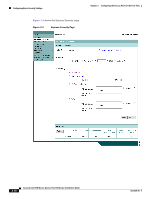
Chapter 3 Configuring the Access Point for the First Time Configuring Basic Security Settings Using the Express Security Page Follow these steps to create an SSID using the Express Security page: Step 1 Type the SSID in the SSID entry field. The SSID can contain up to 32 alphanumeric characters. Note These characters are not allowed in the SSID tab, and a trailing space character. Step 2 Step 3 Step 4 Step 5 To broadcast the SSID in the bridge beacon, check the Broadcast SSID in Beacon check box. When you broadcast the SSID, devices that do not specify an SSID can associate to the bridge. This is a useful option for an SSID used by guests or by client devices in a public space. If you do not broadcast the SSID, client devices cannot associate to the bridge unless their SSID matches this SSID. Only one SSID can be included in the bridge beacon. (Optional) Check the Enable VLAN ID check box and enter a VLAN number (1 through 4095) to assign the SSID to a VLAN. You cannot assign an SSID to an existing VLAN. (Optional) Check the Native VLAN check box to mark the VLAN as the native VLAN. Select the security setting for the SSID. The settings are listed in order of robustness, from No Security to WPA, which is the most secure setting. • If you select Static WEP Key, choose the key number and encryption key size and enter the encryption key (10 hexadecimaldecimal characters for 40-bit keys or 26 hexadecimaldecimal characters for 128-bit keys). • If you select EAP Authentication or WPA, enter the IP address and shared secret for the authentication server on your network. Note If you do not use VLANs on your wireless LAN, the security options that you can assign to multiple SSIDs are limited. Refer to the Cisco IOS Software Configuration Guide for Cisco Aironet Access Points for VLAN details. Step 6 Click Apply. The SSID appears in the SSID table at the bottom of the page. OL-4310-05 Cisco Aironet 1200 Series Access Point Hardware Installation Guide 3-13
-
 1
1 -
2
-
3
-
4
-
5
-
6
-
7
-
8
-
9
-
10
-
11
-
12
-
13
-
14
-
15
-
16
-
17
-
18
-
19
-
20
-
21
-
22
-
23
-
24
-
25
-
26
-
27
-
28
-
29
-
30
-
31
-
32
-
33
-
34
-
35
-
36
-
37
-
38
-
39
-
40
-
41
-
42
-
43
-
 44
44 -
 45
45 -
 46
46 -
 47
47 -
 48
48 -
 49
49 -
 50
50 -
 51
51 -
 52
52 -
 53
53 -
 54
54 -
55
-
56
-
57
-
58
-
59
-
60
-
61
-
62
-
63
-
64
-
65
-
66
-
67
-
68
-
69
-
70
-
71
-
72
-
73
-
74
-
75
-
76
-
77
-
78
-
79
-
80
-
81
-
82
-
83
-
84
-
85
-
86
-
87
-
88
-
89
-
90
-
91
-
92
-
93
-
94
-
95
-
96
-
97
-
98
-
99
-
100
-
101
-
102
-
103
-
104
-
105
-
106
-
107
-
108
-
109
-
110
-
111
-
112
-
113
-
114
-
115
-
116
-
117
-
118
-
119
-
120
-
121
-
122
-
123
-
124
-
125
-
126
-
127
-
128
-
129
-
130
-
131
-
132
-
133
-
134
-
135
-
136
-
137
-
138
-
139
-
140
-
141
-
142
-
143
-
144
-
145
-
146
-
147
-
148
-
149
-
150
-
151
-
152
-
153
-
154
-
155
-
156
-
157
-
158
-
159
-
160
 |
 |