Cisco AIR-LAP1131G-A-K9 Hardware Installation Guide - Page 69
Obtaining the Access Point Image File, Obtaining the TFTP Server Software
 |
View all Cisco AIR-LAP1131G-A-K9 manuals
Add to My Manuals
Save this manual to your list of manuals |
Page 69 highlights
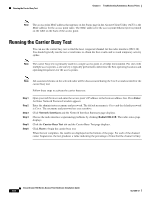
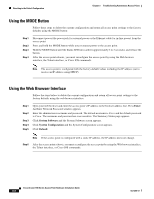
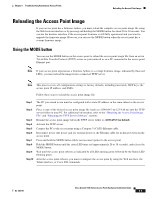
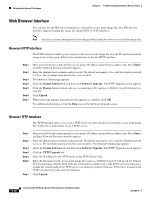
Chapter 5 Troubleshooting Autonomous Access Points Obtaining the Access Point Image File Step 8 When a message appears that indicates the upgrade is complete, click OK. For additional information click the Help icon on the Software Upgrade screen. Obtaining the Access Point Image File The access point image file can be obtained from the Cisco.com software center using the following steps: Step 1 Step 2 Step 3 Step 4 Step 5 Step 6 Step 7 Step 8 Step 9 Step 10 Step 11 Step 12 Step 13 Step 14 Step 15 Step 16 Step 17 Use your Internet browser to access the Cisco Software Center at the following URL: http://www.cisco.com/cisco/software/navigator.html Click Wireless LAN Access > Aironet Access Points > Cisco Aironet 1100 Series. Click Cisco Aironet 1100 Access Point. On the Enter Network Password window, enter your Cisco.com username and password and click OK. Click IOS. Choose the Cisco IOS release desired, such as 12.3.11.JA. Click WIRELESS LAN for an access point image file, such as c1100-k9w7-tar.123-11.JA.tar. On the Enter Network Password window, enter your Cisco.com username and password and click OK. On the Security Information window, click Yes to display non-secure items. On the Encryption Software Export Authorization page, read the information and check Yes or No to the question asking if the image is for use by you or your organization. Click Submit. If you checked No, enter the requested information and click Submit. Click Yes to continue. Click DOWNLOAD. Read and accept the terms and conditions of the Software Download Rules. On the Enter Network Password window, enter your Cisco.com username and password and click OK. Click Save to download your image file to your hard disk. Select the desired download location on your hard disk and click Save. Obtaining the TFTP Server Software You can download TFTP server software from several websites. Cisco recommends the shareware TFTP utility available at this URL: http://tftpd32.jounin.net Follow the instructions on the website for installing and using the utility. OL-4309-07 Cisco Aironet 1100 Series Access Point Hardware Installation Guide 5-11
-
 1
1 -
2
-
3
-
4
-
5
-
6
-
7
-
8
-
9
-
10
-
11
-
12
-
13
-
14
-
15
-
16
-
17
-
18
-
19
-
20
-
21
-
22
-
23
-
24
-
25
-
26
-
27
-
28
-
29
-
30
-
31
-
32
-
33
-
34
-
35
-
36
-
37
-
38
-
39
-
40
-
41
-
42
-
43
-
44
-
45
-
46
-
47
-
48
-
49
-
50
-
51
-
52
-
53
-
54
-
55
-
56
-
57
-
58
-
59
-
60
-
61
-
62
-
63
-
 64
64 -
 65
65 -
 66
66 -
 67
67 -
 68
68 -
 69
69 -
 70
70 -
 71
71 -
 72
72 -
 73
73 -
 74
74 -
75
-
76
-
77
-
78
-
79
-
80
-
81
-
82
-
83
-
84
-
85
-
86
-
87
-
88
-
89
-
90
-
91
-
92
-
93
-
94
-
95
-
96
-
97
-
98
-
99
-
100
-
101
-
102
-
103
-
104
-
105
-
106
-
107
-
108
-
109
-
110
-
111
-
112
-
113
-
114
-
115
-
116
 |
 |