Cisco ASR1006 Hardware Installation Guide - Page 147
Activation of a SIP Configuration Example, SIP Installation and Removal - issu
 |
UPC - 882658196423
View all Cisco ASR1006 manuals
Add to My Manuals
Save this manual to your list of manuals |
Page 147 highlights
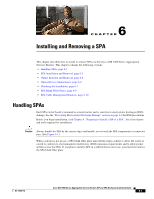
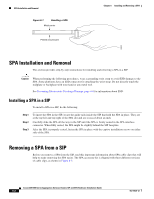
Chapter 5 Installing and Removing a SIP SIP Installation and Removal Activation of a SIP Configuration Example Activate a SIP if you have previously deactivated it. If you did not deactivate the SPAs, the SPAs automatically reactivate with reactivation of the SIP. The following example activates the SIP that is installed in slot 1 of the Cisco ASR 1000 Series Router, its SPAs, and all of the interfaces (as long as the hw-module subslot shutdown command was not issued to also deactivate the SPA): Router(config)# hw-module slot 1 start There are no corresponding console messages shown with activation using this command. If you re-enter the hw-module slot start command, a message displays indicating that the module is already enabled. Deactivation of a SPA Configuration Example Deactivate a SPA when you want to perform OIR of that SPA. The following example deactivates the SPA (and its interfaces) that is installed in subslot 0 of the SIP located in slot 1 of the Cisco ASR 1000 Series Router and removes power to the SPA. Router(config)# hw-module subslot 1/0 shutdown unpowered Activation of a SPA Configuration Example Activate a SPA if you have previously deactivated it. If you have not deactivated a SPA and its interfaces during OIR of a SIP, then the SPA is automatically reactivated upon reactivation of the SIP. The following example activates the SPA that is installed in subslot 0 of the SIP located in slot 1 of the Cisco ASR 1000 Series Router. Router(config)# no hw-module subslot 1/0 shutdown SIP Installation and Removal This section provides step-by-step instructions for installing and removing a SIP. Caution The SIP in the Cisco ASR 1002 Router is permanently installed and cannot be removed. Caution When performing the following procedures, wear a grounding wrist strap to avoid ESD damage to the SIP. Some platforms have an ESD connector for attaching the wrist strap. Do not directly touch the midplane or backplane with your hand or any metal tool. To install a SIP, refer to Figure 5-2 and do the following: Step 1 Step 2 Step 3 Before inserting a SIP, make sure that the chassis is grounded. To insert the SIP, carefully align the edges of the SIP between the upper and lower edges of the router slot. Carefully slide the SIP into the router slot until the SIP makes contact with the backplane. OL-14126-12 Cisco ASR 1000 Series Aggregation Services Routers SIP and SPA Hardware Installation Guide 5-9
-
 1
1 -
2
-
3
-
4
-
5
-
6
-
7
-
8
-
9
-
10
-
11
-
12
-
13
-
14
-
15
-
16
-
17
-
18
-
19
-
20
-
21
-
22
-
23
-
24
-
25
-
26
-
27
-
28
-
29
-
30
-
31
-
32
-
33
-
34
-
35
-
36
-
37
-
38
-
39
-
40
-
41
-
42
-
43
-
44
-
45
-
46
-
47
-
48
-
49
-
50
-
51
-
52
-
53
-
54
-
55
-
56
-
57
-
58
-
59
-
60
-
61
-
62
-
63
-
64
-
65
-
66
-
67
-
68
-
69
-
70
-
71
-
72
-
73
-
74
-
75
-
76
-
77
-
78
-
79
-
80
-
81
-
82
-
83
-
84
-
85
-
86
-
87
-
88
-
89
-
90
-
91
-
92
-
93
-
94
-
95
-
96
-
97
-
98
-
99
-
100
-
101
-
102
-
103
-
104
-
105
-
106
-
107
-
108
-
109
-
110
-
111
-
112
-
113
-
114
-
115
-
116
-
117
-
118
-
119
-
120
-
121
-
122
-
123
-
124
-
125
-
126
-
127
-
128
-
129
-
130
-
131
-
132
-
133
-
134
-
135
-
136
-
137
-
138
-
139
-
140
-
141
-
 142
142 -
 143
143 -
 144
144 -
 145
145 -
 146
146 -
 147
147 -
 148
148 -
 149
149 -
 150
150 -
 151
151 -
 152
152 -
153
-
154
-
155
-
156
-
157
-
158
-
159
-
160
-
161
-
162
-
163
-
164
-
165
-
166
-
167
-
168
-
169
-
170
-
171
-
172
-
173
-
174
-
175
-
176
-
177
-
178
-
179
-
180
-
181
-
182
-
183
-
184
-
185
-
186
-
187
-
188
 |
 |