Cisco E2000 User Manual
Cisco E2000 Manual
 |
View all Cisco E2000 manuals
Add to My Manuals
Save this manual to your list of manuals |
Cisco E2000 manual content summary:
- Cisco E2000 | User Manual - Page 1
User Guide Linksys E2000 Advanced Wireless-N Router - Cisco E2000 | User Manual - Page 2
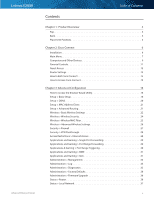
Parental Controls 11 Guest Access 13 Router Settings 13 How to Exit Cisco Connect 15 How to Access Cisco Connect 15 Chapter 3: Advanced Configuration 16 How to Access the Browser-Based Utility 16 Setup > Basic Setup 16 Setup > DDNS 20 Setup > MAC Address Clone 21 Setup > Advanced Routing - Cisco E2000 | User Manual - Page 3
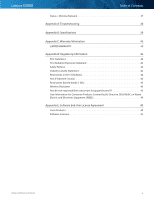
Linksys E2000 Table of Contents Status > Wireless Network 37 Appendix A: Troubleshooting 38 Appendix B: Specifications 39 Appendix C: Electronic Equipment (WEEE 44 Appendix E: Software End User License Agreement 45 Cisco Products 45 Software Licenses 45 Advanced Wireless-N Router iii - Cisco E2000 | User Manual - Page 4
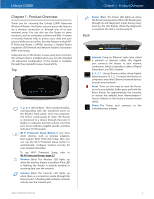
include WiFi Protected Access 2 (WPA2) security, a Stateful Packet Inspection (SPI) firewall and Network Address Translation (NAT) technology. Setup and use of the Router is easy using Cisco Connect, the software that is installed when you run the included CD. Advanced configuration of the Router is - Cisco E2000 | User Manual - Page 5
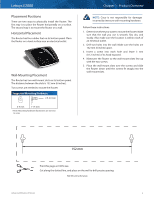
Cisco is not responsible for damages incurred by insecure wall-mounting hardware. Follow these instructions: 1. Determine where you want to mount the Router over the screws and slide the Router down until the screws fit snugly into the wall-mount slots. 152 mm Print this page at 100% size. Cut - Cisco E2000 | User Manual - Page 6
Linksys E2000 Chapter 2: Cisco Connect During installation, the setup software installs Cisco Connect on your computer. Cisco Connect offers options to connect additional computers or devices to the Router and allows you to change the Router's settings. Installation To install the Router: 1. Insert - Cisco E2000 | User Manual - Page 7
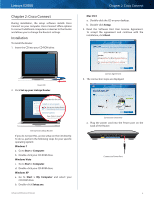
into the yellow port labeled Internet on the back of the Router. Click Next. Internet 4 3 Ethernet 2 1 Reset 12VDC Power Connect Ethernet Cable NOTE: You can view detailed connection steps by clicking in the setup software. NOTE: If the setup software detects multiple routers, then select - Cisco E2000 | User Manual - Page 8
name of your wireless network followed by -guest. 2. Open a web browser. 3. On the login screen, enter the password of your guest network. Then click Login. Change To disable guest access or change settings, click Change and go to Guest Access, page 13. Main Menu - Router Settings Use this option - Cisco E2000 | User Manual - Page 9
go to Connect Manually, page 10. Connecting Another Computer 2. On that computer, click Connect to your Linksys Router. (If you do not see this, access the Easy Setup Key through Windows Explorer or the Finder, and double‑click Connect.) Follow the on-screen instructions to connect that computer - Cisco E2000 | User Manual - Page 10
. If you already have an Easy Setup Key, then you can update it with the Router's current settings. 1. Insert the Easy Setup Key or a USB flash drive into an available USB port on your computer. Chapter 2: Cisco Connect Connect Manually 1. Enter the Network name (SSID), Security Key, and Security - Cisco E2000 | User Manual - Page 11
to Restrict Internet Access List, page 12. To set up parental controls on a computer, refer to Set Up Parental Controls, page 12. Change parental controls password Click this option to change the password that protects access to parental controls. Refer to Change Parental Controls Password, page 13 - Cisco E2000 | User Manual - Page 12
Linksys E2000 Restrict Internet Access List Chapter 2: Cisco Connect Set Up Parental Controls To set up parental controls for a computer, follow these instructions: 1. Select the computer from the Restrict Internet access on list. (If the computer is not listed, click Add to select the computer.) - Cisco E2000 | User Manual - Page 13
By default, guest access is enabled. To disable guest access, select no. Guest network name By default, the setup software sets up the name of the guest network. Password By default, the setup software sets up the password for the guest network. To change the password, click Change. Router - Cisco E2000 | User Manual - Page 14
save your settings. Change Router Name and Password Router Details The Router details screen appears, displaying the Model name, Model number, Serial number, Firmware version, Operating system, Software version, Connection type (WAN), IP address (LAN), IP address (WAN), and Computer IP address. (WAN - Cisco E2000 | User Manual - Page 15
advanced configuration settings of the Router. Username Enter this username to access the browser‑based utility. Password Enter this password to access the browser‑based utility. Copy password To copy the password to the Clipboard, click this option. Chapter 2: Cisco Connect Advanced Settings - Cisco E2000 | User Manual - Page 16
run the setup software, then use the default password, admin. You can set a new password on the Administration > Management screen. Refer to Administration > Management, page 33.) Click OK to continue. Login Screen NOTE: You can also access the browser-based utility through Cisco Connect. For more - Cisco E2000 | User Manual - Page 17
Linksys E2000 Automatic Configuration - DHCP The default Internet Connection Type is set to Automatic Configuration - DHCP (Dynamic Host Configuration Protocol). Keep the default only if your ISP supports DHCP or you are connecting using a dynamic IP Address. (This option usually applies to cable - Cisco E2000 | User Manual - Page 18
Linksys E2000 PPTP Server IP Address Your ISP will provide you with the IP address of the PPTP server. Username and Password Enter the Username and Password provided by your ISP. Connect on Demand: Max Idle Time You can configure the Router to cut the Internet connection after it has been - Cisco E2000 | User Manual - Page 19
1200 to 1500 range. The default size depends on the Internet Connection Type: •• DHCP, Static IP, or Telstra: 1500 •• PPPoE: 1492 •• PPTP or L2TP: 1460 Network Setup The Network Setup section configures the IP settings for your local network. Router IP IP Address The Router's IP address, as seen by - Cisco E2000 | User Manual - Page 20
to select, keep the default, Disabled. Internet IP Address The Router's Internet IP address is displayed here. Because it is dynamic, it will change. Status The status of the DDNS service connection is displayed here. Update To manually trigger an update, click Update. Click Save Settings to - Cisco E2000 | User Manual - Page 21
Router's Internet IP address is displayed here. Because it is dynamic, it will change. Status The status of the DDNS service connection is displayed. Update To manually trigger an update, click Update. Click Save Settings to apply your changes, or click Cancel Changes to clear your changes. Setup - Cisco E2000 | User Manual - Page 22
, such as wireless adapters, that support Wi-Fi Protected Setup, then you can use Wi-Fi Protected Setup. Advanced Wireless-N Router Chapter 3: Advanced Configuration Configuration View To manually configure your wireless network, select Manual. Proceed to the Manual Setup section.To useWi-Fi - Cisco E2000 | User Manual - Page 23
Setup configures one client device at a time. Repeat the instructions for each client device that supports Wi-Fi Protected Setup. •• Wi-Fi Protected Setup Button Use this method if your client device has a Wi-Fi Protected Setup button. Advanced Wireless-N Router Chapter 3: Advanced Configuration - Cisco E2000 | User Manual - Page 24
wireless network(s). The Router supports the following wireless security options: WPA/WPA2 Mixed Mode (default), WPA2 Personal, WPA Personal, WEP, and RADIUS. (WPA stands for Wi-Fi Protected Access. WEP stands for Wired Equivalent Privacy. RADIUS stands for Remote Authentication Dial-In User Service - Cisco E2000 | User Manual - Page 25
of the devices in your wireless network. Wireless Security > RADIUS RADIUS Server Enter the IP address of the RADIUS server. RADIUS Port Enter the port number of the RADIUS server. The default value is 1812. Shared Secret Enter the key shared between the Router and the server. Advanced Wireless - Cisco E2000 | User Manual - Page 26
cases, keep the default settings. Wireless > Advanced Wireless Settings Advanced Wireless-N Router Chapter 3: Advanced Configuration Advanced Wireless AP Isolation The AP (Access Point) Isolation feature isolates all wireless clients and wireless devices on your network from each other. Wireless - Cisco E2000 | User Manual - Page 27
the Router will allow IP multicast packets to be forwarded to the appropriate computers. Select this option to enable the filter. This option is disabled by default. Filter Internet NAT Redirection This option is used to prevent a local computer from using a URL or Internet address to access the - Cisco E2000 | User Manual - Page 28
usage and traffic, such as Internet access, designated services, and websites during specific days and times. Advanced Wireless-N Router Chapter 3: Advanced Configuration Access Restrictions > Internet Access Internet Access Policy Access Policy Access can be managed by a policy. Use the settings - Cisco E2000 | User Manual - Page 29
network via the Internet, the Router will forward those requests to the appropriate computers (also called servers). Before using forwarding, you should assign static IP addresses to the designated computers (use the DHCP Reservation option on the Basic Setup screen; refer to DHCP Reservation, page - Cisco E2000 | User Manual - Page 30
network via the Internet, the Router will forward those requests to the appropriate computers (also called servers). Before using forwarding, you should assign static IP addresses to the designated servers (use the DHCP Reservation option on the Basic Setup screen; refer to DHCP Reservation, page - Cisco E2000 | User Manual - Page 31
E2000 Forwarded Range Enter the starting and ending port numbers of the forwarded port number range. Check with the Internet application documentation for the port number(s) needed. Enabled Select Enabled to enable port triggering. Click Save Settings to apply your changes, or click Cancel Changes - Cisco E2000 | User Manual - Page 32
Click Add to save your changes. Your new entry will appear in the Summary list. Advanced Wireless-N Router Chapter 3: Advanced Configuration Add a New Application QoS > Add a New Application Enter a Name Enter a name for this application. Port Range Enter the port range that the application will - Cisco E2000 | User Manual - Page 33
you access the Router's browser-based utility. The default is admin. Router Password Enter a new password for the Router. Re-enter to confirm Enter the password again to confirm. Web Access Web Utility Access HTTP (HyperText Transport Protocol) is the communications protocol used to connect to - Cisco E2000 | User Manual - Page 34
upgrade the Router from the Internet (outside the local network), select Enabled. (You must have the Remote Management feature enabled as well.) Otherwise, keep the default, Disabled. Allowed Remote IP Address If you want to be able to access the Router from any external IP address, select Any IP - Cisco E2000 | User Manual - Page 35
Cancel Changes to clear your changes. Administration > Diagnostics The diagnostic tests (Ping and Traceroute) allow you to check the connections of your network devices, including connection to the Internet. This screen also allows you to reset the Router. Chapter 3: Advanced Configuration Start - Cisco E2000 | User Manual - Page 36
configuration settings. Factory Defaults Restore All Settings To reset the Router's settings to the defaults, click this option and then follow the on-screen instructions. Any settings you have saved will be lost when the default settings are restored. Administration > Firmware Upgrade The Firmware - Cisco E2000 | User Manual - Page 37
Linksys E2000 Internet Connection This section shows the current network information stored in the Router. The information varies depending on the Internet connection type selected on the Setup > Basic Setup screen. For a DHCP connection, select IP Address Release or IP Address Renew as appropriate - Cisco E2000 | User Manual - Page 38
A: Troubleshooting Your computer cannot connect to the Internet. Follow these instructions until your computer can connect to the Internet: •• Make sure that the Router is powered on. The Power LED should be lit and not flashing. •• If the Power LED is flashing, then power off all of your network - Cisco E2000 | User Manual - Page 39
Description Advanced Wireless-N Router Model Number E2000 Standards 802.11n, 802.11a, 802.11g, 802.11b, 802.3, 802.3u, 802.3ab Ports Power, Internet, and Ethernet Buttons Reset, Wi-Fi Protected Setup LEDs Ethernet (1-4), Wi-Fi Protected Setup, Wireless, Internet, Power Cabling Type CAT - Cisco E2000 | User Manual - Page 40
instructions supplied by Cisco, (e) the product has been subjected to abnormal physical or electrical stress, misuse, negligence, or accident, (f ) the serial number PERMITTED BY APPLICABLE LAW, ALL SOFTWARE AND SERVICES PROVIDED BY CISCO WITH THE PRODUCT, WHETHER FACTORY LOADED ON THE PRODUCT OR - Cisco E2000 | User Manual - Page 41
or, if you purchased your product from a service provider, contact the service provider) for instructions on how to obtain warranty service. The telephone number for Cisco Technical Support in your area can be found by clicking the "Contact Us" link on the home page of www.myciscohome.com. Have your - Cisco E2000 | User Manual - Page 42
E2000 instructions Connect changes or modifications not expressly approved by the party responsible for compliance could void the user's authority to operate this equipment. IEEE 802.11b or 802.11g operation of this product in the USA is firmware-limited to channels Router be a remote risk of electric - Cisco E2000 | User Manual - Page 43
Linksys E2000 Because high power radars are allocated as primary users (meaning they have priority) in network capacity, data throughput rate, range and coverage. Performance depends on many factors, conditions and variables, including distance from the access point, volume of network traffic - Cisco E2000 | User Manual - Page 44
type de produits sur l'environnement et la santé publique. Pour plus d'informations sur le mode d'élimination de votre ancien équipement, veuillez prendre contact avec les pouvoirs publics locaux, le service de traitement des déchets, ou l'endroit où vous avez acheté le produit. WEB: For additional - Cisco E2000 | User Manual - Page 45
of any third party. Cisco may change, suspend or discontinue the Software and Services at any time, including the availability of any feature, functionality, or content without notice or liability. Cisco may also impose limits on certain features and services or restrict Your access to parts or all - Cisco E2000 | User Manual - Page 46
Linksys E2000 Appendix E: Software End User License Agreement or provided in or with the applicable Cisco product, and (b) any upgrades, updates, bug fixes or modified versions ("Upgrades") or backup copies of the Software supplied to You by Cisco or an authorized reseller (whether or not for a - Cisco E2000 | User Manual - Page 47
Linksys E2000 Appendix E: Software End User License Agreement In addition, Cisco may collect and store detailed information regarding Your network configuration and usage for the purpose of providing You technical networking support. The information is associated with You only when You provide a - Cisco E2000 | User Manual - Page 48
Agreement. Technical Support. This limited warranty is neither a service nor a support contract. Information about Cisco's current technical support offerings and policies (including any fees for support services) can be found at www.myciscohome.com/support. Export. Software, including technical - Cisco E2000 | User Manual - Page 49
Linksys E2000 Appendix E: Software End User License Agreement You to use Cisco's or its licensors' names or respective trademarks. END OF SCHEDULE 1 Schedule 2 Open Source and Third Party Licenses Schedule 2-A If this Cisco product contains open source software licensed under Version 2 of the "GNU - Cisco E2000 | User Manual - Page 50
E2000 Appendix E: Software modified files to carry prominent notices stating that you changed the files and the date of any change. b. You must cause any work that you is made by offering access to copy from a designated place, then offering equivalent access to copy the source code Router 50 - Cisco E2000 | User Manual - Page 51
Free Software Foundation may publish revised and/or new versions of the General Public License from time to time. Such new versions will be similar in spirit to the present version, but may differ in detail to address new problems or concerns. Each version is given a distinguishing version number - Cisco E2000 | User Manual - Page 52
version 2, hence the version number 2.1.] Preamble The licenses for most software are designed to take away your freedom to share and change Advanced Wireless-N Router are designed to make sure that you have the freedom to distribute copies of free software (and charge for this service if you wish - Cisco E2000 | User Manual - Page 53
number of people to use a large body of free software using a modified version of the addressed as "you". A "library" means a collection of software Router software library. b. You must cause the files modified to carry prominent notices stating that you changed the files and the date of any change - Cisco E2000 | User Manual - Page 54
, then you can specify that version instead if you wish.) Do not make any other change in these notices. Once this change is made in a given copy for software interchange. If distribution of object code is made by offering access to copy from a designated place, then offering equivalent access - Cisco E2000 | User Manual - Page 55
E2000 Appendix E: Software End User License Agreement a. Accompany the work with the complete corresponding machine-readable source code for the Library including whatever changes work is made by offering access to copy from a designated place, offer equivalent access to copy the above specified - Cisco E2000 | User Manual - Page 56
Software Foundation may publish revised and/or new versions of the Lesser General Public License from time to time. Such new versions will be similar in spirit to the present version, but may differ in detail to address new problems or concerns. Each version is given a distinguishing version number - Cisco E2000 | User Manual - Page 57
E2000 Appendix E: Software End User License Agreement Schedule 2-C OPENSSL LICENSE If this Cisco product contains open source software licensed under the OpenSSL license: This product includes software case of any license issues related to OpenSSL OF SUBSTITUTE GOODS OR SERVICES; LOSS OF USE, - Cisco E2000 | User Manual - Page 58
, BUT NOT LIMITED TO, PROCUREMENT OF SUBSTITUTE GOODS OR SERVICES; LOSS OF USE, DATA, OR PROFITS; OR BUSINESS INTERRUPTION SOFTWARE, EVEN IF ADVISED OF THE POSSIBILITY OF SUCH DAMAGE. The license and distribution terms for any publicly available version or derivative of this code cannot be changed - Cisco E2000 | User Manual - Page 59
www.linksys.com/support © 2010 Cisco Systems, Inc. All rights reserved. Cisco, the Cisco logo, and Linksys are trademarks or registered trademarks of Cisco Systems, Inc. and/or its affiliates in the United States and certain other countries. All other trademarks mentioned in this document or website
-
 1
1 -
 2
2 -
 3
3 -
 4
4 -
 5
5 -
 6
6 -
 7
7 -
8
-
9
-
10
-
11
-
12
-
13
-
14
-
15
-
16
-
17
-
18
-
19
-
20
-
21
-
22
-
23
-
24
-
25
-
26
-
27
-
28
-
29
-
30
-
31
-
32
-
33
-
34
-
35
-
36
-
37
-
38
-
39
-
40
-
41
-
42
-
43
-
44
-
45
-
46
-
47
-
48
-
49
-
50
-
51
-
52
-
53
-
54
-
55
-
56
-
57
-
58
-
59
 |
 |

Linksys E2000
Advanced Wireless-N Router
User Guide