Cisco E4200 User Guide
Cisco E4200 Manual
 |
View all Cisco E4200 manuals
Add to My Manuals
Save this manual to your list of manuals |
Cisco E4200 manual content summary:
- Cisco E4200 | User Guide - Page 1
User Guide LinLkinskyssyEs4E2300000MaHxiigmhuPmerPfeormfoarmncaencWeiW reliereslse-sNs-RNouRtoeurter - Cisco E4200 | User Guide - Page 2
41 Administration > Log 42 Administration > Diagnostics 43 Administration > Factory Defaults 43 Administration > Firmware Upgrade 44 Status > Router 45 Status > Local Network 45 Status > Wireless Network 46 Status > Ports 46 Appendix A: Troubleshooting 47 Maximum Performance Wireless - Cisco E4200 | User Guide - Page 3
Linksys E4200 Table of Contents Appendix B: How to Connect and Access USB Storage 49 Overview 49 Add or Remove USB Storage 49 Quick Access 49 Windows 7 50 Windows Vista 52 Windows XP 53 Mac OS X 55 How to Manage Access to USB Storage 58 Appendix C: Specifications 61 Maximum - Cisco E4200 | User Guide - Page 4
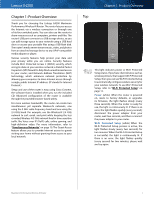
, which enhances network protection by allowing your computers to share Internet access through a single, public Internet IP address. (IP stands for Internet Protocol.) Setup and use of the router is easy using Cisco Connect, the software that is installed when you run the included CD. Advanced - Cisco E4200 | User Guide - Page 5
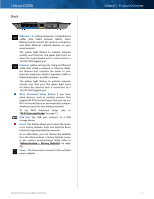
security for your wireless network. To use Wi-Fi Protected Setup, refer to "Wi-Fi Protected Setup" on page 12. USB Port The USB port connects to a USB storage device. Reset This button allows you to reset the router to its factory defaults. Press and hold the Reset button for approximately five - Cisco E4200 | User Guide - Page 6
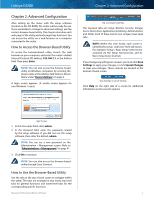
Click Help on the right side of a screen for additional information on the screen's options. Login Screen 1. In the User name field, enter admin. 2. In the Password field, enter the password created by the setup software. If you did not run the setup software, then enter the default, admin. NOTE - Cisco E4200 | User Guide - Page 7
the router's general settings. Chapter 2: Advanced Configuration Automatic Configuration - DHCP The default Internet Connection Type is Automatic Configuration - DHCP (Dynamic Host Configuration Protocol). Keep the default only if your ISP supports DHCP or if you connect using a dynamic IP address - Cisco E4200 | User Guide - Page 8
the router should check the Internet connection. The default is 30 seconds. Internet Connection Type > PPTP If your PPTP connection supports DHCP or a dynamic IP address, then select Obtain an IP Address Automatically. If you are required to use a fixed IP address to connect to the Internet, then - Cisco E4200 | User Guide - Page 9
range. The default size depends on the Internet Connection Type: •• DHCP, Static IP, or Telstra: 1500 •• PPPoE: 1492 •• PPTP or L2TP: 1460 Network Setup The Network Setup section configures the IP settings for your local network. Basic Setup > Router Address Router Address IP Address The router - Cisco E4200 | User Guide - Page 10
device on your network. This is helpful if you have a device whose IP address must always remain the same, such as a media server or print server. To reserve an IP address for a specific device, select it from the list of devices or manually enter the Media Access Control (MAC) address of the device - Cisco E4200 | User Guide - Page 11
, keep the default, Disabled. Internet IP Address The router's Internet IP address is displayed. Because it is dynamic, it will change periodically. Status The status of the DDNS service connection is displayed. Update To manually trigger an update, click Update. Maximum Performance Wireless - Cisco E4200 | User Guide - Page 12
Internet IP Address The router's Internet IP address is displayed. Because it is dynamic, it will change periodically. Status The status of the DDNS service connection is displayed. Update To manually trigger an update, click Update. Setup > MAC Address Clone A Media Access Control (MAC) address - Cisco E4200 | User Guide - Page 13
Linksys E4200 Subnet Mask Enter the subnet mask for the Destination LAN IP address. Gateway Enter the IP address of the gateway server that enables communication between the router and the remote network or host. Interface Select the location of the Destination LAN IP address, the LAN & Wireless - Cisco E4200 | User Guide - Page 14
. You can use Wi-Fi Protected Setup to set up both networks, or you can manually configure the router. Wi-Fi Protected Setup is a feature that makes it easy to set up your wireless network. If you have client devices, such as wireless printers, that support Wi-Fi Protected Setup, then you can use Wi - Cisco E4200 | User Guide - Page 15
. If you used the setup software for installation, then the default Network Name is changed to an easy-to-remember name. NOTE: If you restore the router's factory default settings (by pressing the Reset button or using the Administration > Factory Defaults screen), the Network Name will return to - Cisco E4200 | User Guide - Page 16
. If you used the setup software for installation, then the default Network Name is changed to an easy-to-remember name. NOTE: If you restore the router's factory default settings (by pressing the Reset button or using the Administration > Factory Defaults screen), the Network Name will return to - Cisco E4200 | User Guide - Page 17
Wi-Fi Protected Setup, note the wireless settings, and then manually configure those client devices. Wireless > Wireless Security The wireless security settings configure the security of your wireless network(s). The router supports the following wireless security options: WPA2/WPA Mixed Mode, WPA2 - Cisco E4200 | User Guide - Page 18
If you used the setup software for installation, then the default is changed to a unique passphrase. Wireless Security > WPA2/WPA Enterprise Mixed Mode RADIUS Server Enter the IP address of the RADIUS server. RADIUS Port Enter the port number of the RADIUS server. The default is 1812. Shared Key - Cisco E4200 | User Guide - Page 19
WEP as your Security Mode, each device in your wireless network MUST use WEP and the same encryption and shared key. Wireless Security > WPA2 Enterprise RADIUS Server Enter the IP address of the RADIUS server. RADIUS Port Enter the port number of the RADIUS server. The default is 1812. Shared Key - Cisco E4200 | User Guide - Page 20
can access your wireless network at any time. Wireless Security > Disabled Wireless Security > RADIUS RADIUS Server Enter the IP address of the RADIUS server. RADIUS Port Enter the port number of the RADIUS server. The default is 1812. Shared Secret Enter the key shared between the router and - Cisco E4200 | User Guide - Page 21
allow Internet access through a guest network, keep the default, yes. Otherwise, select no. Guest Network Name The default is the name of your wireless network, followed by -guest. Guest Password The default is guest. If you used the setup software for installation, then the default is changed to - Cisco E4200 | User Guide - Page 22
Linksys E4200 Chapter 2: Advanced Configuration Wireless > Wireless MAC Filter Wireless access can be filtered (restricted) by specifying the MAC addresses of the devices in your wireless network(s). Guest Access > Change Guest Password Change Guest Password •• Enter a new guest network password - Cisco E4200 | User Guide - Page 23
Linksys E4200 Wireless Client List This screen shows computers and other devices on the wireless network. The list can be sorted by Client Name, Interface, IP Address, MAC Address, and Status. Select Save to MAC Address Filter List for any device you want to add to the MAC Address Filter List. Then - Cisco E4200 | User Guide - Page 24
using a URL or Internet IP address to access the local server. Select this option to enable the filter. This option is disabled by default. Filter IDENT (Port 113) This filter keeps port 113 from being scanned by devices from the Internet. This option is enabled by default. Web Filters Proxy This - Cisco E4200 | User Guide - Page 25
the changes. NOTE: If you have already set up Parental Controls and now want to use Internet Access Policy, then you will be asked to enter the password for Parental Controls before you can click Save Settings. Website Blocking by URL Address 8. You can filter access to various services accessed - Cisco E4200 | User Guide - Page 26
Linksys E4200 Storage > Disk The router's USB port lets you connect USB storage that can be accessed over your network. Chapter 2: Advanced Configuration When you connect a USB storage device to the router's USB port, you can access its content without a password via Windows Explorer or the Mac - Cisco E4200 | User Guide - Page 27
Linksys E4200 Edit To change the access settings of a shared folder, click this option. Go to "Edit a Shared Folder" on page 25. Delete To delete a shared folder, click this option. Shared Folders Summary For each folder, the Display Name, Partition, Shared Folder location, and Groups with Access - Cisco E4200 | User Guide - Page 28
Access NOTE: By default, no password is needed for read-and-write access to the disk. If you want to specify which groups can access the shared folder, select Disabled for the Anonymous Disk Access option. Go to "Storage > Administration" on page 29. 5. Click Save Settings to apply your changes - Cisco E4200 | User Guide - Page 29
various Storage screens are available when a USB storage device is connected to the USB port of the router. The Media Server feature allows you to share stored content with other computers and devices on your home network and on the Internet. If you have UPnP AV (Audio and Video)-enabled or Digital - Cisco E4200 | User Guide - Page 30
used the setup software for installation, then the FTP Server Name is the name of your wireless network (up to 15 characters). FTP Server Select Enabled to use the router as an FTP server. Otherwise, select Disabled. An external USB hard drive or USB disk must be connected to the USB port to use - Cisco E4200 | User Guide - Page 31
Group Account" on page 31.) FTP Folder > Share Entire Partition Maximum Performance Wireless-N Router FTP Folder > Groups with Access NOTE: By default, the disk can be accessed without a password. If you want to specify which groups can access the FTP folder, select Disabled for the Anonymous Disk - Cisco E4200 | User Guide - Page 32
name of the FTP server is displayed. The default is Cisco followed by the last 5 digits of the router's serial number, which is found on the bottom of the router. If you used the setup software for installation, then the FTP Server Name is the name of your wireless network (up to 15 characters - Cisco E4200 | User Guide - Page 33
local network. The router's default is workgroup. Server LAN IP Address The local IP address of the router's media and FTP server is displayed. Server Internet IP Address The Internet IP address of the router's FTP server is displayed. Anonymous Access Administration > Anonymous Access Anonymous - Cisco E4200 | User Guide - Page 34
Save Settings to save the policy's settings, or click Cancel Changes to clear the changes. NOTE: If you have already set up Parental Controls and now want to use Internet Access Policy, then you will be asked to enter the password for Parental Controls before you can click Save Settings. Maximum - Cisco E4200 | User Guide - Page 35
Linksys E4200 Access Restrictions > Parental Controls + Internet Access Policy To manage Internet access, you have two methods available, Parental Controls and Internet Access Policy. Only one method can be used at a time. As part of Cisco Connect, Parental Controls can restrict Internet access for - Cisco E4200 | User Guide - Page 36
Changes to clear your changes. To exit this screen and return to the Internet Access Policy screen, click Close. Summary Status Policies are disabled by default. To activate a policy, select the policy number from the drop-down menu, and select Enabled. Maximum Performance Wireless-N Router - Cisco E4200 | User Guide - Page 37
Linksys E4200 To create or change a policy, follow steps 1-10. Repeat these steps to create additional policies, one at a time. 1. Select a number from the Access Blocking Policy drop‑down menu. Select Policy Number 2. Enter a Policy Name. Enter Policy Name 3. To activate this policy, select - Cisco E4200 | User Guide - Page 38
Linksys E4200 10. Click Save Settings to save the policy's settings, or click Cancel Changes to clear the changes. NOTE: If you have already set up Parental Controls and now want to use Internet Access Policy, then you will be asked to enter the password for Parental Controls before you can click - Cisco E4200 | User Guide - Page 39
to customize port services for various applications. When users send these types of requests to your network via the Internet, the router will forward those requests to the appropriate computers (also called servers). Before using forwarding, you should assign static IP addresses to the designated - Cisco E4200 | User Guide - Page 40
of IP address and port mapping rules. Chapter 2: Advanced Configuration Applications and Gaming > DMZ The DMZ (DeMilitarized Zone) feature allows one network device to be exposed to the Internet for use of a special-purpose service, such as online gaming or videoconferencing. The router forwards - Cisco E4200 | User Guide - Page 41
an upstream speed of 2300 Kbps, it will set the maximum at 2048 Kbps (512 Kbps x 4). Upstream Bandwidth This option sets the maximum outgoing bandwidth of your Internet connection. To allow the router to detect the maximum, keep the default, Auto. To specify the maximum, select Manual. Then enter - Cisco E4200 | User Guide - Page 42
Linksys E4200 Applications Applications Select the appropriate application. If you select Add a New Application, follow the instructions in the Add a New Application section. Priority Select the appropriate priority level: High, Medium (Recommended), Normal, or Low. Click Apply to save your - Cisco E4200 | User Guide - Page 43
Linksys E4200 Voice Device QoS > Voice Device Enter a Name Enter a name for your voice device. MAC Address Enter the MAC address of your voice device. Priority Select the appropriate priority level: High (Recommended), Medium, Normal, or Low. Click Apply to save your changes. Your new entry will - Cisco E4200 | User Guide - Page 44
upgrade the router's firmware over the Internet, select Enabled. (You must have the Remote Management option enabled as well.) Allowed Remote IP Address If you want to be able to access the router from any external IP address, select Any IP Address. To specify an external IP address or range of IP - Cisco E4200 | User Guide - Page 45
you want to be able to make manual changes to the router while using the UPnP feature, keep the default, Enabled. Allow Users to Disable Internet Access To prevent local network users from disabling your Internet connection through the UPnP feature, keep the default, Disabled. Back Up and Restore - Cisco E4200 | User Guide - Page 46
Linksys E4200 Administration > Diagnostics The diagnostic tests (Ping and Traceroute) allow you to check the connections of your network devices, including connection to the Internet. Chapter 2: Advanced Configuration Administration > Diagnostics Diagnostics Ping Test Ping checks whether the IP or - Cisco E4200 | User Guide - Page 47
firmware, download the router's firmware upgrade file from the website, www.linksys.com/support. Please select a file to upgrade Click Browse and select the firmware upgrade file. Start Upgrade After you have selected the appropriate file, click this option, and follow the on-screen instructions - Cisco E4200 | User Guide - Page 48
MAC Address The router's MAC address, as seen from the Internet, is displayed. Device Name The Device Name is the NetBIOS name of the router. The default is Cisco followed by the last 5 digits of the router's serial number, which is found on the bottom of the router. If you used the setup software - Cisco E4200 | User Guide - Page 49
router's port lights and displays information about the router's port speeds. Status > Wireless Network 5 GHz Wireless Network or 2.4 GHz Wireless Network MAC Address The MAC address of the router's wireless interface is displayed. Mode The wireless mode used by the network is displayed. Network - Cisco E4200 | User Guide - Page 50
, use a computer or device with Internet access to refer to the support section on the web, www.linksys.com/support •• Make sure that your DSL or cable modem is connected to your router's Internet port using an Ethernet cable. •• Reset all of the devices on your network: 1. Power off all of your - Cisco E4200 | User Guide - Page 51
the browser‑based utility's login password. To see this password: 1. Open Cisco Connect. 2. On the main menu, click Router settings. 3. The Password is displayed on the left side of the screen. The router does not recognize your USB storage device. Make sure the USB storage device uses the NTFS - Cisco E4200 | User Guide - Page 52
Linksys E4200 Appendix B: How to Connect and Access USB Storage Appendix B: How to Connect and Access USB Storage Overview The router's USB port lets you connect USB storage that can be accessed over your network. This appendix covers the following: •• Connect and remove the USB storage device •• - Cisco E4200 | User Guide - Page 53
, enter the default IP address of the router: \\192.168.1.1 Enter Local IP Address of Router NOTE: Another option is to use the Device Name (Disk) of the router. In the Address field, enter: \\Cisco followed by the last five digits of the router's serial number. If you used the setup software for - Cisco E4200 | User Guide - Page 54
, enter the default IP address of the router: \\192.168.1.1 Enter Local IP Address of Router NOTE: Another option is to use the Device Name (Disk) of the router. In the Address field, enter: \\Cisco followed by the last five digits of the router's serial number. If you used the setup software for - Cisco E4200 | User Guide - Page 55
Cisco followed by the last five digits of the router's serial number. If you used the setup software for installation, then enter the name of your wireless network (up to 15 characters) in the Address field. 3. Double-click the shared folder. Double-Click Mapped Drive Windows Vista Access the USB - Cisco E4200 | User Guide - Page 56
Linksys E4200 Appendix B: How to Connect and Access USB Storage 3. Right-click the folder you want to map, and click Map Network Drive. Access the Mapped Drive 1. On your desktop, double-click the Computer icon. Map Network Drive 4. From the Drive drop-down menu, select an available drive - Cisco E4200 | User Guide - Page 57
Linksys E4200 Appendix B: How to Connect and Access USB Storage 2. In the Address field, enter the default IP address of the router: \\192.168.1.1 2. In the Address field, enter the default IP address of the router: \\192.168.1.1 Enter Local IP Address of Router NOTE: Another option is to use - Cisco E4200 | User Guide - Page 58
drive to access it. Select Go > Network 2. Double-click the server name. NOTE: If you used the setup software for installation, then the server name is the name of your wireless network (up to 15 characters). If not, the server name is Cisco followed by the last five digits of the router's serial - Cisco E4200 | User Guide - Page 59
Linksys E4200 Appendix B: How to Connect and Access USB Storage 3. By default, the window displays Connected as: Guest. Double-click the shared folder. Display the Shared Folder on the Desktop 1. Go to Finder > Preferences. Go to Finder > Preferences 2. Select Connected servers. Double-Click - Cisco E4200 | User Guide - Page 60
Linksys E4200 Appendix B: How to Connect and Access USB Storage Add to Startup Login Items 1. Go to the Apple menu and select System Preferences. 4. Drag the shared folder to the Login Items window. Go to Apple > System Preferences 2. Click Accounts. Drag Shared Folder 5. The folder appears - Cisco E4200 | User Guide - Page 61
and enter the router's default IP address, 192.168.1.1, in the Address field. Then press Enter. A login screen appears. (A similar screen appears for non‑Windows 7 users.) 1. In the User name field, enter admin. 2. In the Password field, enter the password created by the setup software. If you did - Cisco E4200 | User Guide - Page 62
Linksys E4200 Appendix B: How to Connect and Access USB Storage 6. To specify a folder to share, click Select. To display subfolders, click Enter into Folder. To return to the previous folder, click Return to Upper Folder. Manage Group and User Access to Shared Folders By default, no password is - Cisco E4200 | User Guide - Page 63
Linksys E4200 Appendix B: How to Connect and Access USB Storage Create a Group Account 1. In the Group Management section on the Storage > Administration screen, click Create New Group. 2. The User Account screen appears. In the Name field, enter a name for the user. Administration > Group - Cisco E4200 | User Guide - Page 64
Frequency 2.4 and 5 GHz Switch Port Speed 10/100/1000 Mbps (Gigabit Ethernet) Ports Power, USB, Internet, Ethernet (1-4) Buttons Reset, Wi-Fi Protected Setup LEDs Top Panel: Power Back Panel: Internet, Ethernet (1-4) Number of Antennas 6 Total, 3 Internal Antennas per Each 2.4 GHz and 5 GHz - Cisco E4200 | User Guide - Page 65
www.linksys.com/support Cisco, the Cisco Logo, and Linksys are trademarks or registered trademarks of Cisco and/or its affiliates in the U.S. and other countries. A listing of Cisco's trademarks can be found at www.cisco.com/go/trademarks. Third‑party trademarks mentioned are the property of their
-
 1
1 -
 2
2 -
 3
3 -
 4
4 -
 5
5 -
 6
6 -
 7
7 -
8
-
9
-
10
-
11
-
12
-
13
-
14
-
15
-
16
-
17
-
18
-
19
-
20
-
21
-
22
-
23
-
24
-
25
-
26
-
27
-
28
-
29
-
30
-
31
-
32
-
33
-
34
-
35
-
36
-
37
-
38
-
39
-
40
-
41
-
42
-
43
-
44
-
45
-
46
-
47
-
48
-
49
-
50
-
51
-
52
-
53
-
54
-
55
-
56
-
57
-
58
-
59
-
60
-
61
-
62
-
63
-
64
-
65
 |
 |
Linksys E4200
Maximum Performance Wireless-N Router
User Guide