Cisco E4200V2 User Manual - Page 16
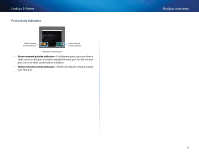
Port activity indicators, Wi-Fi Protected Setup™ button - disk setup
 |
View all Cisco E4200V2 manuals
Add to My Manuals
Save this manual to your list of manuals |
Page 16 highlights
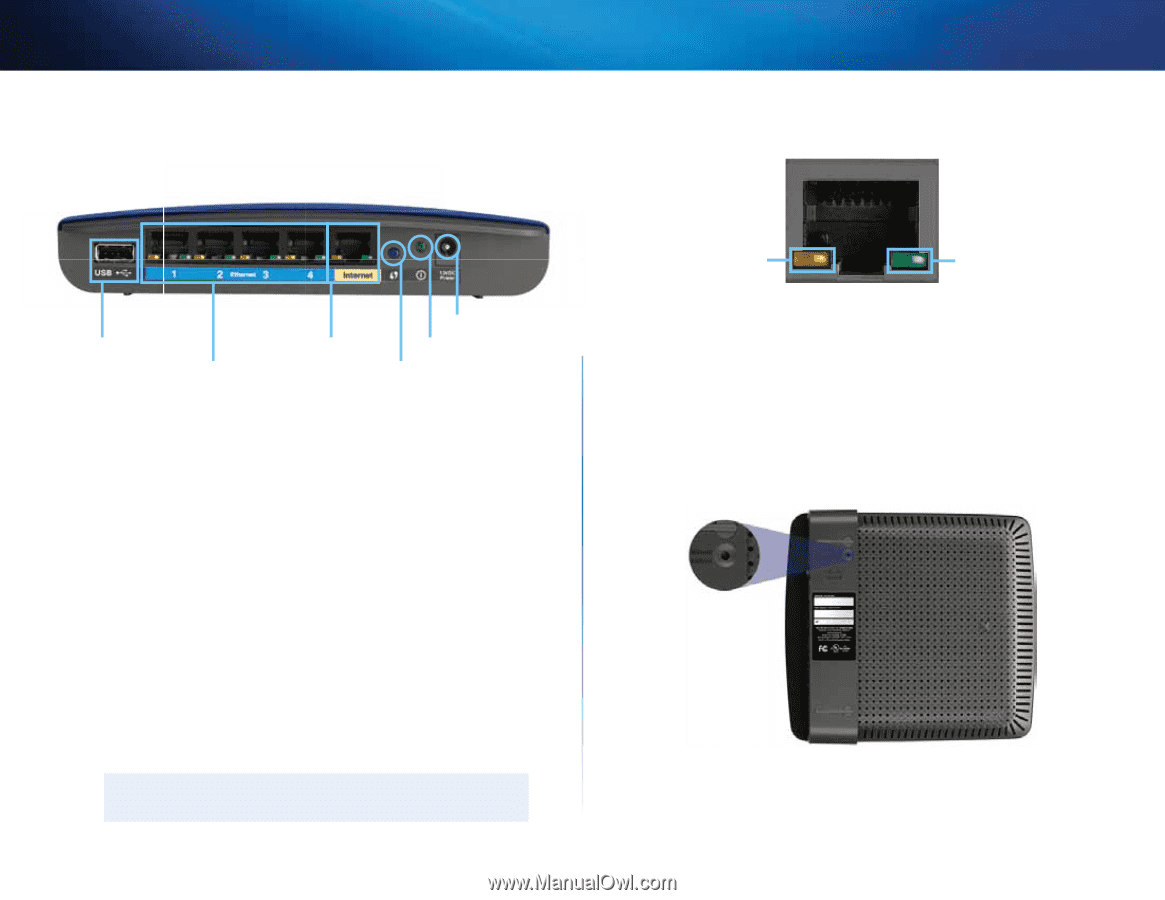
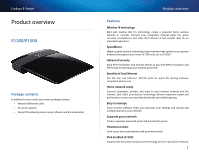
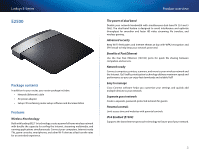
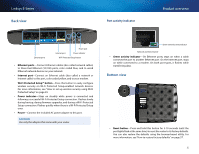
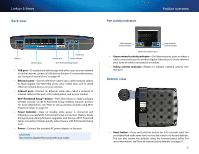
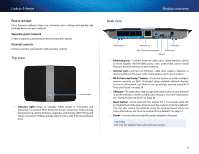
Linksys E-Series Back view Port activity indicators Product overview USB port Ethernet ports Internet port Power port Power indicator Wi-Fi Protected Setup button •• USB port-To easily share disk storage with other users on your network or on the Internet, connect a USB drive to this port. For more information, see "Using an External Drive" on page 44. •• Ethernet ports-Connect Ethernet cables (also called network cables) to these Gigabit (10/100/1000) ports, color coded blue, and to wired Ethernet network devices on your network. •• Internet port-Connect an Ethernet cable (also called a network or Internet cable) to this port, color coded yellow, and to your modem. Wi-Fi Protected Setup™ button-Press this button to easily configure wireless security on Wi-Fi Protected Setup-enabled network devices. For more information, see "How to set up wireless security using Wi‑Fi Protected Setup" on page 39. •• Power indicator-Stays on steadily while power is connected and following a successful Wi-Fi Protected Setup connection. Flashes slowly during bootup, during firmware upgrades, and during a Wi‑Fi Protected Setup connection. Flashes quickly when there is a Wi‑Fi Protected Setup error. •• Power-Connect the included AC power adapter to this port. Caution Use only the adapter that came with your router. Yellow network activity indicator Green network activity indicator Network or Internet port •• Green network activity indicator-On Ethernet ports, turns on when a cable connects the port to another Gigabit Ethernet port. On the Internet port, turns on while connected to a modem. •• Yellow activity indicator-Flashes to indicate network activity over that port. Bottom view •• Reset button-Press and hold this button for 5-10 seconds (until the port lights flash at the same time) to reset the router to its factory defaults. You can also restore the defaults using the browser-based utility. For more information, see "How to restore factory defaults" on page 57. 6
-
 1
1 -
2
-
3
-
4
-
5
-
6
-
7
-
8
-
9
-
10
-
 11
11 -
 12
12 -
 13
13 -
 14
14 -
 15
15 -
 16
16 -
 17
17 -
 18
18 -
 19
19 -
 20
20 -
 21
21 -
22
-
23
-
24
-
25
-
26
-
27
-
28
-
29
-
30
-
31
-
32
-
33
-
34
-
35
-
36
-
37
-
38
-
39
-
40
-
41
-
42
-
43
-
44
-
45
-
46
-
47
-
48
-
49
-
50
-
51
-
52
-
53
-
54
-
55
-
56
-
57
-
58
-
59
-
60
-
61
-
62
-
63
-
64
-
65
-
66
-
67
-
68
-
69
-
70
-
71
-
72
-
73
-
74
-
75
-
76
-
77
-
78
-
79
-
80
-
81
-
82
-
83
 |
 |