Cisco E4200V2 User Manual - Page 18
Top view, Back view, Easy to manage, Separate guest network, Parental controls - default password
 |
View all Cisco E4200V2 manuals
Add to My Manuals
Save this manual to your list of manuals |
Page 18 highlights
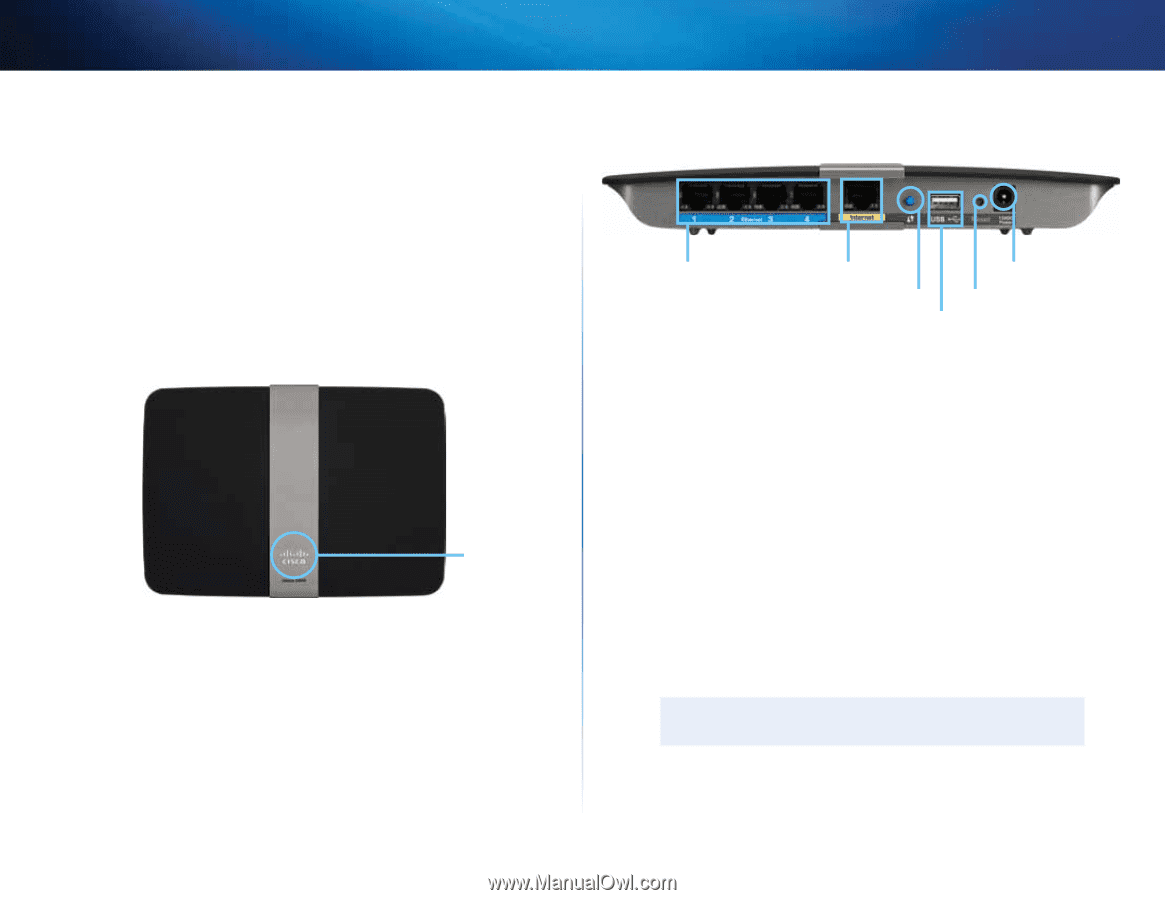
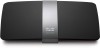
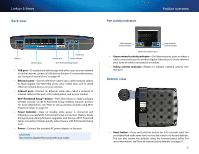
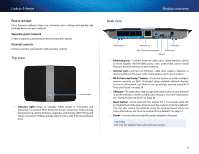
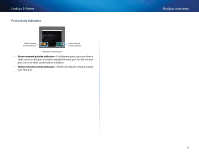
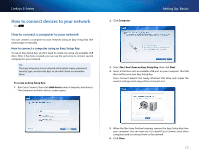
Linksys E-Series Easy to manage Cisco Connect software helps you customize your settings and quickly add multiple devices to your network: Separate guest network Create a separate, password-protected network for guests. Parental controls Limit access time and websites with parental controls. Top view Indicator light •• Indicator light-Stays on steadily while power is connected and following a successful Wi-Fi Protected Setup connection. Pulses slowly during bootup, during firmware upgrades, and during a Wi‑Fi Protected Setup connection. Flashes quickly when there is a Wi‑Fi Protected Setup error. Back view Product overview Ethernet ports Internet port Power port Wi-Fi Protected Setup button Reset button USB port •• Ethernet ports-Connect Ethernet cables (also called network cables) to these Gigabit (10/100/1000) ports, color coded blue, and to wired Ethernet network devices on your network. •• Internet port-Connect an Ethernet cable (also called a network or Internet cable) to this port, color coded yellow, and to your modem. •• Wi-Fi Protected Setup™ button-Press this button to easily configure wireless security on Wi-Fi Protected Setup-enabled network devices. For more information, see "How to set up wireless security using Wi‑Fi Protected Setup" on page 39. •• USB port-To easily share disk storage with other users on your network or on the Internet, connect a USB drive to this port. For more information, see "Using an External Drive" on page 44. •• Reset button-Press and hold this button for 5-10 seconds (until the port lights flash at the same time) to reset the router to its factory defaults. You can also restore the defaults using the browser-based utility. For more information, see "How to restore factory defaults" on page 57. •• Power-Connect the included AC power adapter to this port. Caution Use only the adapter that came with your router. 8
-
 1
1 -
2
-
3
-
4
-
5
-
6
-
7
-
8
-
9
-
10
-
11
-
12
-
 13
13 -
 14
14 -
 15
15 -
 16
16 -
 17
17 -
 18
18 -
 19
19 -
 20
20 -
 21
21 -
 22
22 -
 23
23 -
24
-
25
-
26
-
27
-
28
-
29
-
30
-
31
-
32
-
33
-
34
-
35
-
36
-
37
-
38
-
39
-
40
-
41
-
42
-
43
-
44
-
45
-
46
-
47
-
48
-
49
-
50
-
51
-
52
-
53
-
54
-
55
-
56
-
57
-
58
-
59
-
60
-
61
-
62
-
63
-
64
-
65
-
66
-
67
-
68
-
69
-
70
-
71
-
72
-
73
-
74
-
75
-
76
-
77
-
78
-
79
-
80
-
81
-
82
-
83
 |
 |