Cisco EA4500 User Manual - Page 41
How to set up wireless security using Wi‑Fi Protected Setup, Wi-Fi Protected Setup activity light - printer
 |
View all Cisco EA4500 manuals
Add to My Manuals
Save this manual to your list of manuals |
Page 41 highlights
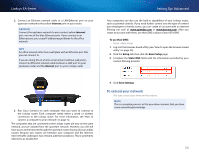
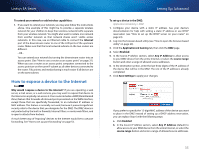
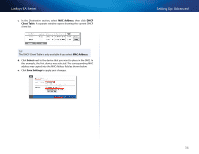
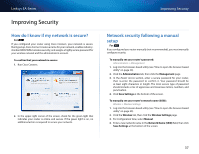
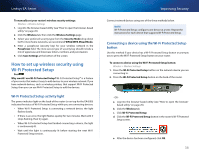
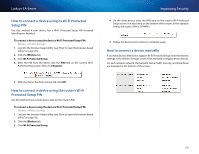
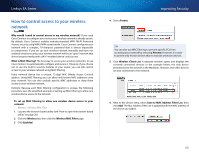
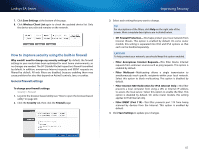
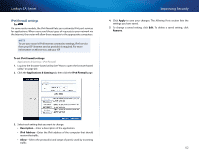
Linksys EA-Series To manually set your router's wireless security settings: Wireless > Wireless Settings 1. Log into the browser-based utility (see "How to open the browser-based utility" on page 20). 2. Click the Wireless tab, then click the Wireless Settings page. 3. Select your preferred security type from the Security Mode drop-down list For most home networks, we recommend WPA2/WPA Mixed Mode. 4. Enter a passphrase (security key) for your wireless network in the Passphrase field. The most secure type of security key should include a mix of uppercase and lowercase letters, numbers, and punctuation. 5. Click Save Settings at the bottom of the screen. How to set up wireless security using Wi‑Fi Protected Setup For ALL Why would I use Wi-Fi Protected Setup? Wi-Fi Protected Setup™ is a feature of your router that makes it easy to add devices to your wireless network. If you have network devices, such as wireless printers, that support Wi-Fi Protected Setup, then you can use Wi-Fi Protected Setup to add the devices. Wi-Fi Protected Setup activity light The power indicator light on the back of the router (or on top for the EA4500) indicates the status of Wi-Fi Protected Setup while you are connecting devices. •• When Wi-Fi Protected Setup is connecting a network device, the light flashes slowly. •• If there is an error, the light flashes quickly for two minutes. Wait until it stops flashing, then try again. •• When Wi-Fi Protected Setup has finished connecting a device, the light is continuously lit . •• Wait until the light is continuously lit before starting the next Wi-Fi Protected Setup session. Improving Security Connect network devices using one of the three methods below. Note Wi-Fi Protected Setup configures one device at a time. Repeat the instructions for each device that supports Wi-Fi Protected Setup. Connecting a device using the Wi-Fi Protected Setup button Use this method if your device has a Wi-Fi Protected Setup button or prompts you to press the Wi-Fi Protected Setup button on your router. To connect a device using the Wi-Fi Protected Setup button: Wireless > Wireless Settings 1. Press the Wi-Fi Protected Setup button on the network device you are connecting to. 2. Press the Wi-Fi Protected Setup button on the back of the router. - OR a. Log into the browser-based utility (see "How to open the browser- based utility" on page 20). b. Click the Wireless tab. c. Click Wi-Fi Protected Setup. d. Click the Wi-Fi Protected Setup button in the router's Wi-Fi Protected Setup screen. e. After the device has been configured, click OK. 38
-
 1
1 -
2
-
3
-
4
-
5
-
6
-
7
-
8
-
9
-
10
-
11
-
12
-
13
-
14
-
15
-
16
-
17
-
18
-
19
-
20
-
21
-
22
-
23
-
24
-
25
-
26
-
27
-
28
-
29
-
30
-
31
-
32
-
33
-
34
-
35
-
 36
36 -
 37
37 -
 38
38 -
 39
39 -
 40
40 -
 41
41 -
 42
42 -
 43
43 -
 44
44 -
 45
45 -
 46
46 -
47
-
48
-
49
-
50
-
51
-
52
-
53
-
54
-
55
-
56
-
57
-
58
-
59
-
60
-
61
-
62
-
63
-
64
-
65
-
66
-
67
-
68
-
69
-
70
-
71
 |
 |