Cisco ESR10008 Hardware Installation Guide
Cisco ESR10008 - 10000 Modular Expansion Base Manual
 |
UPC - 746320761510
View all Cisco ESR10008 manuals
Add to My Manuals
Save this manual to your list of manuals |
Cisco ESR10008 manual content summary:
- Cisco ESR10008 | Hardware Installation Guide - Page 1
Cisco 10008 Router Hardware Installation Guide June 2006 Americas Headquarters Cisco Systems, Inc. 170 West Tasman Drive San Jose, CA 95134-1706 USA http://www.cisco.com Tel: 408 526-4000 800 553-NETS (6387) Fax: 408 527-0883 Text Part Number: OL-0659-13 - Cisco ESR10008 | Hardware Installation Guide - Page 2
, iQuick Study, LightStream, Linksys, MeetingPlace, MGX, Networking Academy, Network Registrar, Packet, PIX, ProConnect, RateMUX, ScriptShare, SlideCast, SMARTnet, StackWise, The Fastest Way to Increase Your Internet Quotient, and TransPath are registered trademarks of Cisco Systems, Inc. and/or its - Cisco ESR10008 | Hardware Installation Guide - Page 3
of Service Request Severity xiii Obtaining Additional Publications and Information xiv Cisco 10008 Router Overview 1-1 Cisco 10008 Router Features 1-2 Cisco 10008 Router Software 1-3 Minimum Software Releases for the Cisco 10008 Router 1-3 Cisco 10008 Router Hardware Description 1-3 Blower Module - Cisco ESR10008 | Hardware Installation Guide - Page 4
the Cisco 10008 Router 3-1 Installation Methods 3-1 Rack-Mounting the Chassis 3-2 General Rack Installation Guidelines 3-2 Flush-Mounting in a 19-Inch Rack 3-3 Center-Mounting in a 19-Inch Rack 3-5 Center-Mounting in a 23-Inch Rack 3-7 Cisco 10008 Router Hardware Installation Guide iv OL - Cisco ESR10008 | Hardware Installation Guide - Page 5
Cable 3-14 Connecting DC Power to the Cisco 10008 Router 3-17 Recommended Tools and Supplies 3-18 Connecting AC Power to the Cisco 10008 Router 3-22 Connecting Alarm Indicators 3-26 Connecting a Video Terminal to the PRE Console Port 3-30 Connecting Network Management and Signal System Cables 3-32 - Cisco ESR10008 | Hardware Installation Guide - Page 6
Contents 5 C H A P T E R A A P P E N D I X B A P P E N D I X GLOSSARY INDEX Troubleshooting the Console Port Serial Connection 4-14 Maintaining the Cisco 10008 Router 5-1 Required Maintenance Tools 5-3 Shutting Down the System 5-3 Backing Up the PCMCIA Card 5-3 Removing and Replacing Field- - Cisco ESR10008 | Hardware Installation Guide - Page 7
This preface describes the audience, purpose, organization, and conventions used in the Cisco 10008 Router Hardware Installation Guide. There is also a list of related documents and instructions for obtaining technical assistance and additional information. Document Version History This is the - Cisco ESR10008 | Hardware Installation Guide - Page 8
before the installation. • Chapter 3, "Installing the Cisco 10008 Router," provides information for installing the router hardware, connecting system cables, and verifying system operation. • Chapter 4, "Starting and Configuring the Router," provides information for starting and configuring the - Cisco ESR10008 | Hardware Installation Guide - Page 9
, such as passwords, are in angle brackets < >. • Default responses to system prompts are in square brackets [ ]. • Exclamation points (!) at the beginning of the Cisco 10000 Series Routers for a listing of translated safety warnings. OL-0659-13 Cisco 10008 Router Hardware Installation Guide ix - Cisco ESR10008 | Hardware Installation Guide - Page 10
advarslene som finnes i denne publikasjonen, kan du se i dokumentet Regulatory Compliance and Safety Information (Overholdelse av forskrifter og sikkerhetsinformasjon) som ble levert med denne enheten. Cisco 10008 Router Hardware Installation Guide x OL-0659-13 - Cisco ESR10008 | Hardware Installation Guide - Page 11
at this URL: http://www.cisco.com/univercd/home/home.htm You can access the Cisco website at this URL: http://www.cisco.com You can access international Cisco websites at this URL: http://www.cisco.com/public/countries_languages.shtml OL-0659-13 Cisco 10008 Router Hardware Installation Guide xi - Cisco ESR10008 | Hardware Installation Guide - Page 12
tools on the Cisco Technical Support Website requires a Cisco.com user ID and password. If you have a valid service contract but do not have a user ID or password, you can register at this URL: http://tools.cisco.com/RPF/register/register.do Cisco 10008 Router Hardware Installation Guide xii OL - Cisco ESR10008 | Hardware Installation Guide - Page 13
business hours to restore service to satisfactory levels. Severity 4 (S4)-You require information or assistance with Cisco product capabilities, installation, or configuration. There is little or no effect on your business operations. OL-0659-13 Cisco 10008 Router Hardware Installation Guide xiii - Cisco ESR10008 | Hardware Installation Guide - Page 14
, reference guides, and logo merchandise. Visit Cisco Marketplace, the company store, at this URL: http://www.cisco.com/go/marketplace/ • The Cisco Product Catalog describes the networking products offered by Cisco Systems, as well as ordering and customer support services. Access the Cisco Product - Cisco ESR10008 | Hardware Installation Guide - Page 15
Optical Network (SONET) interfaces which can be configured for redundancy using SONET 1+1 Automatic Protection Switching (APS) • All line cards, Power Entry Modules (PEMs), and blowers can be hot-swapped without powering down the chassis OL-0659-13 Cisco 10008 Router Hardware Installation Guide - Cisco ESR10008 | Hardware Installation Guide - Page 16
• Multiple fans in blower module provide redundancy to support single failure, and blower replacement will not interrupt service (within certain time limits) • Brackets for cable management • Alarm relays; minor, major, and critical Cisco 10008 Router Hardware Installation Guide 1-2 OL-0659-13 - Cisco ESR10008 | Hardware Installation Guide - Page 17
Description The Cisco 10008 router is Network Equipment Building Standards (NEBS) Level 3 compliant. This includes: • Front-to-back airflow • 12-inch depth Less than 22 inches in height (you can configure up to three Cisco 10008 routers per 7-foot rack). The chassis supports redundant AC or DC - Cisco ESR10008 | Hardware Installation Guide - Page 18
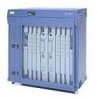
6XCT3-DS0 PERFORMANCE ROUTING ENGINE P/N ESR-PRE3 PERFORMANCE ROUTING ENGINE P/N ESR-PRE3 6XCT3-DS0 6XCT3-DS0 POWER Blower module 2 Primary PEM 3 Redundant PEM 4 Line cards slots 1 to 4 5 PRE - slot 0A 6 PRE slot 0B 7 Line cards slots 5 to 8 Cisco 10008 Router Hardware Installation Guide - Cisco ESR10008 | Hardware Installation Guide - Page 19
5 RX RX 8 Tx 6 Tx 6 RX RX Tx 7 RX Tx 7 RX 126111 1 Line card slot 8 2 Line cards slot 5 3 Blower module 4 Line card slot 4 5 Line card slot 1 6 Power supply 7 Half-height line card subslot 0 8 Half-height line card subslot 1 OL-0659-13 Cisco 10008 Router Hardware Installation Guide 1-5 - Cisco ESR10008 | Hardware Installation Guide - Page 20
power to the chassis electronics (Figure 1-4). DC PEMs receive input power (-48 VDC from building centralized power source) through terminal block connections located on the rear of the chassis. Table 1-1 describes the LEDs on the DC PEM. Cisco 10008 Router Hardware Installation Guide 1-6 OL-0659 - Cisco ESR10008 | Hardware Installation Guide - Page 21
power (100-240 VAC) to the -48 VDC used internally by the system (Figure 1-5). AC power is delivered to the AC PEM from the VAC connection power cable to the power cord attached to the PEM. Table 1-2 describes the LEDs on the AC PEM. OL-0659-13 Cisco 10008 Router Hardware Installation Guide 1-7 - Cisco ESR10008 | Hardware Installation Guide - Page 22
Figure 1-5 AC PEM Chapter 1 Cisco 10008 Router Overview 30004 POWER FAULT Table 1-2 AC PEM LEDs LED Power (green) Fault (yellow) Description PEM is powered on and is operational. The PEM is not operating correctly (see the Cisco 10000 Series ESR Troubleshooting Guide). Line Card - Cisco ESR10008 | Hardware Installation Guide - Page 23
used to connect a modem to the PRE for remote administrative access. • Ethernet port (ETH)-This Ethernet port is used to connect the PRE to a 10/100BASE-T network management LAN. ALARMS ACO CMRAIJTIOCRAL MINOR FSATIALTUS 87430 76995 OL-0659-13 Cisco 10008 Router Hardware Installation Guide 1-9 - Cisco ESR10008 | Hardware Installation Guide - Page 24
on the Cisco 10008 router let you connect the router to a site alarm maintenance system. This allows critical, major, and minor alarms generated by the Cisco 10008 router to be Pressing this switch disables an audible alarm. 1-10 Cisco 10008 Router Hardware Installation Guide OL-0659-13 - Cisco ESR10008 | Hardware Installation Guide - Page 25
a problem to Cisco, it is helpful to include the message on the PRE's alphanumeric display in your problem report. briefly if the system is configured to boot a Cisco IOS software image. If the system is not configured to boot Cisco IOS, this Cisco 10008 Router Hardware Installation Guide 1-11 - Cisco ESR10008 | Hardware Installation Guide - Page 26
Cisco 10008 Router Hardware Description Chapter 1 Cisco 10008 Router Overview 1-12 Cisco 10008 Router Hardware Installation Guide OL-0659-13 - Cisco ESR10008 | Hardware Installation Guide - Page 27
guides you through the process of preparing for your router installation. Do not unpack the system until you are ready to install it. Keep the chassis plan for the installation of the Cisco 10008 router. It contains the following sections: • Cisco Professional Installation • Site Selection Guidelines - Cisco ESR10008 | Hardware Installation Guide - Page 28
must assess the site's air conditioning capacity, and ensure it can compensate for the heat dissipation of the system. Table 2-2 shows the maximum BTUs dissipated by the Cisco 10008 chassis with an AC PEM and all line cards installed. Cisco 10008 Router Hardware Installation Guide 2-2 OL-0659-13 - Cisco ESR10008 | Hardware Installation Guide - Page 29
to these requirements ensures reliable operation of the system. The following sections specify the electrical service and circuit requirements. Follow these precautions and recommendations when planning power connections to the Cisco 10008 router: • Check the power at your site before installation - Cisco ESR10008 | Hardware Installation Guide - Page 30
and national electrical codes. The following sections contain specific recommendations for AC and DC powered systems. AC Powered Systems The Cisco 10008 router chassis' AC PEM uses a short power cord with a male IEC 320 C20 AC inlet power connector and a strain relief device (canoe). This cord mates - Cisco ESR10008 | Hardware Installation Guide - Page 31
Chapter 2 Preparing for Installation Site Planning DC Powered Systems The DC PEMs for the Cisco 10008 router chassis are not shipped with wiring to connect to the DC source. Both systems have terminal blocks to attach building's input, return, and earthing (ground) wiring. The DC power source must - Cisco ESR10008 | Hardware Installation Guide - Page 32
electronic devices. If you have had problems of this sort in the past support RS-232 asynchronous data, and have distance recommendations specified in the IEEE RS-232 standard. Ethernet Connections The distance you can extend your networks Cisco 10008 Router Hardware Installation Guide 2-6 OL-0659-13 - Cisco ESR10008 | Hardware Installation Guide - Page 33
and AC Power Fault Interference If signal wires exceed recommended cabling distances, or if signal wires pass between buildings, you should consider the effect that a lightning strike in your vicinity might have on the Cisco 10008 router. OL-0659-13 Cisco 10008 Router Hardware Installation Guide - Cisco ESR10008 | Hardware Installation Guide - Page 34
shipped with the Cisco 10008 series router. If the rack that you plan to install the system in has metric- Cisco 10008 chassis. A standard 7-foot-high rack can accommodate three Cisco 10008 chassis mounted from the front. The Cisco 10008 chassis can be flush mounted, with the front of the chassis - Cisco ESR10008 | Hardware Installation Guide - Page 35
page 2-2, and the air temperature is sufficient to compensate for the heat dissipated by the system as specified in Table 2-2 on page 2-3. Avoid locating the Cisco 10008 router in a location in which the chassis air intake vents could draw in the exhaust air from adjacent equipment. Consider how the - Cisco ESR10008 | Hardware Installation Guide - Page 36
out the exhaust vents on the top rear of the chassis, as illustrated in Figure 2-1. Figure 2-1 Cisco 10008 Chassis Airflow 1 2 8 3 7 132843 4 5 6 1 Blower module (fans) 2 Top 3 Front 4 Ambient air intake 5 Bottom 6 Air filter assembly 7 Rear 8 Exhaust air Keep the front and top of the - Cisco ESR10008 | Hardware Installation Guide - Page 37
can compensate for the heat dissipation of the Cisco 10000 series (Heat Dissipation, page 2-2). The floor space that the Cisco 10000 series router occupies can support the weight of the system (Floor Loading Considerations, page 2-3). Electrical service to the site complies with the requirements - Cisco ESR10008 | Hardware Installation Guide - Page 38
not wear loose clothing, jewelry (including rings and chains), or other items that could get caught in the chassis. • The AC-powered Cisco 10008 router ships with a three-wire AC electrical grounding-type plug, which fits into a grounding-type power outlet only. This is a safety feature. Ensure the - Cisco ESR10008 | Hardware Installation Guide - Page 39
Chassis Connection CISCO ESR-PRE3 PERFORMANCE ROUTING ENGINE P/N ESR-PRE3 6XCT3-DS0 6XCT3-DS0 6XCT3-DS0 6XCT3-DS0 POWER FAULT MISWIRE 1 FAIL PROCESSOR ONLY 126144 1 ESD socket Electrical Safety All system network interface. OL-0659-13 Cisco 10008 Router Hardware Installation Guide 2-13 - Cisco ESR10008 | Hardware Installation Guide - Page 40
the metal object to the terminals. Statement 43 Warning Read the installation instructions before you connect the system to its power source. Statement 1004 Receiving the Cisco 10000 Series Router Each Cisco 10000 series router chassis is shipped in a container that is strapped to a pallet as - Cisco ESR10008 | Hardware Installation Guide - Page 41
-Lifting Guidelines After you receive the Cisco 10008 router, we recommend that you have three people available to help with the installation and ensure safe lifting. Chassis-Lifting Guidelines The fully configured system weighs approximately 130 pounds. The chassis is not intended to be moved - Cisco ESR10008 | Hardware Installation Guide - Page 42
Power cables, manuals, and other additional items are packaged in separate boxes. After you have unpacked the system to verify that you have received all of the required components. Using the packing list as a guide, take the following steps to check the contents of the Cisco 10008 router shipping - Cisco ESR10008 | Hardware Installation Guide - Page 43
the Cisco 10008 router on a tabletop or in equipment racks. It also describes how to connect interface and power cables, the proper way to power on the system, and installation troubleshooting procedures. Note The illustrations in this guide depict the original Cisco 10008 chassis. Your chassis may - Cisco ESR10008 | Hardware Installation Guide - Page 44
an adequate chassis ground (earth) connection for your router chassis. In addition to the preceding guidelines, review the precautions for avoiding excessive temperature conditions in the "Site Environmental Requirements" section on page 2-2. Cisco 10008 Router Hardware Installation Guide 3-2 OL - Cisco ESR10008 | Hardware Installation Guide - Page 45
Cisco 10008 Router Rack-Mounting the Chassis Flush-Mounting in a 19-Inch Rack The Cisco 10008 chassis can be flush-mounted in a 19-inch equipment rack using the rack-mounting kit provided with your system SM-IR GIGABIT ETHERNET 30010 OL-0659-13 Cisco 10008 Router Hardware Installation Guide 3-3 - Cisco ESR10008 | Hardware Installation Guide - Page 46
Rack-Mounting the Chassis Chapter 3 Installing the Cisco 10008 Router Step 1 Step 2 Step 3 Step 4 (Optional) Install a shelf in the rack to support the Cisco 10008 chassis. If you use a shelf, you can perform the installation with only two people. (Optional) Remove the blower module and the PEMs - Cisco ESR10008 | Hardware Installation Guide - Page 47
Cisco 10008 Router Rack-Mounting the Chassis Center-Mounting in a 19-Inch Rack The Cisco 10008 chassis can be center-mounted in a 19-inch equipment rack using the rack-mounting kit provided with your system -IR GIGABIT ETHERNET 30012 OL-0659-13 Cisco 10008 Router Hardware Installation Guide 3-5 - Cisco ESR10008 | Hardware Installation Guide - Page 48
bracket consists of two pieces (the cable guide and channel), and is shipped assembled. If you want to use the cable guide only, you can remove the channel by loosening the captive screws before attaching the cable guide to the chassis. Cisco 10008 Router Hardware Installation Guide 3-6 OL-0659-13 - Cisco ESR10008 | Hardware Installation Guide - Page 49
bracket • Mounting screws Warning At least three people are required to mount the chassis in the equipment rack: two people are needed to hold the chassis in place while a third person tightens the mounting screws. Statement 234 OL-0659-13 Cisco 10008 Router Hardware Installation Guide 3-7 - Cisco ESR10008 | Hardware Installation Guide - Page 50
ENGINE PERFORMANCE ROUTING ENGINE 6XCT3-DS0 6XCT3-DS0 CH OC-12-DSO SM-IR GIGABIT ETHERNET 30012 Step 1 Attach the two mounting brackets to the chassis so the flanges are positioned at the center of the chassis (Figure 3-6). Cisco 10008 Router Hardware Installation Guide 3-8 OL-0659-13 - Cisco ESR10008 | Hardware Installation Guide - Page 51
Chapter 3 Installing the Cisco 10008 Router Figure 3-7 Attaching 23-inch Bracket Adapters Rack-Mounting the Chassis POWER FAULT MISWIRE POWER FAULT MISWIRE RX TX 23-inch adapters to the mounting brackets (Figure 3-7). 30014 OL-0659-13 Cisco 10008 Router Hardware Installation Guide 3-9 - Cisco ESR10008 | Hardware Installation Guide - Page 52
Step 3 Step 4 Lift the chassis into position between the rack posts (requires two people). Align the mounting bracket holes with the rack post holes (Figure 3-8) and attach the chassis to the rack (performed by the third person). 3-10 Cisco 10008 Router Hardware Installation Guide OL-0659-13 - Cisco ESR10008 | Hardware Installation Guide - Page 53
The chassis should already be in the area where you will install it. If you have not determined where to install your chassis, see the "Receiving the Cisco 10000 Series Router" section on page 2-14 for information about site considerations. OL-0659-13 Cisco 10008 Router Hardware Installation Guide - Cisco ESR10008 | Hardware Installation Guide - Page 54
the chassis to install and replace FRUs, or to access network cables and equipment. • The Cisco 10008 router needs chassis. • An adequate chassis ground (earth) connection exists for your router chassis (see the "Connecting the Chassis Cisco 10008 Router Hardware Installation Guide OL-0659-13 - Cisco ESR10008 | Hardware Installation Guide - Page 55
Chapter 3 Installing the Cisco 10008 Router Connecting the Chassis to Ground Note The cable management bracket consists of two pieces (the cable guide and channel), and is shipped assembled. If you want to use the cable guide only, you can remove the channel by loosening the captive screws before - Cisco ESR10008 | Hardware Installation Guide - Page 56
to Ground Chapter 3 Installing the Cisco 10008 Router Recommended Tools and Supplies Table 3-1 lists the tools, equipment, and supplies necessary to connect the system ground to the chassis. Table 3-1 Tools and Supplies Quantity 1 1 1 2 Varies 2 Varies Description Comments Number 2 Phillips - Cisco ESR10008 | Hardware Installation Guide - Page 57
the Cisco 10008 Router Figure 3-12 Setting PEM Switches to the Off Position Connecting the Chassis to ENGINE P/N ESR-PRE3 6XCT3-DS0 6XCT3-DS0 POWER FAULT MISWIRE PROCESSOR ONLY OC-12/STM-4 POS SM-IR 30019 Step 1 Step 2 Step 3 Power off the chassis by setting the DC or AC PEM power - Cisco ESR10008 | Hardware Installation Guide - Page 58
Cisco 10008 Router Figure 3-14 Connecting Grounding Lug to Chassis 132825 1 1 Threaded grounding holes (2) Step 4 Attach the grounding lug firmly to threaded holes at the bottom rear of the chassis grounding wire (Figure 3-15). 3-16 Cisco 10008 Router Hardware Installation Guide OL-0659-13 - Cisco ESR10008 | Hardware Installation Guide - Page 59
Power to the Cisco 10008 Router" section on page 3-17. • If you are connecting AC power to the system, go to the "Connecting AC Power to the Cisco 10008 Router" section on page 3-22. Connecting DC Power to the Cisco 10008 Router This section describes how to connect the Cisco 10008 router to a -48 - Cisco ESR10008 | Hardware Installation Guide - Page 60
Cisco 10008 router to the DC power source. cables • Two cables are needed for a single DC power source. • Four cables are needed for two DC power sources. Tie wraps • The end of the cable intended to be connected to the chassis ENGINE P/N ESR-PRE3 PERFORMANCE ROUTING ENGINE P/N ESR-PRE3 6XCT3- - Cisco ESR10008 | Hardware Installation Guide - Page 61
Chapter 3 Installing the Cisco 10008 Router Figure 3-17 Removing the Safety Cover Connecting DC Power to the Cisco 10008 Router 30023 Step 2 Loosen the captive screw on the rear safety cover and tilt the cover back (Figure 3-17). OL-0659-13 Cisco 10008 Router Hardware Installation Guide 3-19 - Cisco ESR10008 | Hardware Installation Guide - Page 62
Connecting DC Power to the Cisco 10008 Router Figure 3-18 Removing the Rear Cover Chapter 3 Installing the Cisco 10008 Router 14747 30023 Step 3 Remove the safety cover by lifting it up and out from the chassis (Figure 3-18). Figure 3-19 Stripping Insulation 10 mm max Step 4 Strip not more - Cisco ESR10008 | Hardware Installation Guide - Page 63
Figure 3-21). If you are connecting visual or audio alarm indicators to your system, go to Step 3 of the "Connecting Alarm Indicators" section on page 3-26. If you are not connecting any alarm indicators, continue with the next step. OL-0659-13 Cisco 10008 Router Hardware Installation Guide 3-21 - Cisco ESR10008 | Hardware Installation Guide - Page 64
from being used with the power strips in equipment racks. Note The AC power cord that connects to the PEM power cord and then to the building VAC is not shipped with the Cisco 10008 router. You must order this power cord separately. 3-22 Cisco 10008 Router Hardware Installation Guide OL-0659-13 - Cisco ESR10008 | Hardware Installation Guide - Page 65
3 Installing the Cisco 10008 Router Connecting AC Power to the Cisco 10008 Router There are five styles of AC-input power supply power cords available (differing in plug type); make sure you have the correct style for your site (see Table 3-3, Figure 3-22, and Figure 3-23.) All AC-input power - Cisco ESR10008 | Hardware Installation Guide - Page 66
Connecting AC Power to the Cisco 10008 Router Chapter 3 Installing the Cisco 10008 Router Table 3-4 AC Power Cord Options Label North American Japanese North American Australian Argentinean European Italian United Kingdom Description Plug (Facility End of Cord) Receptacle (Router End of - Cisco ESR10008 | Hardware Installation Guide - Page 67
following procedure to connect AC power to the PEM: Step 1 Set the AC PEM switch (or switches) to the Off position (Figure 3-24). Step 2 Connect the power cord from the PEM to the power cord that connects to the facility VAC input. OL-0659-13 Cisco 10008 Router Hardware Installation Guide 3-25 - Cisco ESR10008 | Hardware Installation Guide - Page 68
the AC power system, go to the "Connecting Alarm Indicators" section on page 3-26. If you are not connecting any alarm indicators, go to the "Connecting a Video Terminal to the PRE Console Port" section on page 3-30 to continue the installation. Connecting Alarm Indicators The Cisco 10008 router - Cisco ESR10008 | Hardware Installation Guide - Page 69
Removing the Safety Cover Connecting Alarm Indicators 30022 Use the following procedure to connect an alarm indicator to the system: Step 1 Loosen the captive screw on the rear safety cover and tilt the cover back (Figure 3-26). OL-0659-13 Cisco 10008 Router Hardware Installation Guide 3-27 - Cisco ESR10008 | Hardware Installation Guide - Page 70
Cisco 10008 Router 14747 30023 Step 2 Remove the safety cover by lifting it up and out from the chassis (Figure 3-27). Figure 3-28 Stripping Insulation 10 mm max Step 3 Step 4 Strip not more than 0.4 inches (10 mm) of insulation off the ends of the alarm indicator wire (Figure 3-28). Connect - Cisco ESR10008 | Hardware Installation Guide - Page 71
the Cisco 10008 Router Figure 3-29 Alarm Terminal Block Connections Connecting Alarm Indicators ALARMS 50VA SELV max NC COM MINOR NO NC COM MAJOR NO NC COM CRITICAL NO 32694 Step 5 Step 6 Step 7 Repeat steps 3 and 4 for any remaining alarm indicators. Secure the power cabling to the chassis - Cisco ESR10008 | Hardware Installation Guide - Page 72
the following procedure to connect a video terminal to the console port on a PRE module. Note Each PRE must have a console port connection (typically to a terminal server) if you are running a redundant configuration in the chassis. 3-30 Cisco 10008 Router Hardware Installation Guide OL-0659-13 - Cisco ESR10008 | Hardware Installation Guide - Page 73
the cable connection. Power on your video terminal. Configure your video terminal to match the following default console port settings: • 9600 baud • 8 data bits • No parity generation or checking • 1 stop bit • No flow control OL-0659-13 Cisco 10008 Router Hardware Installation Guide 3-31 - Cisco ESR10008 | Hardware Installation Guide - Page 74
and Signal System Cables Chapter 3 Installing the Cisco 10008 Router Step 6 Go to the "Connecting Network Management and Signal System Cables" section on page 3-32 to continue the installation. Connecting Network Management and Signal System Cables The Cisco 10008 router has connections to both - Cisco ESR10008 | Hardware Installation Guide - Page 75
Cisco 10008 Router Connecting Network Management and Signal System Cables Figure 3-33 Connecting 10BASE-T to Ethernet Port CISCO 10000 CONSOLE AUX LINK ELITNHKERNET SSLLOOTT01 30036 Step 1 Step 2 Step 3 Connect at the back. OL-0659-13 Cisco 10008 Router Hardware Installation Guide 3-33 - Cisco ESR10008 | Hardware Installation Guide - Page 76
Connecting Network Management and Signal System Cables Chapter 3 Installing the Cisco 10008 Router • The wire connected to the left-most pin (pin 1) on one connector should be the same color as the wire connected to the left-most pin on the other connector. • The same rule applies to pins 2 - Cisco ESR10008 | Hardware Installation Guide - Page 77
3 Installing the Cisco 10008 Router Connecting Network Management and Signal System Cables Auxiliary Modem Connection This asynchronous EIA/TIA-232 serial port is used to connect a modem to the PRE for remote administrative access. Use the following procedure to connect the Cisco 10008 router to - Cisco ESR10008 | Hardware Installation Guide - Page 78
Connecting Network Management and Signal System Cables Chapter 3 Installing the Cisco 10008 Router 3-36 Cisco 10008 Router Hardware Installation Guide OL-0659-13 - Cisco ESR10008 | Hardware Installation Guide - Page 79
All network interface cables are connected to the line cards. • The console terminal is turned on. • A PCMCIA flash memory card installed in the PRE. You are now ready to power on the system for the first time using the following procedure: OL-0659-13 Cisco 10008 Router Hardware Installation Guide - Cisco ESR10008 | Hardware Installation Guide - Page 80
fans in the blower are operating properly. If any Fan Failure LEDs light (yellow), see the "Troubleshooting Installation Problems" section on page 4-12. c. When the system boot is complete, the PRE begins to initialize the line cards. Go to the "Configuring the Cisco 10008 Router at Startup" section - Cisco ESR10008 | Hardware Installation Guide - Page 81
the Cisco 10008 router. The setup facility uses a question and answer sequence called the System Configuration Dialog to walk you through configuring the router. You do not have to configure the interfaces immediately; however, you cannot enable the interfaces or connect them to any networks until - Cisco ESR10008 | Hardware Installation Guide - Page 82
At the configure system management prompt, enter No. Configure System Management? [yes/no]: no If you want to access the router using SNMP, enter Yes at the prompt: Configure SNMP Network Management? [yes]: yes Specify an SNMP community string. Cisco 10008 Router Hardware Installation Guide 4-4 OL - Cisco ESR10008 | Hardware Installation Guide - Page 83
-TX (RJ-45) connector? [yes]: yes Step 12 Configure both the Cisco 10008 router and the remote device to use the same mode. Operate in full-duplex mode? [no]: no Step 13 You must enter the IP address to achieve network connectivity. Configure IP on this interface? [yes]: yes Step 14 Specify the - Cisco ESR10008 | Hardware Installation Guide - Page 84
(config-if)#ip address 3.5.3.45 255.255.0.0 Router#copy running-config startup-config You can now configure the line cards. For specific information on system and interface configuration, see the Cisco 10000 Series Router Line Card Configuration Guide. Formatting Flash Memory Cards and Disks The - Cisco ESR10008 | Hardware Installation Guide - Page 85
page 4-8 File Systems The Cisco 10008 series router includes the file systems described in Table 4-1. Table 4-1 Cisco 10008 Series Router Principal File Systems File System CLI Name slot0: or slot1: refers to Flash memory cards. OL-0659-13 Cisco 10008 Router Hardware Installation Guide 4-7 - Cisco ESR10008 | Hardware Installation Guide - Page 86
minutes while the system is merging service compress-config command. Note If you try to load a configuration that is more than three times larger than the NVRAM size, the following error message appears: [buffer overflow-file-size/buffer-size bytes]. Cisco 10008 Router Hardware Installation Guide - Cisco ESR10008 | Hardware Installation Guide - Page 87
, the system boots to the ROM monitor prompt, where a technician can load a specific image by entering the boot command at the rommon prompt. (For more information, see the Cisco IOS Configuration Fundamentals Configuration Guide.) OL-0659-13 Cisco 10008 Router Hardware Installation Guide 4-9 - Cisco ESR10008 | Hardware Installation Guide - Page 88
not take effect until you reload the system or reboot the router. To display the new software configuration register setting, issue the show version command. Router# show version . . . # 00 through 03 = 0x0002, and bit 13 = 2000. 4-10 Cisco 10008 Router Hardware Installation Guide OL-0659-13 - Cisco ESR10008 | Hardware Installation Guide - Page 89
Cisco IOS software image required to run the router: • 00-At power-on, the system remains at the ROM monitor prompt (rommon>), awaiting a user command to boot the system manually other network connected equipment • Verify the performance and stability of a platform • Test software services and - Cisco ESR10008 | Hardware Installation Guide - Page 90
on, see the Cisco 10000 Series Router Troubleshooting Guide. • If the MISWIRE LED is on, the -48V and return (RTN) wires are reversed. Power off the PEM and reconnect the wires correctly (see the "Connecting DC Power to the Cisco 10008 Router" section on page 3-17). System experiences a Enter the - Cisco ESR10008 | Hardware Installation Guide - Page 91
a failure in the blower module (see Fan Failure above), insufficient ventilation, or high ambient temperature. See the Cisco 10000 Series Router Troubleshooting Guide for additional information. Troubleshooting Ethernet Connections If an Ethernet connection to your Cisco 10008 router fails to work - Cisco ESR10008 | Hardware Installation Guide - Page 92
need to replace the PRE. Contact the Cisco TAC for further assistance. Troubleshooting the Console Port Serial Connection If the terminal connected to the Cisco 10008 console port appears frozen or fails to work properly, check for the following problems: • Check the console cable and make sure - Cisco ESR10008 | Hardware Installation Guide - Page 93
units (FRUs). This chapter contains the information necessary to perform that maintenance for the Cisco 10008 router. Note Detailed, up-to-date instructions are also shipped with all FRUs and upgrade kits. System components fall into two categories: • hot-swappable components that do not require you - Cisco ESR10008 | Hardware Installation Guide - Page 94
service providers have redundant chassis, service and accommodate a growing number of customers. Customers requiring the highest levels of network reliability and availability often add redundancy by connecting to two different service providers. 38546 Cisco 10008 Router Hardware Installation Guide - Cisco ESR10008 | Hardware Installation Guide - Page 95
(FRUs) for the Cisco 10008 router. Before beginning any FRU procedure, be sure you are familiar with the safety precautions outlined in Chapter 2, "Preparing for Installation." Note The illustrations in this guide depict the original Cisco 10008 chassis. Your chassis may have slight differences - Cisco ESR10008 | Hardware Installation Guide - Page 96
system and protects the cables and connectors from damage. The following procedures describe how to remove and replace the front cover. Note Your router may not have a front cover. Only the original Cisco 10008 chassis . 30038 30039 Cisco 10008 Router Hardware Installation Guide 5-4 OL-0659-13 - Cisco ESR10008 | Hardware Installation Guide - Page 97
ROUTING ENGINE P/N ESR-PRE3 6XCT3-DS0 6XCT3-DS0 FPAOUWLTER MISWIRE POWER FAULT MISWIRE PROCESSOR ONLY OC-12/STM-4 POS SM-IR 30040 Step 2 Remove the cover by lifting it up slightly and then pulling it toward you (Figure 5-2). OL-0659-13 Cisco 10008 Router Hardware Installation Guide 5-5 - Cisco ESR10008 | Hardware Installation Guide - Page 98
a bezel plug into each hole below the corner posts and press in the top of each bezel plug to secure the front cover to the chassis (Figure 5-4). 32218 32219 Cisco 10008 Router Hardware Installation Guide 5-6 OL-0659-13 - Cisco ESR10008 | Hardware Installation Guide - Page 99
Chapter 5 Maintaining the Cisco 10008 Router Removing and Replacing Field-Replaceable Units Replacing the Air Filter If the air filter is dirty or clogged, the blower module could have a problem providing sufficient cooling air flow throughout the chassis, causing the system to overheat. To - Cisco ESR10008 | Hardware Installation Guide - Page 100
the captive screws on each side of the blower module (Figure 5-12). Return all interface cables through the cable management brackets. Replace the front cover if necessary (see the "Replacing the Front Cover" section on page 5-6). Cisco 10008 Router Hardware Installation Guide 5-8 OL-0659-13 - Cisco ESR10008 | Hardware Installation Guide - Page 101
FAULT MISWIRE 5 5 5 5 5 ACO CMRAIJTOICRAL MINOR SFATAILTUS ACO CMRAIJTOICRAL MINOR SFATAILTUS PROCESSOR ONLY 76220 Step 2 Slide the new filter all of the way into the chassis and lift it up until it snaps into place (Figure 5-9). OL-0659-13 Cisco 10008 Router Hardware Installation Guide 5-9 - Cisco ESR10008 | Hardware Installation Guide - Page 102
Chapter 5 Maintaining the Cisco 10008 Router Note The directional arrows located on the metal frame of the filter should point up (see enlargement in Figure 5-9). Replacing the Blower Module Use the following procedure to replace a blower module. The blower module supports hot-swapping (for up - Cisco ESR10008 | Hardware Installation Guide - Page 103
(Figure 5-12). The FANS OK LED should light (green). If a FAN FAILURE LED lights (yellow): • Try reseating the blower module. • Remove the rear safety cover and make sure the blower module cable is connected securely (Figure 5-13). OL-0659-13 Cisco 10008 Router Hardware Installation Guide 5-11 - Cisco ESR10008 | Hardware Installation Guide - Page 104
down the system before replacing a PEM. Installing a Second DC PEM Use the following procedure to install a second DC PEM in the bottom power bay for redundancy. Caution Do not power off the primary DC PEM or all data traffic will halt. 5-12 Cisco 10008 Router Hardware Installation Guide OL-0659 - Cisco ESR10008 | Hardware Installation Guide - Page 105
(see Front Cover Procedures, page 5-4). Step 2 Loosen the captive screws to remove the blank cover from the bottom power bay (Figure 5-14). OL-0659-13 Cisco 10008 Router Hardware Installation Guide 5-13 - Cisco ESR10008 | Hardware Installation Guide - Page 106
ACO CMRAIJTOICRAL MINOR SFATAILTUS PROCESSOR 132861 1 Captive screws Step 3 Install the new DC PEM all the way into the power bay to ensure a secure connection to the backplane, and tighten the captive screws (Figure 5-15). 5-14 Cisco 10008 Router Hardware Installation Guide OL-0659-13 - Cisco ESR10008 | Hardware Installation Guide - Page 107
5 Maintaining the Cisco 10008 Router Figure 5-16 Loosening the Captive Screw Removing and Replacing Field-Replaceable Units 30022 Step 4 Loosen the captive screw on the rear safety cover and tilt back the cover (Figure 5-16). OL-0659-13 Cisco 10008 Router Hardware Installation Guide 5-15 - Cisco ESR10008 | Hardware Installation Guide - Page 108
Removing and Replacing Field-Replaceable Units Figure 5-17 Removing the Safety Cover Chapter 5 Maintaining the Cisco 10008 Router 30023 Step 5 Remove the safety cover by lifting it up and out from the chassis (Figure 5-17). 5-16 Cisco 10008 Router Hardware Installation Guide OL-0659-13 - Cisco ESR10008 | Hardware Installation Guide - Page 109
6 Connect the DC PEM power leads: • Connect the DC power lead from the external power source to the DC terminal block B labeled -48V (Figure 5-18). • Connect the return wire (RTN) to terminal block B labeled RTN (+) (Figure 5-18). OL-0659-13 Cisco 10008 Router Hardware Installation Guide 5-17 - Cisco ESR10008 | Hardware Installation Guide - Page 110
by feeding a tie wrap through the slot on the side of the chassis and binding the cables (Figure 5-19). Replace the rear safety cover, making sure that the power cables exit through the holes on the side of the cover (Figure 5-19). 5-18 Cisco 10008 Router Hardware Installation Guide OL-0659-13 - Cisco ESR10008 | Hardware Installation Guide - Page 111
Chapter 5 Maintaining the Cisco 10008 Router Removing and Replacing Field-Replaceable Units Figure 5-20 Setting DC Power Switch to the On the front cover if necessary (see the "Replacing the Front Cover" section on page 5-6). OL-0659-13 Cisco 10008 Router Hardware Installation Guide 5-19 - Cisco ESR10008 | Hardware Installation Guide - Page 112
-DS0 6XCT3-DS0 PERFORMANCE ROUTING ENGINE P/N ESR-PRE3 PERFORMANCE ROUTING ENGINE P/N ESR-PRE3 6XCT3-DS0 6XCT3-DS0 POWER FAULT MISWIRE system, or the system shuts and down all data traffic stops. Only power off the DC PEM you are replacing. 5-20 Cisco 10008 Router Hardware Installation Guide - Cisco ESR10008 | Hardware Installation Guide - Page 113
MINOR SFATAILTUS PROCESSOR 132831 1 Captive screw 2 Handle Step 3 Loosen the captive screws on the DC PEM you are removing and pull the PEM from the chassis using the handle on the faceplate (Figure 5-22). OL-0659-13 Cisco 10008 Router Hardware Installation Guide 5-21 - Cisco ESR10008 | Hardware Installation Guide - Page 114
FAULT ACO CMRAIJTOICRAL MINOR SFATAILTUS PROCESSOR 132832 1 Captive screws Step 4 Install the new DC PEM all the way into the power bay to ensure a secure connection to the backplane, and tighten the captive screws (Figure 5-23). 5-22 Cisco 10008 Router Hardware Installation Guide OL-0659-13 - Cisco ESR10008 | Hardware Installation Guide - Page 115
Chapter 5 Maintaining the Cisco 10008 Router Removing and Replacing Field-Replaceable Units Figure 5-24 Setting DC Power Switch to the Replace the front cover if necessary (see the "Replacing the Front Cover" section on page 5-6). OL-0659-13 Cisco 10008 Router Hardware Installation Guide 5-23 - Cisco ESR10008 | Hardware Installation Guide - Page 116
Field-Replaceable Units Chapter 5 Maintaining the Cisco 10008 Router Installing a Second AC PEM Use the following procedure to install a second AC PEM in the bottom power bay for blank cover from the bottom power bay (Figure 5-25). 5-24 Cisco 10008 Router Hardware Installation Guide OL-0659-13 - Cisco ESR10008 | Hardware Installation Guide - Page 117
the new AC PEM all the way into the power bay to ensure a secure connection to the backplane and tighten the captive screws (Figure 5-26). Connect the power cord from the PEM to your power cord that connects to the facility VAC input. OL-0659-13 Cisco 10008 Router Hardware Installation Guide 5-25 - Cisco ESR10008 | Hardware Installation Guide - Page 118
32235 1 Strain relief devices Step 5 Step 6 Set the AC power cord connectors in strain relief devices to prevent them from accidently disconnecting (Figure 5-27). Plug the facility AC input power cord into a power receptacle. 5-26 Cisco 10008 Router Hardware Installation Guide OL-0659-13 - Cisco ESR10008 | Hardware Installation Guide - Page 119
Chapter 5 Maintaining the Cisco 10008 Router Removing and Replacing Field-Replaceable Units Figure 5-28 Setting the AC Power Switch to the On Position POWER FAULT POWER FAULT the "Replacing the Front Cover" section on page 5-6). OL-0659-13 Cisco 10008 Router Hardware Installation Guide 5-27 - Cisco ESR10008 | Hardware Installation Guide - Page 120
off both AC PEMs in a redundant system, or the system shuts down and all data traffic stops. Only power off the AC PEM you are replacing. Step 3 Remove the PEM power cable from its canoe and disconnect it from the AC input power cable. 5-28 Cisco 10008 Router Hardware Installation Guide OL-0659 - Cisco ESR10008 | Hardware Installation Guide - Page 121
CMRAIJTOICRAL MINOR SFATAILTUS PROCESSOR 132863 1 Captive screw 2 Handle Step 4 Loosen the captive screws on the PEM you are removing and pull the PEM from the chassis using the handle on the faceplate (Figure 5-30). OL-0659-13 Cisco 10008 Router Hardware Installation Guide 5-29 - Cisco ESR10008 | Hardware Installation Guide - Page 122
new AC PEM all the way into the power bay to ensure a secure connection to the backplane and tighten the captive screws on the PEM (Figure 5-31). Connect the power cord from the PEM to the power cord that connects to the facility VAC input. 5-30 Cisco 10008 Router Hardware Installation Guide OL - Cisco ESR10008 | Hardware Installation Guide - Page 123
32235 1 Strain relief devices Step 7 Step 8 Set the AC power cord connectors in a cord strain relief device to prevent them from accidently disconnecting (Figure 5-32). Plug the facility AC input power cord into a power receptacle. OL-0659-13 Cisco 10008 Router Hardware Installation Guide 5-31 - Cisco ESR10008 | Hardware Installation Guide - Page 124
that affects system operation and should be investigated as soon as possible. • Critical-A condition that affects system operation and requires immediate attention. Use the following procedure to connect an alarm indicator to the system: 5-32 Cisco 10008 Router Hardware Installation Guide OL-0659 - Cisco ESR10008 | Hardware Installation Guide - Page 125
5-34 Removing the Safety Cover Connecting Alarm Indicators 30022 Step 1 Set the AC or DC PEM power switches to the off (0) position. Step 2 Loosen the captive screw on the rear safety cover and tilt the cover back (Figure 5-34). OL-0659-13 Cisco 10008 Router Hardware Installation Guide 5-33 - Cisco ESR10008 | Hardware Installation Guide - Page 126
cover by lifting it up and out from the chassis (Figure 5-35). Figure 5-36 Stripping Insulation 10 mm max Step 4 Strip not more than 0.4 inches (10 mm) of insulation off of the ends of the alarm indicator wire (Figure 5-36). 5-34 Cisco 10008 Router Hardware Installation Guide OL-0659-13 - Cisco ESR10008 | Hardware Installation Guide - Page 127
Maintaining the Cisco 10008 Router Figure 5-37 Alarm Terminal Block Connections Connecting Alarm Indicators ALARMS 50VA SELV max NC COM MINOR NO NC COM MAJOR NO NC COM CRITICAL NO 32694 Step 5 Connect one set of alarm indicator wires to the alarm terminal block as follows: a. Connect one lead - Cisco ESR10008 | Hardware Installation Guide - Page 128
Connecting Alarm Indicators Chapter 5 Maintaining the Cisco 10008 Router Figure 5-38 Alarm Indicator Wires Exiting Safety Cover 32693 Step 7 Step 8 Secure the power cabling to the chassis by feeding a tie wrap through the slot on the side of the chassis not operate the system unless all slots - Cisco ESR10008 | Hardware Installation Guide - Page 129
Cisco 10008 Router Figure 5-39 ESD Chassis Connection CISCO 10000 5 5 5 5 5 Connecting Alarm Indicators SLOT 0 STATUFSAIL BITS SLOT 0 STATUFSAIL BITS 6XCT3-DS0 CH OC-12-DSO SM-IR OC-12/STM-4 POS SM-IR PERFORMANCE ROUTING ENGINE P/N ESR Cisco 10008 Router Hardware Installation Guide 5-37 - Cisco ESR10008 | Hardware Installation Guide - Page 130
Connecting Alarm Indicators Figure 5-40 ESR-PRE3 PERFORMANCE ROUTING ENGINE P/N ESR-PRE3 6XCT3-DS0 6XCT3-DS0 POWER FAULT MISWIRE 1 PROCESSOR 132833 1 Captive screw Step 5 Unscrew the top and bottom captive screws on the PRE (Figure 5-40). 5-38 Cisco 10008 Router Hardware Installation Guide - Cisco ESR10008 | Hardware Installation Guide - Page 131
Chapter 5 Maintaining the Cisco 10008 Router Figure 5-41 Opening the Ejector Levers Connecting Alarm Indicators OC-12/STM-4 POS SM-IR 6XCT3-DS0 6XCT3-DS0 6XCT3-DS0 PERFORMANCE ROUTING ENGINE PERFORMANCE ROUTING ENGINE 6XCT3-DS0 6XCT3-DS0 CH - Cisco ESR10008 | Hardware Installation Guide - Page 132
an antistatic bag (Figure 5-42). Grasp the faceplate of the new PRE with one hand and place your other hand under the card carrier (to support the weight of the module) and position the card in front of the card cage slot. 5-40 Cisco 10008 Router Hardware Installation Guide OL-0659-13 - Cisco ESR10008 | Hardware Installation Guide - Page 133
ESR-PRE3 32682 Step 9 Carefully align the upper and lower edges of the PRE with the upper and lower guides in the chassis, and slide the module into the slot until you can feel it begin to seat in the backplane connectors (Figure 5-43). OL-0659-13 Cisco 10008 Router Hardware Installation Guide - Cisco ESR10008 | Hardware Installation Guide - Page 134
. The Fail LED stays on briefly (about 5 to 6 seconds) and then shuts off. If the Fail LED remains on or is flashing, go to the "Troubleshooting Installation Problems" section on page 4-12. 5-42 Cisco 10008 Router Hardware Installation Guide OL-0659-13 - Cisco ESR10008 | Hardware Installation Guide - Page 135
PRE installation for redundancy. The system automatically downloads the necessary configuration information from the primary PRE. Step 15 Replace the front cover if necessary (see the "Replacing the Front Cover" section on page 5-6). OL-0659-13 Cisco 10008 Router Hardware Installation Guide 5-43 - Cisco ESR10008 | Hardware Installation Guide - Page 136
10000 0 6 CISCO 10000 0 7 CISCO 10000 0 1 1 1 3 3 2 2 2 4 4 5 5 3 3 3 4 4 4 5 5 5 FAIL 8 CISCO 10000 ACO CMRAIJTOICRAL MINOR SFATAILTUS ACO CMRAIJTOICRAL MINOR SFATAILTUS PROCESSOR ONLY 1 0 1 2 1 3 4 32689 1 Captive screw 5-44 Cisco 10008 Router Hardware Installation Guide OL - Cisco ESR10008 | Hardware Installation Guide - Page 137
Chapter 5 Maintaining the Cisco 10008 Router Figure 5-47 Removing the PCMCIA Flash Card CISCO 10000 CONSOLE AUX ELAICTNHTKIEVRITNYET Connecting Alarm Indicators SSLLOOTT01 32690 Step 3 Lift the cover and pull the flash card up and out of its slot (Figure 5-47). Figure 5-48 Inserting the - Cisco ESR10008 | Hardware Installation Guide - Page 138
You can increase the amount of SDRAM in your system configuration by replacing the two dual in-line memory chassis configuration. The DIMMs that you remove may be used in other compatible equipment and should be stored in an antistatic bag. 5-46 Cisco 10008 Router Hardware Installation Guide - Cisco ESR10008 | Hardware Installation Guide - Page 139
along the connector edge of the DIMM). The Cisco 10008 router system is hot-swappable, which means you can remove and replace a PRE while the system is operating-if your configuration includes a secondary (redundant) PRE installed in the chassis. The hot-swapping feature allows you to remove - Cisco ESR10008 | Hardware Installation Guide - Page 140
Upgrading SDRAM on the PRE Chapter 5 Maintaining the Cisco 10008 Router Place the PRE on an antistatic mat or pad so that the DIMMs are facing up DIMM 132842 1 1 Key Step 3 Remove a new DIMM from its antistatic bag (Figure 5-52). 5-48 Cisco 10008 Router Hardware Installation Guide OL-0659-13 - Cisco ESR10008 | Hardware Installation Guide - Page 141
you must return the PRE to Cisco for repair. Step 5 Reinstall the PRE in the chassis after both DIMMs are installed. Troubleshooting the DIMM Installation If the system fails to boot properly, or if end of the DIMMs (see Figure 5-53) OL-0659-13 Cisco 10008 Router Hardware Installation Guide 5-49 - Cisco ESR10008 | Hardware Installation Guide - Page 142
the Cisco Technical Assistance Center (TAC) for additional help. Before you contact TAC, make a note of any error messages, unusual LED states, or any other indications that might help the service representative to identify the problem. 5-50 Cisco 10008 Router Hardware Installation Guide OL - Cisco ESR10008 | Hardware Installation Guide - Page 143
term: 5 percent to 90 percent • Storage: 5 percent to 95 percent −197 ft to 13,123 ft (-60 m to 4000 m) 150 cfm1 through the system blower module 200 cfm through the system blower module if the exhaust temperature exceeds 45 degrees C OL-0659-13 Cisco 10008 Router Hardware Installation Guide A-1 - Cisco ESR10008 | Hardware Installation Guide - Page 144
Appendix A Technical Specifications Table A-1 Cisco 10008 Router System Specifications (continued) Description Power entry modules Specifications DC PEM Supports up to two separate −48 VDC input feeds by means of built-in two-position terminal blocks • Part Number: ESR-PWR-DC (Primary) Part - Cisco ESR10008 | Hardware Installation Guide - Page 145
Appendix A Technical Specifications Table A-1 Cisco 10008 Router System Specifications (continued) Description Performance routing engine (PRE) Specifications • Part Number: ESR-PRE1 (Primary) Part Number: ESR-PRE1/R (Redundant) • Power: 80W • Max per chassis: 2 • Weight: 7.5 lb (3.41 kg) Height - Cisco ESR10008 | Hardware Installation Guide - Page 146
Appendix A Technical Specifications Cisco 10008 Router Hardware Installation Guide A-4 OL-0659-13 - Cisco ESR10008 | Hardware Installation Guide - Page 147
system and packing materials. To return or move the Cisco 10008 router to a different location, follow these instructions for repacking the system, using the original packaging material: Figure B-1 Cisco 10008 System and Packing Material OL-0659-13 Cisco 10008 Router Hardware Installation Guide - Cisco ESR10008 | Hardware Installation Guide - Page 148
inside the container (see Figure B-1). Place the top packing material over the top of the Cisco 10008 chassis (see Figure B-1). Place both accessory boxes inside the cutouts in the top section of the packing material (see Figure B-1). Cisco 10008 Router Hardware Installation Guide B-2 OL-0659-13 - Cisco ESR10008 | Hardware Installation Guide - Page 149
Appendix B Repacking the Box Figure B-2 Cisco 10008 System Package 1 2 132823 3 1 Carton 2 Pallet 3 Packing straps Step 5 Step 6 Fold the outside carton down outside carton to the bottom pallet. Packaging straps must be used. OL-0659-13 Cisco 10008 Router Hardware Installation Guide B-3 - Cisco ESR10008 | Hardware Installation Guide - Page 150
Appendix B Repacking the Box Cisco 10008 Router Hardware Installation Guide B-4 OL-0659-13 - Cisco ESR10008 | Hardware Installation Guide - Page 151
, 100BaseT sends link pulses over the network segment when no traffic is present. However Cisco specification. See also 1000BaseSX, 1000BaseLX/LH, Gigabit Ethernet, and IEEE 802.3. A set of IEEE standards for the definition of LAN protocols. OL-0659-13 Cisco 10008 Router Hardware Installation Guide - Cisco ESR10008 | Hardware Installation Guide - Page 152
primary circuit fails or if the error rate on the primary line exceeds a set threshold. The Cisco 10008 router supports 1+1 APS, which provides permanent electrical bridging to the service and protection equipment, placed at both ends of the circuit. ASIC Application-specific integrated circuit - Cisco ESR10008 | Hardware Installation Guide - Page 153
system by entering commands and optional arguments at the command prompt. CO Central office. The local telephone company office to which all local loops in a given area connect and in which circuit switching of subscriber lines occurs. OL-0659-13 Cisco 10008 Router Hardware Installation Guide - Cisco ESR10008 | Hardware Installation Guide - Page 154
carries data at a rate of 2.048 Mbps. E1 lines can be leased for private use from common carriers. Compare with T1; see also DS1. GL-4 Cisco 10008 Router Hardware Installation Guide OL-0659-13 - Cisco ESR10008 | Hardware Installation Guide - Page 155
, the protocol for which it is generally considered a replacement. Field replaceable unit. A component that can be removed from a network device and replaced in the field. Line cards, power modules, and fan modules are typically FRUs. OL-0659-13 Cisco 10008 Router Hardware Installation Guide GL-5 - Cisco ESR10008 | Hardware Installation Guide - Page 156
Intermediate reach See IR. Internet service provider See ISP. IOS Internet Operating System. See Cisco IOS. IP Internet Protocol. Network layer protocol in the TCP group identified by a single IP destination group address. GL-6 Cisco 10008 Router Hardware Installation Guide OL-0659-13 - Cisco ESR10008 | Hardware Installation Guide - Page 157
Service chassis. LMI Local Management Interface. A set of enhancements to the basic Frame Relay specification. LMI includes support for a keepalive mechanism, which verifies that data is flowing; a multicast mechanism, which provides the network Cisco 10008 Router Hardware Installation Guide GL-7 - Cisco ESR10008 | Hardware Installation Guide - Page 158
copied by the network and sent to a specific subset of network addresses. These addresses are specified in the Destination Address field. Compare with Broadcast and Unicast. Multilink Point-to-Point See MLP. Multimode fiber See MMF. GL-8 Cisco 10008 Router Hardware Installation Guide OL-0659 - Cisco ESR10008 | Hardware Installation Guide - Page 159
the system power, entering console commands, or causing other software or interfaces to shut down. Same as hot swapping. Online insertion and See OIR. removal Optical carrier See OC. Optical fiber See Fiber-optic cable. OL-0659-13 Cisco 10008 Router Hardware Installation Guide GL - Cisco ESR10008 | Hardware Installation Guide - Page 160
chassis for redundancy. See also PXF Network Processors. PXF Network Processors Parallel eXpress Forwarding network processors. A pair of programmable ASICs that perform parallel processing to support high performance Layer 3 forwarding. GL-10 Cisco 10008 Router Hardware Installation Guide - Cisco ESR10008 | Hardware Installation Guide - Page 161
devices, services, or connections so that, in the event of a failure, the redundant devices, services, or connections can remote monitoring of networked devices. The RMON specification provides numerous monitoring, problem detection, and reporting Cisco 10008 Router Hardware Installation Guide GL-11 - Cisco ESR10008 | Hardware Installation Guide - Page 162
scalable network security solution. Terminal Access Controller Access Control System Plus. Proprietary Cisco enhancement to Terminal Access Controller Access Control System (TACACS). Provides additional support for authentication, authorization, and accounting. GL-12 Cisco 10008 Router Hardware - Cisco ESR10008 | Hardware Installation Guide - Page 163
amounts to ensure that the traffic will fit within the promised traffic envelope for the particular connection. Traffic shaping is used in ATM, Frame Relay, and other types of networks. Also known as metering, shaping, or smoothing. OL-0659-13 Cisco 10008 Router Hardware Installation Guide GL-13 - Cisco ESR10008 | Hardware Installation Guide - Page 164
sent to a single network destination. Compare with Broadcast and Multicast. V Virtual Private Network VLAN VoIP VPN VT-n See VPN. Virtual LAN. A network behavior during congestion and results in better performance and fewer retransmissions. GL-14 Cisco 10008 Router Hardware Installation Guide - Cisco ESR10008 | Hardware Installation Guide - Page 165
Glossary Wide-area network See WAN. WRED Weighted Random Early Detection. RED uses an algorithm to randomly interface starts to get congested and provide differentiated performance characteristics for different classes of service. OL-0659-13 Cisco 10008 Router Hardware Installation Guide GL-15 - Cisco ESR10008 | Hardware Installation Guide - Page 166
Glossary GL-16 Cisco 10008 Router Hardware Installation Guide OL-0659-13 - Cisco ESR10008 | Hardware Installation Guide - Page 167
-through Ethernet 3-33 chassis air circulation 3-2 center-mounting (19 in. rack) 3-5 center-mounting (23 in. rack) 3-7 components 1-6 connecting to ground 3-13 flush-mounting (19 in. rack) 3-3 front view 1-4 ground connection description 2-4 Cisco 10008 Router Hardware Installation Guide IN-1 - Cisco ESR10008 | Hardware Installation Guide - Page 168
view 1-3 circuit requirements 2-3 circuitry viii Cisco 10000 Series edge services router (ESR) powerup 4-11 Cisco 10008 router basic setup 4-4 Ethernet port 4-5 features 1-2 hardware description 1-3 setup facility 4-3 software description 1-3 CLI file system names 4-7 CLI, setup facility 4-2 coaxial - Cisco ESR10008 | Hardware Installation Guide - Page 169
1-1 hot-swapping 1-1 humidity 2-2 specifications A-1 I installing 5-44 AC PEM 5-24 air filter 5-7 blower module 5-10 DC PEM 5-12 DIMMs 5-47 front cover 5-6 general guidelines 3-2 lifting chassis 2-15 PRE 5-36 interface cable 3-1 interference Cisco 10008 Router Hardware Installation Guide IN-3 - Cisco ESR10008 | Hardware Installation Guide - Page 170
PRE 1-11 loss of service 5-3 low-speed circuits 1-1 M modem connections 3-35 N no shutdown command 4-5 IN-4 Cisco 10008 Router Hardware Installation Guide NVRAM file system 4-7 ignoring contents 4-9 size 4-8 O operating conditions, chassis 2-5 optical network interfaces 1-1 P Parallel eXpress - Cisco ESR10008 | Hardware Installation Guide - Page 171
Ethernet 1-9, A-3 RJ-45 3-34 power AC/DC 1-3 surge suppression 2-6 power cord 3- 3-1 RCP protocol 4-7 rear view of chassis 1-3 redundancy 1-2, 5-2 regulatory information xi 4-7 service compress- system configuration dialog 4-4 system shutdown 5-3 Cisco 10008 Router Hardware Installation Guide - Cisco ESR10008 | Hardware Installation Guide - Page 172
2-2 W warning 1-11 chassis installation 3-3, 3-5, 3-7 disconnect device 2-5 installation instructions 2-14 jewelry removal 2-14, 3-17 qualified personnel 2-12 short-circuit protection 3-18 two-person lifting 2-15, 3-12 IN-6 Cisco 10008 Router Hardware Installation Guide work during lightening
-
 1
1 -
 2
2 -
 3
3 -
 4
4 -
 5
5 -
 6
6 -
 7
7 -
8
-
9
-
10
-
11
-
12
-
13
-
14
-
15
-
16
-
17
-
18
-
19
-
20
-
21
-
22
-
23
-
24
-
25
-
26
-
27
-
28
-
29
-
30
-
31
-
32
-
33
-
34
-
35
-
36
-
37
-
38
-
39
-
40
-
41
-
42
-
43
-
44
-
45
-
46
-
47
-
48
-
49
-
50
-
51
-
52
-
53
-
54
-
55
-
56
-
57
-
58
-
59
-
60
-
61
-
62
-
63
-
64
-
65
-
66
-
67
-
68
-
69
-
70
-
71
-
72
-
73
-
74
-
75
-
76
-
77
-
78
-
79
-
80
-
81
-
82
-
83
-
84
-
85
-
86
-
87
-
88
-
89
-
90
-
91
-
92
-
93
-
94
-
95
-
96
-
97
-
98
-
99
-
100
-
101
-
102
-
103
-
104
-
105
-
106
-
107
-
108
-
109
-
110
-
111
-
112
-
113
-
114
-
115
-
116
-
117
-
118
-
119
-
120
-
121
-
122
-
123
-
124
-
125
-
126
-
127
-
128
-
129
-
130
-
131
-
132
-
133
-
134
-
135
-
136
-
137
-
138
-
139
-
140
-
141
-
142
-
143
-
144
-
145
-
146
-
147
-
148
-
149
-
150
-
151
-
152
-
153
-
154
-
155
-
156
-
157
-
158
-
159
-
160
-
161
-
162
-
163
-
164
-
165
-
166
-
167
-
168
-
169
-
170
-
171
-
172
 |
 |

Americas Headquarters
Cisco Systems, Inc.
170 West Tasman Drive
San Jose, CA 95134-1706
USA
Tel: 408 526-4000
800 553-NETS (6387)
Fax: 408 527-0883
Cisco 10008 Router Hardware Installation
Guide
June 2006
Text Part Number: OL-0659-13