Cisco MDS-9124 Troubleshooting Guide - Page 285
Resolving Host and Storage Not in the Same Zone Using the CLI, permit, zone default-zone permit
 |
View all Cisco MDS-9124 manuals
Add to My Manuals
Save this manual to your list of manuals |
Page 285 highlights
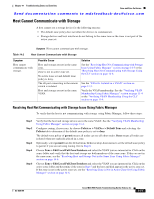
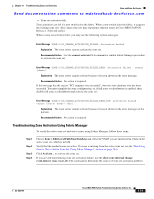
Chapter 14 Troubleshooting Zones and Zone Sets Zone and Zone Set Issues Send documentation comments to [email protected] Step 3 Step 4 Step 5 Step 6 Step 7 Step 8 switch# show zone status vsan 1 VSAN: 1 default-zone: deny distribute: active only Interop: default mode: basic merge-control: allow session: none hard-zoning: enabled Default zone: qos: low broadcast: disabled ronly: disabled Full Zoning Database : Zonesets:0 Zones:0 Aliases: 0 Active Zoning Database : Name: Database Not Available Status: The default zone policy of permit means all nodes can see all other nodes. Deny means all nodes are isolated when not explicitly placed in a zone. Optionally, use the zone default-zone permit command to set the default zone policy to permit if you are not using zoning. Go to Step 7. Use the show zone member command for host and storage device to verify that they are both in the same zone. If they are not in the same zone, see the "Resolving Host and Storage Not in the Same Zone Using Fabric Manager" section on page 14-6. Use the show zoneset active command to determine if the zone in Step 4 and the host and disk appear in the active zone set. v_188# show zoneset active vsan 2 zoneset name ZoneSet3 vsan 2 zone name Zone5 vsan 2 pwwn 10:00:00:00:77:99:7a:1b [Hostalias] pwwn 21:21:21:21:21:21:21:21 [Diskalias] If the zone is not in the active zone set, see the "Resolving Zone is Not in Active Zone Set Using Fabric Manager" section on page 14-6. If there is no active zone set, use the zoneset activate command to activate the zone set. switch(config)# zoneset activate ZoneSet1 vsan 2. Verify that the host and storage can now communicate. Resolving Host and Storage Not in the Same Zone Using the CLI To move the host and storage device into the same zone using the CLI, follow these steps: Step 1 Use the zone name zonename vsan-id command to create a zone in the VSAN if necessary, and add the host or storage into this zone. ca-9506(config)# zone name NewZoneName vsan 2 ca-9506(config-zone)# member pwwn 22:35:00:0c:85:e9:d2:c2 ca-9506(config-zone)# member pwwn 10:00:00:00:c9:32:8b:a8 Note The pWWNs for zone members can be obtained from the device or by issuing the show flogi database vsan-id command. Step 2 Use the show zone command to verify that host and storage are now in the same zone. switchA# show zone zone name NewZoneName vsan 2 OL-9285-05 Cisco MDS 9000 Family Troubleshooting Guide, Release 3.x 14-7
-
 1
1 -
2
-
3
-
4
-
5
-
6
-
7
-
8
-
9
-
10
-
11
-
12
-
13
-
14
-
15
-
16
-
17
-
18
-
19
-
20
-
21
-
22
-
23
-
24
-
25
-
26
-
27
-
28
-
29
-
30
-
31
-
32
-
33
-
34
-
35
-
36
-
37
-
38
-
39
-
40
-
41
-
42
-
43
-
44
-
45
-
46
-
47
-
48
-
49
-
50
-
51
-
52
-
53
-
54
-
55
-
56
-
57
-
58
-
59
-
60
-
61
-
62
-
63
-
64
-
65
-
66
-
67
-
68
-
69
-
70
-
71
-
72
-
73
-
74
-
75
-
76
-
77
-
78
-
79
-
80
-
81
-
82
-
83
-
84
-
85
-
86
-
87
-
88
-
89
-
90
-
91
-
92
-
93
-
94
-
95
-
96
-
97
-
98
-
99
-
100
-
101
-
102
-
103
-
104
-
105
-
106
-
107
-
108
-
109
-
110
-
111
-
112
-
113
-
114
-
115
-
116
-
117
-
118
-
119
-
120
-
121
-
122
-
123
-
124
-
125
-
126
-
127
-
128
-
129
-
130
-
131
-
132
-
133
-
134
-
135
-
136
-
137
-
138
-
139
-
140
-
141
-
142
-
143
-
144
-
145
-
146
-
147
-
148
-
149
-
150
-
151
-
152
-
153
-
154
-
155
-
156
-
157
-
158
-
159
-
160
-
161
-
162
-
163
-
164
-
165
-
166
-
167
-
168
-
169
-
170
-
171
-
172
-
173
-
174
-
175
-
176
-
177
-
178
-
179
-
180
-
181
-
182
-
183
-
184
-
185
-
186
-
187
-
188
-
189
-
190
-
191
-
192
-
193
-
194
-
195
-
196
-
197
-
198
-
199
-
200
-
201
-
202
-
203
-
204
-
205
-
206
-
207
-
208
-
209
-
210
-
211
-
212
-
213
-
214
-
215
-
216
-
217
-
218
-
219
-
220
-
221
-
222
-
223
-
224
-
225
-
226
-
227
-
228
-
229
-
230
-
231
-
232
-
233
-
234
-
235
-
236
-
237
-
238
-
239
-
240
-
241
-
242
-
243
-
244
-
245
-
246
-
247
-
248
-
249
-
250
-
251
-
252
-
253
-
254
-
255
-
256
-
257
-
258
-
259
-
260
-
261
-
262
-
263
-
264
-
265
-
266
-
267
-
268
-
269
-
270
-
271
-
272
-
273
-
274
-
275
-
276
-
277
-
278
-
279
-
 280
280 -
 281
281 -
 282
282 -
 283
283 -
 284
284 -
 285
285 -
 286
286 -
 287
287 -
 288
288 -
 289
289 -
 290
290 -
291
-
292
-
293
-
294
-
295
-
296
-
297
-
298
-
299
-
300
-
301
-
302
-
303
-
304
-
305
-
306
-
307
-
308
-
309
-
310
-
311
-
312
-
313
-
314
-
315
-
316
-
317
-
318
-
319
-
320
-
321
-
322
-
323
-
324
-
325
-
326
-
327
-
328
-
329
-
330
-
331
-
332
-
333
-
334
-
335
-
336
-
337
-
338
-
339
-
340
-
341
-
342
-
343
-
344
-
345
-
346
-
347
-
348
-
349
-
350
-
351
-
352
-
353
-
354
-
355
-
356
-
357
-
358
-
359
-
360
-
361
-
362
-
363
-
364
-
365
-
366
-
367
-
368
-
369
-
370
-
371
-
372
-
373
-
374
-
375
-
376
-
377
-
378
-
379
-
380
-
381
-
382
-
383
-
384
-
385
-
386
-
387
-
388
-
389
-
390
-
391
-
392
-
393
-
394
-
395
-
396
-
397
-
398
-
399
-
400
-
401
-
402
-
403
-
404
-
405
-
406
-
407
-
408
-
409
-
410
-
411
-
412
-
413
-
414
-
415
-
416
-
417
-
418
-
419
-
420
-
421
-
422
-
423
-
424
-
425
-
426
-
427
-
428
-
429
-
430
-
431
-
432
-
433
-
434
-
435
-
436
-
437
-
438
-
439
-
440
-
441
-
442
-
443
-
444
-
445
-
446
-
447
-
448
-
449
-
450
-
451
-
452
-
453
-
454
-
455
-
456
-
457
-
458
-
459
-
460
-
461
-
462
-
463
-
464
-
465
-
466
-
467
-
468
-
469
-
470
-
471
-
472
-
473
-
474
-
475
-
476
-
477
-
478
-
479
-
480
-
481
-
482
-
483
-
484
-
485
-
486
-
487
-
488
-
489
-
490
-
491
-
492
-
493
-
494
-
495
-
496
-
497
-
498
-
499
-
500
-
501
-
502
-
503
-
504
-
505
-
506
-
507
-
508
-
509
-
510
-
511
-
512
-
513
-
514
-
515
-
516
-
517
-
518
-
519
-
520
-
521
-
522
-
523
-
524
-
525
-
526
-
527
-
528
-
529
-
530
-
531
-
532
-
533
-
534
-
535
-
536
-
537
-
538
-
539
-
540
-
541
-
542
-
543
-
544
-
545
-
546
-
547
-
548
-
549
-
550
-
551
-
552
-
553
-
554
-
555
-
556
-
557
-
558
-
559
-
560
 |
 |