Cisco MDS-9124 Troubleshooting Guide - Page 480
Switches > Security > PKI, Admin > Flash Files
 |
View all Cisco MDS-9124 manuals
Add to My Manuals
Save this manual to your list of manuals |
Page 480 highlights
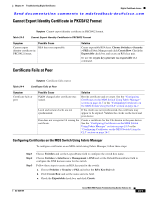
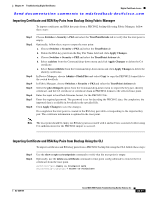
Digital Certificate Issues Chapter 24 Troubleshooting Digital Certificates Send documentation comments to [email protected] Step 4 Step 5 Step 6 Step 7 Step 8 Step 9 Follow these steps to create a trust point and associate the RSA key pairs with it: a. Choose Switches > Security > PKI and select the Trust Point tab. b. Click Create Row and set the TrustPointName field. c. Select the RSA key pairs from the KeyPairName drop-down menu. d. Select the certificates revocation method from the RevokeCheckMethods drop-down menu. e. Click Create. Choose Switches > Copy Configuration and click Apply Changes to copy the running-config to startup-config and save the trust point and key pair. Download the CA certificate from the CA that you want to add as the trustpoint CA. Follow these steps to authenticate the CA that you want to enroll to the trust point: a. In Device Manager, choose Admin > Flash Files and select Copy and then select tftp from the Protocols radio button to copy the CA certificate to bootflash. b. In Fabric Manager, choose Switches > Security > PKI and select the TrustPoint Actions tab. c. Select cauth from the Command drop-down menu. d. Click... in the URL field and select the CA certificate from bootflash. e. Click Apply Changes to authenticate the CA that you want to enroll to the trust point. f. Click the Trust Point Actions tab in the Information Pane. g. Make a note of the CA certificate fingerprint displayed in the IssuerCert FingerPrint column for the trust point row in question. Compare the CA certificate fingerprint with the fingerprint already communicated by the CA (obtained from the CA web site). If the fingerprints match exactly, accept the CA by selecting the certconfirm trust point action. Otherwise, reject the CA by selecting the certnoconfirm trust point action. h. If you selected certconfirm in step g, select the Trust Point Actions tab, select certconfirm from the Command drop-down menu and then click Apply Changes. i. If you selected certnoconfirm inStep g, select the Trust Point Actions tab, select certnoconfirm from the Command drop-down menu, and then click Apply Changes. Follow these steps to generate a certificate request for enrolling with that trust point: a. Select the Trust Point Actions tab in the Information pane. b. Select certreq from the Command drop-down menu. This generates a PKCS#10 certificate signing request (CSR) needed for an identity certificate from the CA corresponding to this trust point entry. c. Enter the output file name for storing the generated certificate request. It should be specified in the bootflash:filename format and will be used to store the CSR generated in PEM format. d. Enter the challenge password to be included in the CSR. The challenge password is not saved with the configuration. This password is required in the event that your certificate needs to be revoked, so you must remember this password. e. Click Apply Changes to save the changes. Request an identity certificate from the CA. Note The CA may require manual verification before issuing the identity certificate. 24-6 Cisco MDS 9000 Family Troubleshooting Guide, Release 3.x OL-9285-05
-
 1
1 -
2
-
3
-
4
-
5
-
6
-
7
-
8
-
9
-
10
-
11
-
12
-
13
-
14
-
15
-
16
-
17
-
18
-
19
-
20
-
21
-
22
-
23
-
24
-
25
-
26
-
27
-
28
-
29
-
30
-
31
-
32
-
33
-
34
-
35
-
36
-
37
-
38
-
39
-
40
-
41
-
42
-
43
-
44
-
45
-
46
-
47
-
48
-
49
-
50
-
51
-
52
-
53
-
54
-
55
-
56
-
57
-
58
-
59
-
60
-
61
-
62
-
63
-
64
-
65
-
66
-
67
-
68
-
69
-
70
-
71
-
72
-
73
-
74
-
75
-
76
-
77
-
78
-
79
-
80
-
81
-
82
-
83
-
84
-
85
-
86
-
87
-
88
-
89
-
90
-
91
-
92
-
93
-
94
-
95
-
96
-
97
-
98
-
99
-
100
-
101
-
102
-
103
-
104
-
105
-
106
-
107
-
108
-
109
-
110
-
111
-
112
-
113
-
114
-
115
-
116
-
117
-
118
-
119
-
120
-
121
-
122
-
123
-
124
-
125
-
126
-
127
-
128
-
129
-
130
-
131
-
132
-
133
-
134
-
135
-
136
-
137
-
138
-
139
-
140
-
141
-
142
-
143
-
144
-
145
-
146
-
147
-
148
-
149
-
150
-
151
-
152
-
153
-
154
-
155
-
156
-
157
-
158
-
159
-
160
-
161
-
162
-
163
-
164
-
165
-
166
-
167
-
168
-
169
-
170
-
171
-
172
-
173
-
174
-
175
-
176
-
177
-
178
-
179
-
180
-
181
-
182
-
183
-
184
-
185
-
186
-
187
-
188
-
189
-
190
-
191
-
192
-
193
-
194
-
195
-
196
-
197
-
198
-
199
-
200
-
201
-
202
-
203
-
204
-
205
-
206
-
207
-
208
-
209
-
210
-
211
-
212
-
213
-
214
-
215
-
216
-
217
-
218
-
219
-
220
-
221
-
222
-
223
-
224
-
225
-
226
-
227
-
228
-
229
-
230
-
231
-
232
-
233
-
234
-
235
-
236
-
237
-
238
-
239
-
240
-
241
-
242
-
243
-
244
-
245
-
246
-
247
-
248
-
249
-
250
-
251
-
252
-
253
-
254
-
255
-
256
-
257
-
258
-
259
-
260
-
261
-
262
-
263
-
264
-
265
-
266
-
267
-
268
-
269
-
270
-
271
-
272
-
273
-
274
-
275
-
276
-
277
-
278
-
279
-
280
-
281
-
282
-
283
-
284
-
285
-
286
-
287
-
288
-
289
-
290
-
291
-
292
-
293
-
294
-
295
-
296
-
297
-
298
-
299
-
300
-
301
-
302
-
303
-
304
-
305
-
306
-
307
-
308
-
309
-
310
-
311
-
312
-
313
-
314
-
315
-
316
-
317
-
318
-
319
-
320
-
321
-
322
-
323
-
324
-
325
-
326
-
327
-
328
-
329
-
330
-
331
-
332
-
333
-
334
-
335
-
336
-
337
-
338
-
339
-
340
-
341
-
342
-
343
-
344
-
345
-
346
-
347
-
348
-
349
-
350
-
351
-
352
-
353
-
354
-
355
-
356
-
357
-
358
-
359
-
360
-
361
-
362
-
363
-
364
-
365
-
366
-
367
-
368
-
369
-
370
-
371
-
372
-
373
-
374
-
375
-
376
-
377
-
378
-
379
-
380
-
381
-
382
-
383
-
384
-
385
-
386
-
387
-
388
-
389
-
390
-
391
-
392
-
393
-
394
-
395
-
396
-
397
-
398
-
399
-
400
-
401
-
402
-
403
-
404
-
405
-
406
-
407
-
408
-
409
-
410
-
411
-
412
-
413
-
414
-
415
-
416
-
417
-
418
-
419
-
420
-
421
-
422
-
423
-
424
-
425
-
426
-
427
-
428
-
429
-
430
-
431
-
432
-
433
-
434
-
435
-
436
-
437
-
438
-
439
-
440
-
441
-
442
-
443
-
444
-
445
-
446
-
447
-
448
-
449
-
450
-
451
-
452
-
453
-
454
-
455
-
456
-
457
-
458
-
459
-
460
-
461
-
462
-
463
-
464
-
465
-
466
-
467
-
468
-
469
-
470
-
471
-
472
-
473
-
474
-
 475
475 -
 476
476 -
 477
477 -
 478
478 -
 479
479 -
 480
480 -
 481
481 -
 482
482 -
 483
483 -
 484
484 -
 485
485 -
486
-
487
-
488
-
489
-
490
-
491
-
492
-
493
-
494
-
495
-
496
-
497
-
498
-
499
-
500
-
501
-
502
-
503
-
504
-
505
-
506
-
507
-
508
-
509
-
510
-
511
-
512
-
513
-
514
-
515
-
516
-
517
-
518
-
519
-
520
-
521
-
522
-
523
-
524
-
525
-
526
-
527
-
528
-
529
-
530
-
531
-
532
-
533
-
534
-
535
-
536
-
537
-
538
-
539
-
540
-
541
-
542
-
543
-
544
-
545
-
546
-
547
-
548
-
549
-
550
-
551
-
552
-
553
-
554
-
555
-
556
-
557
-
558
-
559
-
560
 |
 |