Cisco WS-C3560X-24P-S Hardware Installation Guide
Cisco WS-C3560X-24P-S Manual
 |
View all Cisco WS-C3560X-24P-S manuals
Add to My Manuals
Save this manual to your list of manuals |
Cisco WS-C3560X-24P-S manual content summary:
- Cisco WS-C3560X-24P-S | Hardware Installation Guide - Page 1
Catalyst 3560 Switch Hardware Installation Guide March 2010 Americas Headquarters Cisco Systems, Inc. 170 West Tasman Drive San Jose, CA 95134-1706 USA http://www.cisco.com Tel: 408 526-4000 800 553-NETS (6387) Fax: 408 527-0883 Text Part Number: OL-6337-07 - Cisco WS-C3560X-24P-S | Hardware Installation Guide - Page 2
energy. If it is not installed in accordance with Cisco's installation instructions, it may cause interference with radio and television reception. This equipment has been tested and found to comply with the limits for a Class B digital device in accordance with the specifications in part 15 of the - Cisco WS-C3560X-24P-S | Hardware Installation Guide - Page 3
1-13 Dual-Purpose Port LEDs 1-15 Cable Guard 1-15 Rear Panel Description 1-15 Internal Power Supply 1-18 DC Power Connector 1-18 Cisco RPS 1-19 Cisco RPS 2300 1-19 Cisco RPS 675 1-19 Console Port 1-19 Security Slots 1-20 Management Options 1-20 Catalyst 3560 Switch Hardware Installation Guide iii - Cisco WS-C3560X-24P-S | Hardware Installation Guide - Page 4
to 1000BASE-T SFP Modules 2-22 Connecting to a Dual-Purpose Port 2-23 Where to Go Next 2-24 Switch Installation (8- and 12-Port Switches) 3-1 Preparing for Installation 3-1 Warnings 3-2 Installation Guidelines 3-5 Equipment That You Supply 3-6 Catalyst 3560 Switch Hardware Installation Guide iv OL - Cisco WS-C3560X-24P-S | Hardware Installation Guide - Page 5
the AC Power Cord 3-19 Where to Go Next 3-20 Troubleshooting 4-1 Diagnosing Problems 4-1 Network Interface Cards 4-5 Cabling Distance 4-5 Clearing the Switch IP Address and Configuration 4-5 Locating the Switch Serial Number 4-6 Contents OL-6337-07 Catalyst 3560 Switch Hardware Installation Guide - Cisco WS-C3560X-24P-S | Hardware Installation Guide - Page 6
Specifications B-4 SFP Module Cable Specifications B-4 Two Twisted-Pair Cable Pinouts B-5 Four Twisted-Pair Cable Pinouts for 1000BASE-T Ports B-6 Identifying a Crossover Cable B-6 Adapter Pinouts B-7 Connecting to DC Power C-1 Connecting to DC Power C-1 Preparing for Installation C-2 Grounding - Cisco WS-C3560X-24P-S | Hardware Installation Guide - Page 7
: http://www.cisco.com/web/learning/index.html Purpose This guide describes the hardware features of the Catalyst 3560 switch. It describes the physical and performance characteristics of the switch, explains how to install it, and provides troubleshooting information. This guide does not describe - Cisco WS-C3560X-24P-S | Hardware Installation Guide - Page 8
Notes for Cisco Network Assistant • Cisco Small Form-Factor Pluggable Modules Installation Notes • Cisco CWDM GBIC and CWDM SFP Installation Note • Cisco RPS 2300 Redundant Power System Hardware Installation Guide • Cisco RPS 675 Redundant Power System Hardware Installation Guide These compatibility - Cisco WS-C3560X-24P-S | Hardware Installation Guide - Page 9
in Cisco Product Documentation as a Really Simple Syndication (RSS) feed and set content to be delivered directly to your desktop using a reader application. The RSS feeds are a free service and Cisco currently supports RSS version 2.0. OL-6337-07 Catalyst 3560 Switch Hardware Installation Guide - Cisco WS-C3560X-24P-S | Hardware Installation Guide - Page 10
Obtaining Documentation and Submitting a Service Request Preface Catalyst 3560 Switch Hardware Installation Guide x OL-6337-07 - Cisco WS-C3560X-24P-S | Hardware Installation Guide - Page 11
how to use Express Setup to initially configure your Catalyst switch. The getting started guide provides switch management options, basic rack-mounting procedures, port and module connections, power connection procedures, and troubleshooting help. For instructions on setting up your switch using the - Cisco WS-C3560X-24P-S | Hardware Installation Guide - Page 12
-T (only Catalyst 3560 24- and 48-port switches) • 1000BASE-ZX • Coarse Wavelength-Division Multiplexing (CWDM) • SFP module patch cable. (CAB-SFP-50CM=.) Switches running Cisco IOS Release 12.2(25)SEB or later support this patch cable. Catalyst 3560 Switch Hardware Installation Guide 1-2 OL - Cisco WS-C3560X-24P-S | Hardware Installation Guide - Page 13
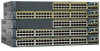
Panel OL-6337-07 97912 SYST RPS STAT DUPLX SPEED PoE MODE 12 1X 34 56 78 9 10 11 12 11X 2X 12X 13 14 13X 15 16 17 18 19 20 21 22 23 24 Catalyst 3560 SERIES PoE-24 23X 14X 24X 1 2 1 2 1 10/100 PoE ports 2 SFP module slots Catalyst 3560 Switch Hardware Installation Guide 1-3 - Cisco WS-C3560X-24P-S | Hardware Installation Guide - Page 14
19 20 21 22 23 24 25 26 27 28 29 30 31 32 16X 18X 33 31X 33X 34 35 36 37 38 39 40 41 42 43 44 45 46 47 48 Catalyst 3560 SERIES PoE-48 47X 32X 34X 1 3 48X 2 4 1 2 1 10/100 PoE ports 2 SFP module slots Catalyst 3560 Switch Hardware Installation Guide 1-4 OL-6337-07 - Cisco WS-C3560X-24P-S | Hardware Installation Guide - Page 15
20 21 22 23 24 25 26 27 28 29 30 31 32 16X 18X 33 31X 33X 34 35 36 37 38 39 40 41 42 43 44 45 46 47 48 47X 32X 34X Catalyst 3560 SERIES 1 3 48X 2 4 1 2 1 10/100 ports 2 SFP module slots The console port, 10/100 PoE ports, and a dual - Cisco WS-C3560X-24P-S | Hardware Installation Guide - Page 16
SYST RPS STAT DUPLX SPEED PoE MODE 12 1X 34 56 78 9 10 11 12 11X 2X 12X 13 14 13X 15 16 17 18 19 20 21 22 23 24 Catalyst 3560G SERIES PoE-24 23X 25 14X 27 24X 26 28 1 2 1 10/100/1000 ports 2 SFP module slots Catalyst 3560 Switch Hardware Installation Guide 1-6 OL-6337-07 - Cisco WS-C3560X-24P-S | Hardware Installation Guide - Page 17
24 25 26 27 28 29 30 31 32 16X 18X 33 31X 33X 34 35 36 37 38 39 40 41 42 43 44 45 46 47 48 Catalyst 3560G SERIES PoE-48 47X 32X 34X 49 51 48X 50 52 1 2 1 10/100/1000 ports 2 SFP module slots OL-6337-07 Catalyst 3560 Switch Hardware Installation Guide - Cisco WS-C3560X-24P-S | Hardware Installation Guide - Page 18
Front Panel Description Chapter 1 Product Overview The 10/100/1000 ports on the Catalyst 3560G-48TS switch are grouped in pairs. The first member of the pair (port 1) is above the second member (port 2) on the left, as shown in Figure 1-10. Port 3 is above port 4, and so on. The SFP module slots - Cisco WS-C3560X-24P-S | Hardware Installation Guide - Page 19
guide or the switch command reference. • The10/100 and 10/100/1000 PoE ports on the switch provide PoE support for devices compliant with IEEE 802.3af and Cisco prestandard PoE support for Cisco IP Phones and Cisco Aironet Access Points. • Each of the Catalyst 3560-8PC, 3560-12PC-S, 3560-24PS - Cisco WS-C3560X-24P-S | Hardware Installation Guide - Page 20
Front Panel Description Chapter 1 Product Overview Many legacy powered devices, including older Cisco IP phones and access points that do not fully support IEEE 802.3af, might not support PoE when connected to the switches by a crossover cable. SFP Module Slots See the release notes for the - Cisco WS-C3560X-24P-S | Hardware Installation Guide - Page 21
powered on. System is operating normally. System is receiving power but is not functioning properly. For information on the System LED colors during the power-on self-test (POST), see the "Verifying Switch Operation" section on page 2-6. OL-6337-07 Catalyst 3560 Switch Hardware Installation Guide - Cisco WS-C3560X-24P-S | Hardware Installation Guide - Page 22
do not have an RPS LED. For more information about the Cisco RPS 2300 and the RPS 675, see the Cisco Redundant Power System 2300 Hardware Installation Guide and the Cisco RPS 675 Redundant Power System Hardware Installation Guide. 1-12 Catalyst 3560 Switch Hardware Installation Guide OL-6337-07 - Cisco WS-C3560X-24P-S | Hardware Installation Guide - Page 23
PoE port power The PoE status. 1. When installed in Catalyst 3560 switches, 1000BASE-T SFP modules can operate at 10, 100, or 1000 Mb/s in full-duplex mode or at 10 or 100 Mb/s in half-duplex mode. Even if the PoE mode is not selected, the PoE LED shows PoE problems when they are detected. The - Cisco WS-C3560X-24P-S | Hardware Installation Guide - Page 24
Port is operating at 10 Mb/s. Green Port is operating at 100 Mb/s. Blinking green Port is operating at 1000 Mb/s. Note When installed in Catalyst 3560 switches, 1000BASE-T SFP modules can operate at 10, 100, or 1000 Mb/s in full-duplex mode or at 10 or 100 Mb/s in half-duplex mode. 1-14 - Cisco WS-C3560X-24P-S | Hardware Installation Guide - Page 25
a different purpose than the cable guide (see "Attaching the Cable Guide" section on page 2-11). Rear Panel Description • Internal Power Supply, page 1-18 • Cisco RPS, page 1-19 • Console Port, page 1-19 • Security Slots, page 1-20 Note The Catalyst 3560-8PC and the Catalyst 3560-12PC-S switches do - Cisco WS-C3560X-24P-S | Hardware Installation Guide - Page 26
1-15 Catalyst 3560G-24PS, 3560G-48PS, 3560G-24TS, and 3560G-48TS Switch Rear Panel 119678 CONSOLE DSCPIENPCPOIUWFTIEESDRFISONURMPRPAELNYMUOATLE 12 3 4 1 RJ-45 console port 3 RPS connector 2 Fan exhaust 4 AC power connector 1-16 Catalyst 3560 Switch Hardware Installation Guide OL-6337 - Cisco WS-C3560X-24P-S | Hardware Installation Guide - Page 27
4 1 RJ-45 console port 2 Fan exhaust 3 RPS connector 4 AC power connector Figure 1-17 Catalyst 3560V2-24TS-SD Switch Rear Panel 274671 CONSOLE 12 3 4 1 RJ-45 console port 2 Fan exhaust 3 RPS connector 4 DC power connector OL-6337-07 Catalyst 3560 Switch Hardware Installation Guide 1-17 - Cisco WS-C3560X-24P-S | Hardware Installation Guide - Page 28
240 VAC. Use the supplied AC power cord to connect the AC power connector to an AC power outlet. DC Power Connector The Catalyst 3560V2-24TS-SD has an internal DC-power converter. It has dual feeds (A and B) that are diode-OR-ed into a single power block. For installation instructions, see Appendix - Cisco WS-C3560X-24P-S | Hardware Installation Guide - Page 29
RPS 2300 has two output levels: -52 V and 12 V. The maximum output power depends on the installed power-supply modules. Cisco RPS 675 The Cisco 675 RPS is a redundant power system that supports six network devices and provides power to one failed switch at a time. It automatically senses when the - Cisco WS-C3560X-24P-S | Hardware Installation Guide - Page 30
you run the installer, follow the displayed instructions. In the final panel, click Finish to complete the Network Assistant installation. See the Network Assistant online help and the getting started guide for more information. 1-20 Catalyst 3560 Switch Hardware Installation Guide OL-6337-07 - Cisco WS-C3560X-24P-S | Hardware Installation Guide - Page 31
of network configuration concepts. The software configuration guide also provides examples of network configurations that use the switch to create dedicated network segments that are interconnected through Ethernet connections. OL-6337-07 Catalyst 3560 Switch Hardware Installation Guide 1-21 - Cisco WS-C3560X-24P-S | Hardware Installation Guide - Page 32
Management Options Chapter 1 Product Overview 1-22 Catalyst 3560 Switch Hardware Installation Guide OL-6337-07 - Cisco WS-C3560X-24P-S | Hardware Installation Guide - Page 33
3560 12-PC-S switches, see Chapter 3, "Switch Installation (8- and 12-Port Switches)." The instructions in this chapter for connecting to the switch ports and for installing, and connecting to the SFP modules apply to all Catalyst 3560 switches. Read the topics and perform the procedures in this - Cisco WS-C3560X-24P-S | Hardware Installation Guide - Page 34
the wall-mounting instructions carefully before beginning installation. Failure to use the correct hardware or to follow the correct procedures could result in a hazardous situation to people and damage to the system. Statement 378 Catalyst 3560 Switch Hardware Installation Guide 2-2 OL-6337-07 - Cisco WS-C3560X-24P-S | Hardware Installation Guide - Page 35
installation instructions before connecting the system to the power source. Statement 1004 Warning This product relies on the building's installation with stabilizing devices, install the stabilizers before mounting or servicing the unit in the Catalyst 3560 Switch Hardware Installation Guide 2-3 - Cisco WS-C3560X-24P-S | Hardware Installation Guide - Page 36
Warning This unit might have more than one power supply connection. All connections must be removed to de-energize the unit. Statement 1028 Warning Only trained and qualified personnel should be allowed to install, replace, or service this equipment. Statement 1030 Warning Ultimate disposal of - Cisco WS-C3560X-24P-S | Hardware Installation Guide - Page 37
3560 switch SFP ports use both GLC-GE-100XX and GLC-FE-100XX SFP modules. When you use shorter lengths of single-mode fiber cable, you might need to insert an inline optical attenuator in the link to avoid overloading the receiver. OL-6337-07 Catalyst 3560 Switch Hardware Installation Guide 2-5 - Cisco WS-C3560X-24P-S | Hardware Installation Guide - Page 38
-T copper port and one SFP module slot) Box Contents The switch getting started guide on Cisco.com describes the box contents. If any item is missing or damaged, contact your Cisco representative or reseller for support. Tools and Equipment You need to supply a number-2 Phillips screwdriver to - Cisco WS-C3560X-24P-S | Hardware Installation Guide - Page 39
POST, the System LED turns amber. POST failures are usually fatal. Call Cisco technical support representative if your switch fails POST. Powering Off the Switch After a successful POST, disconnect the power cord from the switch. Install the switch in a rack, on a wall, on a table, or on a shelf as - Cisco WS-C3560X-24P-S | Hardware Installation Guide - Page 40
Switch Installation (24- and 48-Port Switches) Removing Screws from the Switch Before you install the switch in a rack, remove the switch chassis screws (see Figure 2-1.) Figure 2-1 Removing Screws from the Catalyst 3560 Switch 97916 40 41 42 43 44 45 46 47 48 47X Catalyst 3560 SERIES PoE - Cisco WS-C3560X-24P-S | Hardware Installation Guide - Page 41
Chapter 2 Switch Installation (24- and 48-Port Switches) Installing the Switch Figure 2-3 1 Attaching Brackets for 24-Inch Racks to a Catalyst 3560 Switch, Front Panel Forward 1 Phillips flat-head screws SYST RPS STAT DUPLX SPEED PoE MODE 1 1X 23 45 67 8 9 10 11 12 13 14 15 16 15X - Cisco WS-C3560X-24P-S | Hardware Installation Guide - Page 42
20 21 22 23 24 25 26 27 28 29 30 31 32 16X 18X 33 31X 33X 34 35 36 37 38 39 40 41 42 43 44 45 46 47 48 Catalyst 3560 SERIES PoE-48 47X 32X 34X 1 3 48X 2 4 1 1 Phillips machine screws 97923 2-10 Catalyst 3560 Switch Hardware Installation Guide OL-6337-07 - Cisco WS-C3560X-24P-S | Hardware Installation Guide - Page 43
of the switch and the other devices installed in the rack. Use the supplied black screw shown in Figure 2-9 to attach the cable guide to the left or right bracket. Figure 2-9 Attaching the Cable Guide on the Catalyst 3560 Switch 1 SYST RPS STAT DUPLX SPEED PoE MODE 1 1X 2X 23 45 67 8 9 10 - Cisco WS-C3560X-24P-S | Hardware Installation Guide - Page 44
the Switch Chapter 2 Switch Installation (24- and 48-Port Switches) Wall-Mounting These switches wall-mount only with the front panel facing up: • Catalyst 3560-24PS, 3560-24TS-S, 3560-48PS, and 3560-48TS-S • Catalyst 3560G-24PS, 3560G-24TS, 3560G-48PS, and 3560G-48TS These switches wall - Cisco WS-C3560X-24P-S | Hardware Installation Guide - Page 45
Installation (24- and 48-Port Switches) Installing the Switch Attaching the RPS Connector Cover If you are not using an RPS with your switch, use the two Phillips pan-head screws to attach the RPS connector cover to the back of the switch, as shown in Figure 2-11. Warning If a redundant power - Cisco WS-C3560X-24P-S | Hardware Installation Guide - Page 46
97927 1 1 1 User-supplied screws After the switch is mounted in the rack: 1. Power on the switch. See the "Verifying Switch Operation" section on page 2-6. 2. Connect to a 10/100 or 10/100/1000 port, and run Express Setup. See the Catalyst 3560 Switch Getting Started Guide for instructions. To use - Cisco WS-C3560X-24P-S | Hardware Installation Guide - Page 47
information, which Cisco uses to identify and validate that the SFP module meets the requirements for the switch. For detailed instructions on installing, removing, and cabling the SFP module, see the SFP module documentation. OL-6337-07 Catalyst 3560 Switch Hardware Installation Guide 2-15 - Cisco WS-C3560X-24P-S | Hardware Installation Guide - Page 48
connector on the module snap into place in the rear of the slot. (See Figure 2-14.) Figure 2-14 Installing an SFP Module into an SFP Module Slot 40 41 42 43 44 45 46 47 48 47X Catalyst 3560 SERIES PoE-48 1 3 48X 2 4 97928 2-16 Catalyst 3560 Switch Hardware Installation Guide OL-6337 - Cisco WS-C3560X-24P-S | Hardware Installation Guide - Page 49
Screwdriver 97929 40 41 42 43 44 45 46 47 48 47X Catalyst 3560 SERIES PoE-48 1 3 1 Bale clasp 48X 2 4 1 Step 4 Grasp the SFP module between your thumb and index finger, and carefully remove it from the module slot. OL-6337-07 Catalyst 3560 Switch Hardware Installation Guide 2-17 - Cisco WS-C3560X-24P-S | Hardware Installation Guide - Page 50
24X 1 2 13 14 13X 15 16 17 18 19 20 21 22 23 24 23X Catalyst 3560 SERIES 14X 24X 1 2 126811 To remove an SFP module patch cable from the SFP module slot, release the connector, and pull it from the SFP module slot. 2-18 Catalyst 3560 Switch Hardware Installation Guide OL-6337-07 - Cisco WS-C3560X-24P-S | Hardware Installation Guide - Page 51
between Cisco IOS Release 12.1(14)EA1 and 12.2(18)SE, the auto-MDIX feature is disabled by default. For configuration information for this feature, see the switch software configuration guide or the switch command reference. OL-6337-07 Catalyst 3560 Switch Hardware Installation Guide 2-19 - Cisco WS-C3560X-24P-S | Hardware Installation Guide - Page 52
not turn on, the device at the other end might not be turned on, or there might be a cable problem or a problem with the adapter installed in the attached device. See Chapter 4, "Troubleshooting," for solutions to cabling problems. 2-20 Catalyst 3560 Switch Hardware Installation Guide OL-6337-07 - Cisco WS-C3560X-24P-S | Hardware Installation Guide - Page 53
you understand the port and cabling stipulations in the "Installation Guidelines" section on page 2-5. See Appendix B, "Connector and Cable Specifications," for information about the LC on the SFP module. Step 1 Remove the rubber plugs from the module port and fiber-optic cable, and store them for - Cisco WS-C3560X-24P-S | Hardware Installation Guide - Page 54
might be a cable problem, or there might be problem with the adapter installed in the target device. See Chapter 4, "Troubleshooting," for solutions to cabling problems. If necessary, reconfigure and restart the switch or target device. Connecting to 1000BASE-T SFP Modules Caution To prevent ESD - Cisco WS-C3560X-24P-S | Hardware Installation Guide - Page 55
. See Chapter 4, "Troubleshooting," for solutions to cabling problems. If necessary, reconfigure and restart the switch or target device. Connecting to a Dual-Purpose Port Step 1 Connect an RJ-45 connector to the 10/100/1000 port, or install an SFP module into the SFP module slot, and connect - Cisco WS-C3560X-24P-S | Hardware Installation Guide - Page 56
the Catalyst 3560 Switch Software Configuration Guide and the Catalyst 3560 Switch Command Reference on Cisco.com for information on using the CLI with a Catalyst 3560 switch. • Start an SNMP application such as the CiscoView application. 2-24 Catalyst 3560 Switch Hardware Installation Guide OL - Cisco WS-C3560X-24P-S | Hardware Installation Guide - Page 57
operation. It also describes how to install the switch. Note This chapter describes the installation information specific to the Catalyst 3560-8PC and Catalyst 3560-12PC-S switches. For installing the other Catalyst 3560 switches, see Chapter 2, "Switch Installation (24- and 48-Port Switches)." Read - Cisco WS-C3560X-24P-S | Hardware Installation Guide - Page 58
the wall-mounting instructions carefully before beginning installation. Failure to use the correct hardware or to follow the correct procedures could result in a hazardous situation to people and damage to the system. Statement 378 Catalyst 3560 Switch Hardware Installation Guide 3-2 OL-6337-07 - Cisco WS-C3560X-24P-S | Hardware Installation Guide - Page 59
installation instructions before connecting the system to the power source. Statement 1004 Warning This product relies on the building's installation with stabilizing devices, install the stabilizers before mounting or servicing the unit in the Catalyst 3560 Switch Hardware Installation Guide 3-3 - Cisco WS-C3560X-24P-S | Hardware Installation Guide - Page 60
Warning This unit might have more than one power supply connection. All connections must be removed to de-energize the unit. Statement 1028 Warning Only trained and qualified personnel should be allowed to install, replace, or service this equipment. Statement 1030 Warning Ultimate disposal of - Cisco WS-C3560X-24P-S | Hardware Installation Guide - Page 61
and 12-Port Switches) Statement 371-Power Cable and AC Adapter Preparing for Installation Caution To comply with the Telcordia GR-1089 Network Equipment Building Systems (NEBS) standard and to provide easier access to the cables. OL-6337-07 Catalyst 3560 Switch Hardware Installation Guide 3-5 - Cisco WS-C3560X-24P-S | Hardware Installation Guide - Page 62
20 This applies to all Cisco Ethernet switches except for this compact model: - Catalyst 3560-8PC switch-8 10/100 PoE ports and 1 dual-purpose port (one 10/100/1000BASE-T copper port and one SFP module slot) Equipment That You Supply You need this equipment to install the switch: • Number-2 Phillips - Cisco WS-C3560X-24P-S | Hardware Installation Guide - Page 63
. If any item is missing or damaged, contact your Cisco representative or reseller for support. Tools and Equipment You need to supply a number-2 Phillips screwdriver to rack-mount the switch. Verifying Switch Operation Before you install the switch, power it on and verify that it passes POST. See - Cisco WS-C3560X-24P-S | Hardware Installation Guide - Page 64
. Figure 3-1 3 Installing the Mounting Screws on a Desk or Shelf 2 1 210096 1 Screw template 3 Desk or shelf 2 Screws Step 3 Peel the adhesive strip off the bottom of the screw template, and attach it to the top of the desk or shelf. Catalyst 3560 Switch Hardware Installation Guide 3-8 OL-6337 - Cisco WS-C3560X-24P-S | Hardware Installation Guide - Page 65
STAT DPLX SPD PoE MODE CONSOLE 1x 2x 3x 4x 5x 6x 7x 8x Catalyst 3560 SERIES PoE-8 1 3 power cord faces the rear of the desk or shelf after the switch is installed. Wait before you attach the screw template to the desk or shelf. OL-6337-07 Catalyst 3560 Switch Hardware Installation Guide - Cisco WS-C3560X-24P-S | Hardware Installation Guide - Page 66
the Switch Chapter 3 Switch Installation (8- and 12-Port Switches) Figure 3-3 Installing the Mounting Screws Under a Desk or Shelf 1 5 2 89857 3 4 3 1 Desk or shelf 2 Screw template from underneath the desk or shelf. 3-10 Catalyst 3560 Switch Hardware Installation Guide OL-6337-07 - Cisco WS-C3560X-24P-S | Hardware Installation Guide - Page 67
run Express Setup. See the Catalyst 3560 Switch Getting Started Guide for instructions. To use the CLI setup program, see Appendix D, "Configuring the Switch with the CLI-Based Setup Program." 4. Connect to the front-panel ports. OL-6337-07 Catalyst 3560 Switch Hardware Installation Guide 3-11 - Cisco WS-C3560X-24P-S | Hardware Installation Guide - Page 68
in Figure 3-5. For the best support of the switch and cables, make sure the switch is attached securely to a wall stud or to a firmly attached plywood mounting backboard. Note Wait before you attach the screw template to the wall. 3-12 Catalyst 3560 Switch Hardware Installation Guide OL-6337-07 - Cisco WS-C3560X-24P-S | Hardware Installation Guide - Page 69
(8- and 12-Port Switches) Figure 3-5 Installing the Mounting Screws on a Wall 1 2 Installing the Switch TMHIOSUSNIDTIENAGWSAUYRFFRAOCEM 157828 CABLE SIDE ENTRY 2 3 2 1 Wall 3 Screw template 2 Screws template from the wall. OL-6337-07 Catalyst 3560 Switch Hardware Installation Guide 3-13 - Cisco WS-C3560X-24P-S | Hardware Installation Guide - Page 70
run Express Setup. See the Catalyst 3560 Switch Getting Started Guide for instructions. To use the CLI setup program, see Appendix D, "Configuring the Switch with the CLI-Based Setup Program." 4. Connect to the front-panel ports. 3-14 Catalyst 3560 Switch Hardware Installation Guide OL-6337-07 - Cisco WS-C3560X-24P-S | Hardware Installation Guide - Page 71
the wall-mounting instructions carefully before beginning installation. Failure to use power cord. See "Securing the AC Power Cord" section on page 3-19. 2. Power on the switch. See the "Verifying Switch Operation" section on page 3-7. OL-6337-07 Catalyst 3560 Switch Hardware Installation Guide - Cisco WS-C3560X-24P-S | Hardware Installation Guide - Page 72
Setup. See the Catalyst 3560 Switch Getting Started Guide for instructions. To use the CLI setup program, see Appendix D, "Configuring the Switch with the CLI-Based Setup Program." 4. Connect to the front-panel ports. Rack-Mounting Installing the Catalyst 3560-8PC switch or the Catalyst 3560 12-PC - Cisco WS-C3560X-24P-S | Hardware Installation Guide - Page 73
Setup. See the Catalyst 3560 Switch Getting Started Guide for instructions. To use the CLI setup program, see Appendix D, "Configuring the Switch with the CLI-Based Setup Program." 4. Connect to the front-panel ports. Wall-Mounting (with Rack-Mount Brackets) Installing the Catalyst 3560-8PC switch - Cisco WS-C3560X-24P-S | Hardware Installation Guide - Page 74
run Express Setup. See the Catalyst 3560 Switch Getting Started Guide for instructions. To use the CLI setup program, see Appendix D, "Configuring the Switch with the CLI-Based Setup Program." 4. Connect to the front-panel ports. 3-18 Catalyst 3560 Switch Hardware Installation Guide OL-6337-07 - Cisco WS-C3560X-24P-S | Hardware Installation Guide - Page 75
Step 5 Slide the bushing so that it rests against the power-cord connector, and then rotate the bushing clockwise until the bushing is securely fastened and its opening is on the right side of the power cord (see Figure 3-14). OL-6337-07 Catalyst 3560 Switch Hardware Installation Guide 3-19 - Cisco WS-C3560X-24P-S | Hardware Installation Guide - Page 76
the Catalyst 3560 Switch Software Configuration Guide and the Catalyst 3560 Switch Command Reference on Cisco.com for information on using the CLI with a Catalyst 3560 switch. • Start an SNMP application such as the CiscoView application. 3-20 Catalyst 3560 Switch Hardware Installation Guide OL - Cisco WS-C3560X-24P-S | Hardware Installation Guide - Page 77
Simple Network Management Protocol (SNMP) workstation. See the software configuration guide, the switch command reference guide on Cisco.com, or the documentation that came with your SNMP application for details. This chapter describes these topics for troubleshooting problems: • Diagnosing Problems - Cisco WS-C3560X-24P-S | Hardware Installation Guide - Page 78
failures are usually fatal. Contact your Cisco technical support representative if your switch does not pass POST. Monitor Switch LEDs Look at the port LEDs for troubleshooting information about the switch. See the "LEDs" section on page 1-11 for descriptions of the LED colors and their meanings - Cisco WS-C3560X-24P-S | Hardware Installation Guide - Page 79
Connector and Cable Specifications." for more information. • Look for loose connections. Sometimes a cable appears to be seated, but is not. Disconnect and then reconnect the cable. Transceiver Module Port Issues Use only Cisco small form-factor (SFP) modules on the switch. Each Cisco module has an - Cisco WS-C3560X-24P-S | Hardware Installation Guide - Page 80
the "Understanding UDLD" section in the software configuration guide. Monitor Switch Performance Review these sections when you troubleshoot switch performance problems: • Speed, Duplex, and Autonegotiation, page 4-4 • Autonegotiation and Network Interface Cards, page 4-5 • Cabling Distance, page - Cisco WS-C3560X-24P-S | Hardware Installation Guide - Page 81
Network Interface Cards Problems sometimes occur between the switch and third-party network troubleshoot autonegotiation problems, try to manually set both sides of the connection. If this does not solve the problem and Cable Specifications," for Catalyst 3560 Switch Hardware Installation Guide 4-5 - Cisco WS-C3560X-24P-S | Hardware Installation Guide - Page 82
SN: XXXNNNNXXXX Figure 4-3 Serial Number Location on the Catalyst 3560-48PS and 3560V2-48PS Switch 116112 CONSOLE RATING 5.0A1-20.05-A2,0500V-6~0 HZ SN: AAANNNNXXXX [email protected]@YMUO7A.TL8EA Catalyst 3560 Switch Hardware Installation Guide 4-6 OL-6337-07 - Cisco WS-C3560X-24P-S | Hardware Installation Guide - Page 83
STACK 1 STACK 2 CONSOLE DSCPIENPCPOIUWFTIEESDRFISONURMPRPAELNYMUOATLE SN: XXXNNNNXXXX Figure 4-6 Serial Number Location on the Catalyst 3560 8-PS and the Catalyst 3560 12-PS-S Switches SN: XXXNNNNXXXX 250518, 781-00604-01 A0 OL-6337-07 Catalyst 3560 Switch Hardware Installation Guide 4-7 - Cisco WS-C3560X-24P-S | Hardware Installation Guide - Page 84
Locating the Switch Serial Number Chapter 4 Troubleshooting Catalyst 3560 Switch Hardware Installation Guide 4-8 OL-6337-07 - Cisco WS-C3560X-24P-S | Hardware Installation Guide - Page 85
page A-3, Specifications for the Catalyst 3560-8PC and Catalyst 3560-12PC Switches • Table A-7 on page A-4, Specifications for the Catalyst 3560G-24TS Switch • Table A-8 on page A-4, Specifications for the Catalyst 3560G-24PS Switch • Table A-9 on page A-5, Specifications for the Catalyst 3560G-48TS - Cisco WS-C3560X-24P-S | Hardware Installation Guide - Page 86
per hour Power rating 0.53 KVA Power over Ethernet Range from 4 to 15.4 W per port, up to 370-W switch maximum Physical Dimensions Weight 13.2 lb (6 kg) Dimensions (H x D x W) 1.73 x 14.85 x 17.5 in. (4.39 x 37.72 x 44.45 cm) Catalyst 3560 Switch Hardware Installation Guide A-2 OL-6337 - Cisco WS-C3560X-24P-S | Hardware Installation Guide - Page 87
Power over Ethernet Up to 124-W switch maximum Physical Dimensions Weight Dimensions (H x D x W) 100 to 240 VAC (autoranging) 2.5 to 1.3 A, 50 to 60 Hz 204 W 80 W, 12 BTUs per hour 0.2 KVA 5 lb (2.3 kg) 1.73 x 9.1 x 10.6 in. (4.4 x 23 x 26.9 cm) Catalyst 3560 Switch Hardware Installation Guide - Cisco WS-C3560X-24P-S | Hardware Installation Guide - Page 88
per hour Power rating 0.52 KVA Power over Ethernet Range from 4 to 15.4 W per port, up to 370 W switch maximum Physical Dimensions Weight 13.5 lb (6.1 kg) Dimensions (H x D x W) 1.73 x 14.9 x 17.5 in. (4.39 x 37.8 x 44.45 cm) Catalyst 3560 Switch Hardware Installation Guide A-4 OL-6337 - Cisco WS-C3560X-24P-S | Hardware Installation Guide - Page 89
Power rating 0.56 KVA Power over Ethernet Range from 4 to 15.4 W per port, up to 370 W switch maximum Physical Dimensions Weight 15.5 lb (7.03 kg) Dimensions (H x D x W) 1.73 x 16.1 x 17.5 in. (4.39 x 40.9 x 44.45 cm) Table A-11 Specifications for the Catalyst 3560V2-48PS and 3560V2-24PS - Cisco WS-C3560X-24P-S | Hardware Installation Guide - Page 90
Power consumption 180 W, 615 BTUs per hour Power rating 0.180 kVA Physical Dimensions Weight 8.5 lb (3.9 kg) Dimensions (H x W x D) 1.73 x 11.81 x 17.5 in. (4.4 x 30 x 44.45 cm) Table A-13 Specifications for the Catalyst m) Catalyst 3560 Switch Hardware Installation Guide A-6 OL-6337-07 - Cisco WS-C3560X-24P-S | Hardware Installation Guide - Page 91
Ranges Power Requirements DC input voltage -36 to -72 VDC 3 to 1.5 A Power consumption 94 W, 321 BTUs per hour Physical Dimensions Weight 9 lb (4.1 kg) Dimensions (H x W x D) 1.73 x 17.5 x 11.8 in. (4.4 x 44.5 x 30.1 cm) OL-6337-07 Catalyst 3560 Switch Hardware Installation Guide A-7 - Cisco WS-C3560X-24P-S | Hardware Installation Guide - Page 92
Appendix A Technical Specifications Catalyst 3560 Switch Hardware Installation Guide A-8 OL-6337-07 - Cisco WS-C3560X-24P-S | Hardware Installation Guide - Page 93
: • "Connector Specifications" section on page B-1 • "Cable and Adapter Specifications" section on page B-4 Connector Specifications • 10/100 and 10/100/1000 Ports, page B-1 • SFP Module Ports, page shows the pinout for a 10/100 port. OL-6337-07 Catalyst 3560 Switch Hardware Installation Guide B-1 - Cisco WS-C3560X-24P-S | Hardware Installation Guide - Page 94
12345678 SFP Module Ports The Catalyst 3560 switch uses SFP modules for fiber-optic and copper uplinks. See the Catalyst 3560 release notes for a list of supported SFP modules. Figure B-3 Fiber-Optic SFP Module LC Connector 58476 60915 Catalyst 3560 Switch Hardware Installation Guide B-2 OL - Cisco WS-C3560X-24P-S | Hardware Installation Guide - Page 95
-purpose port uses SFP modules for fiber-optic and copper uplink ports. See the Catalyst 3560 release notes for a list of supported SFP modules. Note The auto-MDIX feature is enabled by default. For configuration information for this feature, see the switch software configuration guide or the switch - Cisco WS-C3560X-24P-S | Hardware Installation Guide - Page 96
cable at lengths up to 328 feet (100 meters). Table B-1 Fiber-Optic SFP Module Port Cabling Specifications SFP Module 100BASE-BX (GLC-FE-100BX-D GLC-FE-100BX-U) 100BASE-FX (GLC-GE- feet (10 km) 43.4 to 62 miles (70 to 100 km)4 Catalyst 3560 Switch Hardware Installation Guide B-4 OL-6337-07 - Cisco WS-C3560X-24P-S | Hardware Installation Guide - Page 97
, you must also install a mode-conditioning patch cord between the SFP module and the MMF cable on both the sending and receiving ends of the link. The mode-conditioning patch cord is required for link distances greater than 984 feet (300 m). 4. 1000BASE-ZX SFP modules can send data up to 62 miles - Cisco WS-C3560X-24P-S | Hardware Installation Guide - Page 98
Specifications Appendix B Connector and Cable Specifications Four Twisted-Pair Cable Pinouts for 1000BASE-T Ports Figure B-8 and Figure B-9 show the schematics of four twisted-pair cables for 1000BASE-T SFP module ports on Catalyst Catalyst 3560 Switch Hardware Installation Guide B-6 OL-6337-07 - Cisco WS-C3560X-24P-S | Hardware Installation Guide - Page 99
1 on the other connector should be different colors. Pin 1 Cable and Adapter Specifications 200915 Adapter Pinouts Table B-2 lists the pinouts for the console port, the RJ- which is not supplied with the switch (ACS-DSBUASYN=). OL-6337-07 Catalyst 3560 Switch Hardware Installation Guide B-7 - Cisco WS-C3560X-24P-S | Hardware Installation Guide - Page 100
Specifications Table B-3 Switch Console Port (DTE) Signal RTS DTR TxD GND GND RxD DSR CTS Console Port Signaling Using a DB-25 Adapter RJ-45-to-DB-25 Terminal Adapter DB-25 Pin 5 6 3 7 7 2 20 4 Console Device Signal CTS DSR RxD GND GND TxD DTR RTS Catalyst 3560 Switch Hardware Installation - Cisco WS-C3560X-24P-S | Hardware Installation Guide - Page 101
describes how to make DC power connections to the Catalyst 3560V2-24TS-SD switch. See "Switch Installation (24- and 48-Port Switches)" and "Switch Installation (8- and 12-Port Switches)" for instructions on installing the switch. Connecting to DC Power To connect the Catalyst 3560V2-24TS-SD switch - Cisco WS-C3560X-24P-S | Hardware Installation Guide - Page 102
Power Appendix C Connecting to DC Power Caution The Catalyst 3560V2-24TS-SD switch is suitable only for intrabuilding or nonexposed wiring connections. Preparing for Installation follow the grounding procedure instructions, and use a Catalyst 3560 Switch Hardware Installation Guide C-2 OL-6337-07 - Cisco WS-C3560X-24P-S | Hardware Installation Guide - Page 103
the Ground Wire 0.5 in. (12.7 mm) ± 0.02 in. (0.5 mm) Connecting to DC Power 60528 Insulation Wire lead Step 3 Slide the open end of the ground lug over the exposed area of each ground-lug screw to 15 lbf-in. (240 ozf-in.) OL-6337-07 Catalyst 3560 Switch Hardware Installation Guide C-3 - Cisco WS-C3560X-24P-S | Hardware Installation Guide - Page 104
to DC Power Appendix C Connecting to DC Power Figure C-3 Attaching the Ground Lug Assembly Over the RPS Connector CONSOLE 274667 Figure C-4 Attaching the Ground Lug to the Ground Lug Hole 274668 1 1 Ground hole location Catalyst 3560 Switch Hardware Installation Guide C-4 OL-6337 - Cisco WS-C3560X-24P-S | Hardware Installation Guide - Page 105
install, replace, or service this equipment. Statement 1030 Caution You must connect the Catalyst 3560V2-24TS-SD switch only to a DC-input power source that has an input supply voltage from -36 to -72 VDC. If the supply installation. OL-6337-07 Catalyst 3560 Switch Hardware Installation Guide C-5 - Cisco WS-C3560X-24P-S | Hardware Installation Guide - Page 106
Connecting to DC Power 86460 Step 5 Insert the exposed wire of one of the four DC-input power source wires into power source can conduct harmful levels of electricity. Be sure of the DC-input power source wire extends from the terminal block captive screw (above the installed wire lead) to 4.5 lbf-in. ( - Cisco WS-C3560X-24P-S | Hardware Installation Guide - Page 107
in. (72 ozf-in.) 60533 Step 7 Repeat Steps 4 and 5 for the remaining three DC-input power source wires. Figure C-9 shows the completed wiring of a terminal block plug. Figure C-9 Completed Wiring of to secure the wires to the rack. OL-6337-07 Catalyst 3560 Switch Hardware Installation Guide C-7 - Cisco WS-C3560X-24P-S | Hardware Installation Guide - Page 108
to DC Power Figure C-10 Inserting the Terminal Block in the Block Header 274669 CONSOLE 2 1 1 Tie wrap 2 Terminal block Step 9 Remove the tape from the circuit-breaker switch handle, and move the circuit-breaker handle to the on position. Catalyst 3560 Switch Hardware Installation Guide C-8 OL - Cisco WS-C3560X-24P-S | Hardware Installation Guide - Page 109
28 29 30 31 32 16X 18X 33 31X 33X 34 35 36 37 38 39 40 41 42 43 44 45 46 47 48 Catalyst 3560 SERIES PoE-48 47X 32X 34X 1 3 48X 2 4 2 97933 OL-6337-07 3 1 Catalyst 3560 switch 3 AC power cord 2 RJ-45-to-DB-9 adapter cable Catalyst 3560 Switch Hardware Installation Guide D-1 - Cisco WS-C3560X-24P-S | Hardware Installation Guide - Page 110
baud • 8 data bits • 1 stop bit • No parity • None (flow control) Connect one end of the supplied AC power cord to the power connector on a switch rear panel. See Figure D-2. Connect the other end of the power cable to a grounded AC outlet. Catalyst 3560 Switch Hardware Installation Guide D-2 OL - Cisco WS-C3560X-24P-S | Hardware Installation Guide - Page 111
failures are usually fatal. Call Cisco technical support representative if your switch fails POST. If you started the terminal emulation program before you powered on your switch, the PC text. Enter enable secret: secret_password OL-6337-07 Catalyst 3560 Switch Hardware Installation Guide D-3 - Cisco WS-C3560X-24P-S | Hardware Installation Guide - Page 112
as that interface. Enter interface name used to connect to the management network from the above interface summary: vlan1 Configure the interface by entering the /0/3 ! ... ! interface GigabitEthernet2/0/28 Catalyst 3560 Switch Hardware Installation Guide D-4 OL-6337-07 - Cisco WS-C3560X-24P-S | Hardware Installation Guide - Page 113
choices appear: [0] Go to the IOS command prompt without saving this config. Cisco Network Assistant guide. For installation procedures for mounting your switch, connecting to the switch ports, or connecting to the small form-factor pluggable (SFP) modules, see Chapter 2, "Switch Installation (24 - Cisco WS-C3560X-24P-S | Hardware Installation Guide - Page 114
Completing the Setup Program Appendix D Configuring the Switch with the CLI-Based Setup Program Catalyst 3560 Switch Hardware Installation Guide D-6 OL-6337-07 - Cisco WS-C3560X-24P-S | Hardware Installation Guide - Page 115
1000BASE-T SFP module ports cable lengths 2-5, 3-6 5 A-branch circuit protection caution C-5 A AC power connecting to 2-6, 3-7 connector 1-19 specifications A-2 adapter pinouts, terminal RJ-45-to-DB-25 B-7 RJ-45-to-DB-9 B-7 auto-MDIX 2-19, B-3 OL-6337-07 INDEX autonegotiation 1-8 troubleshooting - Cisco WS-C3560X-24P-S | Hardware Installation Guide - Page 116
1000BASE-T SFP module ports 2-22 pinout for four twisted-pair, 1000BASE-T ports B-6 IN-2 Catalyst 3560 Switch Hardware Installation Guide D DC circuit warning C-5 DC-I grounding note 2-5, 3-5 DC power connecting to C-1 to C-2 specifications A-7 warnings C-6 DC power caution C-5 DC power through - Cisco WS-C3560X-24P-S | Hardware Installation Guide - Page 117
procedures installing SFP modules 2-16 to 2-17 internal power supply 1-18 L LEDs color meanings 1-13 dual-purpose port 1-15 duplex 1-13 front panel 1-11 interpreting 1-13 PoE 1-13 port 1-13 port mode 1-13 to 1-14 POST results 2-7, 4-2, D-3 RPS 1-12 speed 1-13 STATUS 1-13 system 1-11 troubleshooting - Cisco WS-C3560X-24P-S | Hardware Installation Guide - Page 118
-to-DB-9 terminal adapter B-7 SFP module ports B-2 straight-through cables four twisted-pair 1000BASE-T ports B-6 two twisted-pair B-5 PoE LED 1-13 shock hazard warning 2-4, 3-4 IN-4 Catalyst 3560 Switch Hardware Installation Guide port and interface troubleshooting 4-4 port LEDs 1-13 port modes - Cisco WS-C3560X-24P-S | Hardware Installation Guide - Page 119
) 2-2, 3-2 security slot 1-20 serial number location 4-6 servicing equipment warning C-5 SFP module patch cable description 1-10 installing and removing 2-18 SFP modules 1000BASE-T supported speeds 1-14 bale-clasp latch removal 2-17 cable specifications B-4 connecting to 2-21 to 2-23 connectors - Cisco WS-C3560X-24P-S | Hardware Installation Guide - Page 120
Index PoE shock hazard 2-4, 3-4 removing power from DC circuit C-5 restricted access area C-1 servicing equipment C-5 IN-6 Catalyst 3560 Switch Hardware Installation Guide OL-6337-07
-
 1
1 -
 2
2 -
 3
3 -
 4
4 -
 5
5 -
 6
6 -
 7
7 -
8
-
9
-
10
-
11
-
12
-
13
-
14
-
15
-
16
-
17
-
18
-
19
-
20
-
21
-
22
-
23
-
24
-
25
-
26
-
27
-
28
-
29
-
30
-
31
-
32
-
33
-
34
-
35
-
36
-
37
-
38
-
39
-
40
-
41
-
42
-
43
-
44
-
45
-
46
-
47
-
48
-
49
-
50
-
51
-
52
-
53
-
54
-
55
-
56
-
57
-
58
-
59
-
60
-
61
-
62
-
63
-
64
-
65
-
66
-
67
-
68
-
69
-
70
-
71
-
72
-
73
-
74
-
75
-
76
-
77
-
78
-
79
-
80
-
81
-
82
-
83
-
84
-
85
-
86
-
87
-
88
-
89
-
90
-
91
-
92
-
93
-
94
-
95
-
96
-
97
-
98
-
99
-
100
-
101
-
102
-
103
-
104
-
105
-
106
-
107
-
108
-
109
-
110
-
111
-
112
-
113
-
114
-
115
-
116
-
117
-
118
-
119
-
120
 |
 |

Americas Headquarters
Cisco Systems, Inc.
170 West Tasman Drive
San Jose, CA 95134-1706
USA
Tel: 408 526-4000
800 553-NETS (6387)
Fax: 408 527-0883
Catalyst 3560 Switch
Hardware Installation Guide
March 2010
Text Part Number: OL-6337-07