Cisco WS-C3750X-24T-L Hardware Installation Guide - Page 38
Verifying Switch IP Address (Optional
 |
View all Cisco WS-C3750X-24T-L manuals
Add to My Manuals
Save this manual to your list of manuals |
Page 38 highlights
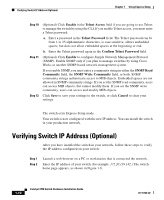
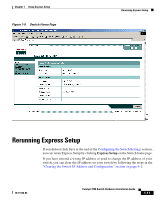
Verifying Switch IP Address (Optional) Chapter 1 Using Express Setup Step 10 Step 11 Step 12 (Optional) Click Enable in the Telnet Access field if you are going to use Telnet to manage the switch by using the CLI. If you enable Telnet access, you must enter a Telnet password: a. Enter a password in the Telnet Password field. The Telnet password can be from 1 to 25 alphanumeric characters, is case sensitive, allows embedded spaces, but does not allow embedded spaces at the beginning or end. b. Enter the Telnet password again in the Confirm Telnet Password field. (Optional) Click Enable to configure Simple Network Management Protocol (SNMP). Enable SNMP only if you plan to manage switches by using Cisco Works or another SNMP-based network-management system. If you enable SNMP, you must enter a community string in either the SNMP Read Community field, the SNMP Write Community field, or both. SNMP community strings authenticate access to MIB objects. Embedded spaces are not allowed in SNMP community strings. If you set the SNMP read community, users can access MIB objects, but cannot modify them. If you set the SNMP write community, users can access and modify MIB objects. Click Save to save your settings to the switch, or click Cancel to clear your settings. The switch exits Express Setup mode. Your switch is now configured with the new IP address. You can install the switch in your production network. Verifying Switch IP Address (Optional) After you have installed the switch in your network, follow these steps to verify the IP address configured on your switch: Step 1 Step 2 Launch a web browser on a PC or workstation that is connected the network. Enter the IP address of your switch (for example: 172.20.139.142.) The switch home page appears, as shown in Figure 1-8. 1-10 Catalyst 3750 Switch Hardware Installation Guide 78-15136-02
-
 1
1 -
2
-
3
-
4
-
5
-
6
-
7
-
8
-
9
-
10
-
11
-
12
-
13
-
14
-
15
-
16
-
17
-
18
-
19
-
20
-
21
-
22
-
23
-
24
-
25
-
26
-
27
-
28
-
29
-
30
-
31
-
32
-
 33
33 -
 34
34 -
 35
35 -
 36
36 -
 37
37 -
 38
38 -
 39
39 -
 40
40 -
 41
41 -
 42
42 -
 43
43 -
44
-
45
-
46
-
47
-
48
-
49
-
50
-
51
-
52
-
53
-
54
-
55
-
56
-
57
-
58
-
59
-
60
-
61
-
62
-
63
-
64
-
65
-
66
-
67
-
68
-
69
-
70
-
71
-
72
-
73
-
74
-
75
-
76
-
77
-
78
-
79
-
80
-
81
-
82
-
83
-
84
-
85
-
86
-
87
-
88
-
89
-
90
-
91
-
92
-
93
-
94
-
95
-
96
-
97
-
98
-
99
-
100
-
101
-
102
-
103
-
104
-
105
-
106
-
107
-
108
-
109
-
110
-
111
-
112
-
113
-
114
-
115
-
116
-
117
-
118
-
119
-
120
-
121
-
122
-
123
-
124
-
125
-
126
-
127
-
128
-
129
-
130
-
131
-
132
-
133
-
134
-
135
-
136
-
137
-
138
-
139
-
140
-
141
-
142
-
143
-
144
-
145
-
146
-
147
-
148
-
149
-
150
-
151
-
152
-
153
-
154
-
155
-
156
-
157
-
158
-
159
-
160
-
161
-
162
-
163
-
164
-
165
-
166
-
167
-
168
-
169
-
170
-
171
-
172
-
173
-
174
-
175
-
176
-
177
-
178
-
179
-
180
-
181
-
182
-
183
-
184
-
185
-
186
-
187
-
188
-
189
-
190
-
191
-
192
-
193
-
194
-
195
-
196
-
197
-
198
 |
 |