Coby DVD938 Quick Setup Guide
Coby DVD938 Manual
 |
UPC - 716829999387
View all Coby DVD938 manuals
Add to My Manuals
Save this manual to your list of manuals |
Coby DVD938 manual content summary:
- Coby DVD938 | Quick Setup Guide - Page 1
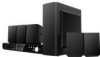
Package List • DVD938 Main Unit • Remote Control • Batteries ("AA" x 2) Quick Start Guide DVD938 | 5.1-Channel DVD Home Theater System • Front Speakers (x 2) • Center Speaker (x 1) • Surround Speakers (x 2) • Subwoofer (x 1) • Speaker Wire (x 5) • AV Cable • AM Antenna (Loop) • FM Antenna (Wire) - Coby DVD938 | Quick Setup Guide - Page 2
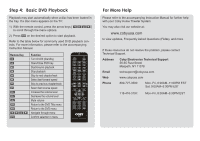
Instruction Manual. Step 3: Set Up the Viewing Mode 1) Set the Power switch on the rear panel of the DVD938 to the "ON" position, then press the Standby button to turn the unit on. 2) Turn on the TV. 3) Press the "Source" button on the TV's remote control repeatedly until you see the DVD - Coby DVD938 | Quick Setup Guide - Page 3
Instruction Manual for further help with your Coby Home Theater System. You may also visit our website at: www.cobyusa.com to view updates, Frequently Asked Questions (FAQs), and more. If these resources do not resolve the problem, please contact Technical Support. Address Coby Electronics - Coby DVD938 | Quick Setup Guide - Page 4
Lista de Contenidos Guía de Inicio Rápido DVD938 | Sistema DVD Home Theater de 5.1 canales • DVD938 (Unidad Principal) • Control remoto • Pilas "AA" (x 2) • Altavoces frontales (x 2) • Altavoz central (x 1) • Altavoces traseros (x 2) • Altavoz de sub-graves (x 1) • Cables para altavoces (x 5) • - Coby DVD938 | Quick Setup Guide - Page 5
compuesto que se muestra aquí. Para más opciones de conexión, consulte el manual de instrucciones que acompaña al producto. Para la conexión compuesta de control remoto de su televisor repetidamente hasta que vea la pantalla de fondo del DVD. Este es el modo de visualización correcto para el DVD938. - Coby DVD938 | Quick Setup Guide - Page 6
el volumen Volver al menú de título del DVD Volver al menú del DVD Navegar a través de los menús Confirmar selección en los menús Para Mayor Ayuda Para obtener mayor ayuda consulte el manual de instrucciones que acompaña al Sistema Home Theater Coby. Puede también visitar nuestro sitio web: www - Coby DVD938 | Quick Setup Guide - Page 7
(Unité Principale) • Télécommande • Piles "AA" (x 2) Guide de Démarrage Rapide DVD938 | Système Cinéma-Maison DVD de Canaux 5.1 • Haut-parleurs avant (x 2) • Caisson de basses (x 1) • Haut-parleur central (x -parleur à plusieurs bornes. than one wire to each speaker terminal; do not connect one - Coby DVD938 | Quick Setup Guide - Page 8
DVD938 à une prise d'alimentation CA. Pour un guide complet de vos options de connexion, veuillez vous référer au Manuel d'Instructions reprises jusqu'à ce que l'écran de fond du DVD apparaisse. C'est le bon mode d'affichage pour le DVD938. Pour certains téléviseurs, vous pouvez avoir besoin d' - Coby DVD938 | Quick Setup Guide - Page 9
rer au Manuel d'Instructions ci-joint. Touche Fonction Allumer/Éteindre (Veille) Ouvrir/Fermer le plateau de DVD. Commencer/continuer Questions (FAQ), et beaucoup plus. Si ces ressources ne règlent pas le problème, contactez l'Assistance Technique. Adresse Coby Electronics Technical Support
-
 1
1 -
 2
2 -
 3
3 -
 4
4 -
 5
5 -
 6
6 -
 7
7 -
8
-
9
 |
 |

DVD938
|
5.1-Channel DVD Home Theater System
Quick Start Guide
Package List
DVD938 Main Unit
•
Remote Control
•
Batteries (“AA” x 2)
•
Front Speakers (x 2)
•
Center Speaker (x 1)
•
Surround Speakers (x 2)
•
Subwoofer (x 1)
•
Speaker Wire (x 5)
•
AV Cable
•
AM Antenna (Loop)
•
FM Antenna (Wire)
•
Step 1: Connecting the Speakers
If necessary, strip 3/8” (10 mm) of insulation from the ends of the speaker wire.
1)
While pressing the lever, insert the wire into the hole, then release the lever.
2)
Make sure that the terminals are correctly connected to the bare wires and
not the insulation.
The speaker cable and terminal for each speaker is labeled for your conve-
3)
nience.
The following guide describes which speaker goes to which terminal:
Terminal
Speaker
SW
Subwoofer
CEN
Center
SR
Surround Right
SL
Surround Left
FR
Forward Right
FL
Forward Left
Disconnect the power cord from the wall outlet before making any connections. Always match
colored positive (+) terminals together; and match black negative (-) terminals together. If
switched, the sound will be out of phase and will not be produced correctly. Do not connect more
than one wire to each speaker terminal; do not connect one speaker to several terminals.
SW
FL
CEN
FR
SL
SR