Compaq 400338-001 HP J1473A 4-port, J1474A 8-port, J1475A Console Switch Rackm - Page 43
Instructions for Console Switches with Revision Code B, Control, Enter
 |
UPC - 743172745156
View all Compaq 400338-001 manuals
Add to My Manuals
Save this manual to your list of manuals |
Page 43 highlights
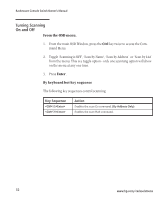
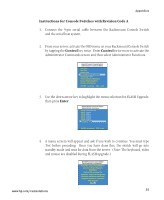
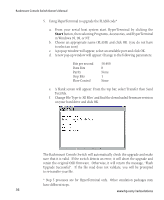
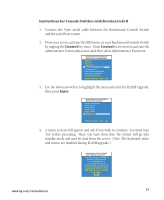
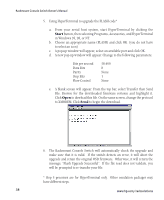
Instructions for Console Switches with Revision Code B 1. Connect the 9-pin serial cable between the Rackmount Console Switch and the serial host system. 2. From your server, activate the OSD menu on your Rackmount Console Switch by tapping the Control key twice. Enter Control twice more to activate the Administrator Commands screen and then select Administrator Functions. Hewlett Packard Console Switch Administrator Command Menu Add Port Edit Port Delete Port Administrative Functions Scanning is OFF Reset Standard Mse/Kbd Reset Wheel Mse/Kbd Version Information ENTER = activate ESC = exit 3. Use the down arrow key to highlight the menu selection for FLASH Upgrade, then press Enter. Hewlett Packard Console Switch Administrator Functions Setup Administrator Setup USER1 Setup USER2 Setup USER3 Setup USER4 Flash Upgrade ENTER = activate ESC = exit 4. A menu screem will appear and ask if you wish to continue. You must type 'Yes' before preceding. Once you have done this, the switch will go into standby mode and wait for data from the server. (Note: The keyboard, video and mouse are disabled during FLASH upgrade.) Hewlett Packard Console Switch Flash Upgrade Confirmation Type YES and press ENTER to perform a Flash Upgrade = = = WARNING = = = During this process the keyboard, video and mouse are disabled until either the Flash Upgrade is done or 3 minutes time elapses yes www.hp.com/racksolutions 37
-
 1
1 -
2
-
3
-
4
-
5
-
6
-
7
-
8
-
9
-
10
-
11
-
12
-
13
-
14
-
15
-
16
-
17
-
18
-
19
-
20
-
21
-
22
-
23
-
24
-
25
-
26
-
27
-
28
-
29
-
30
-
31
-
32
-
33
-
34
-
35
-
36
-
37
-
 38
38 -
 39
39 -
 40
40 -
 41
41 -
 42
42 -
 43
43 -
 44
44 -
 45
45 -
 46
46 -
 47
47 -
 48
48 -
49
-
50
-
51
-
52
-
53
-
54
-
55
-
56
-
57
-
58
-
59
-
60
-
61
-
62
-
63
-
64
-
65
-
66
-
67
-
68
-
69
-
70
-
71
-
72
-
73
-
74
-
75
-
76
-
77
-
78
-
79
-
80
-
81
-
82
-
83
-
84
-
85
-
86
-
87
-
88
-
89
-
90
-
91
-
92
-
93
-
94
-
95
-
96
-
97
-
98
-
99
-
100
-
101
-
102
-
103
-
104
-
105
-
106
-
107
-
108
-
109
-
110
-
111
-
112
-
113
-
114
-
115
-
116
-
117
-
118
-
119
-
120
-
121
-
122
-
123
-
124
-
125
-
126
-
127
-
128
-
129
-
130
-
131
-
132
-
133
-
134
-
135
-
136
-
137
-
138
-
139
-
140
-
141
-
142
-
143
-
144
-
145
-
146
-
147
-
148
-
149
-
150
-
151
-
152
-
153
-
154
-
155
-
156
-
157
-
158
-
159
-
160
-
161
-
162
-
163
-
164
-
165
-
166
-
167
-
168
-
169
-
170
-
171
-
172
-
173
-
174
-
175
-
176
-
177
-
178
-
179
-
180
-
181
-
182
-
183
-
184
-
185
-
186
-
187
-
188
-
189
-
190
-
191
-
192
-
193
-
194
-
195
-
196
-
197
-
198
-
199
-
200
-
201
-
202
-
203
-
204
-
205
-
206
-
207
-
208
-
209
-
210
-
211
-
212
-
213
 |
 |