Compaq Evo n1050v Service Manual - Page 118
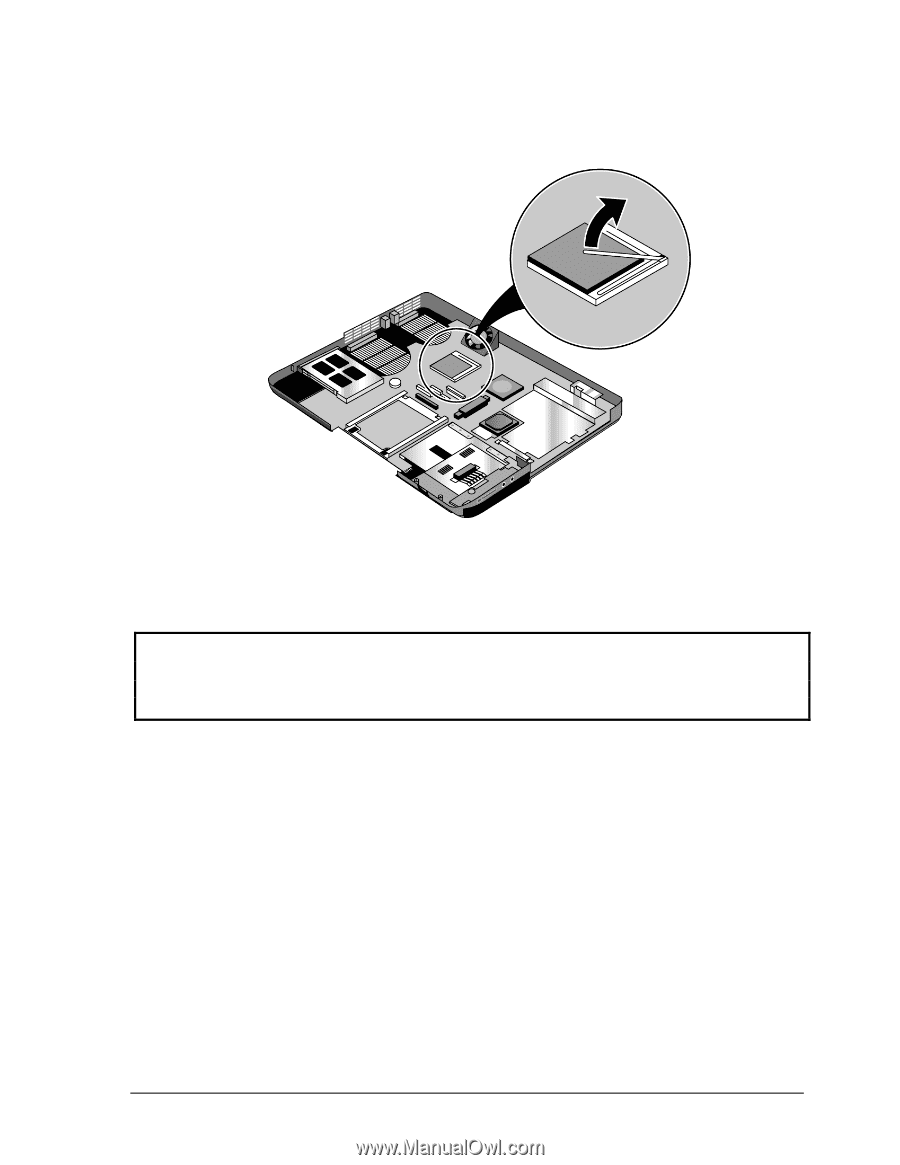
Removing the CPU Module, HP Pavilion 5300 and 5200, HP nx9010
 |
View all Compaq Evo n1050v manuals
Add to My Manuals
Save this manual to your list of manuals |
Page 118 highlights
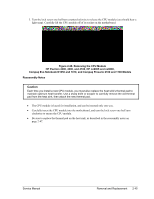
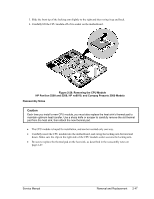
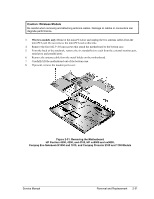
3. Slide the front tip of the locking arm slightly to the right and then swing it up and back. 4. Carefully lift the CPU module off of its socket on the motherboard. Figure 2-29. Removing the CPU Module HP Pavilion 5300 and 5200, HP nx9010, and Compaq Presario 2500 Models Reassembly Notes Caution Each time you install a new CPU module, you must also replace the heat sink's thermal pad to maintain optimum heat transfer. Use a sharp knife or scraper to carefully remove the old thermal pad from the heat sink, then attach the new thermal pad. • The CPU module is keyed for installation, and can be inserted only one way. • Carefully insert the CPU module into the motherboard, and swing the locking arm forward and down. Make sure the clip on the right side of the CPU module socket secures the locking arm. • Be sure to replace the thermal pad on the heat sink, as described in the reassembly notes on page 2-47. Service Manual Removal and Replacement 2-47
-
 1
1 -
2
-
3
-
4
-
5
-
6
-
7
-
8
-
9
-
10
-
11
-
12
-
13
-
14
-
15
-
16
-
17
-
18
-
19
-
20
-
21
-
22
-
23
-
24
-
25
-
26
-
27
-
28
-
29
-
30
-
31
-
32
-
33
-
34
-
35
-
36
-
37
-
38
-
39
-
40
-
41
-
42
-
43
-
44
-
45
-
46
-
47
-
48
-
49
-
50
-
51
-
52
-
53
-
54
-
55
-
56
-
57
-
58
-
59
-
60
-
61
-
62
-
63
-
64
-
65
-
66
-
67
-
68
-
69
-
70
-
71
-
72
-
73
-
74
-
75
-
76
-
77
-
78
-
79
-
80
-
81
-
82
-
83
-
84
-
85
-
86
-
87
-
88
-
89
-
90
-
91
-
92
-
93
-
94
-
95
-
96
-
97
-
98
-
99
-
100
-
101
-
102
-
103
-
104
-
105
-
106
-
107
-
108
-
109
-
110
-
111
-
112
-
 113
113 -
 114
114 -
 115
115 -
 116
116 -
 117
117 -
 118
118 -
 119
119 -
 120
120 -
 121
121 -
 122
122 -
 123
123 -
124
-
125
-
126
-
127
-
128
-
129
-
130
-
131
-
132
-
133
-
134
-
135
-
136
-
137
-
138
-
139
-
140
-
141
-
142
-
143
-
144
-
145
-
146
-
147
-
148
-
149
-
150
-
151
-
152
-
153
-
154
-
155
-
156
-
157
-
158
-
159
-
160
-
161
-
162
-
163
-
164
-
165
-
166
-
167
-
168
-
169
-
170
-
171
-
172
-
173
-
174
-
175
-
176
-
177
-
178
-
179
-
180
-
181
-
182
-
183
-
184
-
185
-
186
-
187
-
188
 |
 |