Compaq Evo n1050v Service Manual - Page 130
Replacing Components on a Bottom Case, Reassembly Procedure, Installing a New Serial Number Label
 |
View all Compaq Evo n1050v manuals
Add to My Manuals
Save this manual to your list of manuals |
Page 130 highlights
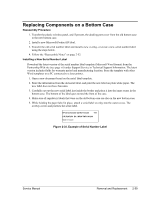
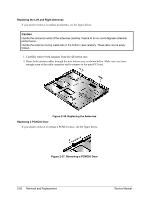
Replacing Components on a Bottom Case Reassembly Procedure 1. Transfer the plastic wireless panel, and if present, the docking port cover from the old bottom case to the new bottom case. 2. Install a new Microsoft Product ID label. 3. Transfer the old serial number label and install a new overlay, or create a new serial number label using the steps below. 4. Follow the "Reassembly Notes" on page 2-52. Installing a New Serial Number Label Download the latest version of the serial number label template (Microsoft Word format) from the Partnership Web site (see page vii) under Support/Service in Technical Support Information. The latest version includes fields for warranty period and manufacturing location. Store the template with other Word templates on a PC connected to a laser printer. 1. Open a new document based on the serial label template. 2. Enter the information from the old serial label, and print the new label on plain white paper. The new label does not have barcodes. 3. Carefully cut out the new serial label just inside the border and place it into the inner recess in the bottom case. The bottom of the label goes toward the front of the case. 4. Make sure all regulatory labels that were on the old bottom case are also on the new bottom case. 5. While holding the paper label in place, attach a serial label overlay into the outer recess. The overlay covers and protects the serial label. HP Serial Number (S)TW711A1234 1YR (1P) F2072 W EA MFG# TW711A1234 Made in Taiwan Figure 2-35. Example of Serial Number Label Service Manual Removal and Replacement 2-59
-
 1
1 -
2
-
3
-
4
-
5
-
6
-
7
-
8
-
9
-
10
-
11
-
12
-
13
-
14
-
15
-
16
-
17
-
18
-
19
-
20
-
21
-
22
-
23
-
24
-
25
-
26
-
27
-
28
-
29
-
30
-
31
-
32
-
33
-
34
-
35
-
36
-
37
-
38
-
39
-
40
-
41
-
42
-
43
-
44
-
45
-
46
-
47
-
48
-
49
-
50
-
51
-
52
-
53
-
54
-
55
-
56
-
57
-
58
-
59
-
60
-
61
-
62
-
63
-
64
-
65
-
66
-
67
-
68
-
69
-
70
-
71
-
72
-
73
-
74
-
75
-
76
-
77
-
78
-
79
-
80
-
81
-
82
-
83
-
84
-
85
-
86
-
87
-
88
-
89
-
90
-
91
-
92
-
93
-
94
-
95
-
96
-
97
-
98
-
99
-
100
-
101
-
102
-
103
-
104
-
105
-
106
-
107
-
108
-
109
-
110
-
111
-
112
-
113
-
114
-
115
-
116
-
117
-
118
-
119
-
120
-
121
-
122
-
123
-
124
-
 125
125 -
 126
126 -
 127
127 -
 128
128 -
 129
129 -
 130
130 -
 131
131 -
 132
132 -
 133
133 -
 134
134 -
 135
135 -
136
-
137
-
138
-
139
-
140
-
141
-
142
-
143
-
144
-
145
-
146
-
147
-
148
-
149
-
150
-
151
-
152
-
153
-
154
-
155
-
156
-
157
-
158
-
159
-
160
-
161
-
162
-
163
-
164
-
165
-
166
-
167
-
168
-
169
-
170
-
171
-
172
-
173
-
174
-
175
-
176
-
177
-
178
-
179
-
180
-
181
-
182
-
183
-
184
-
185
-
186
-
187
-
188
 |
 |