Compaq Evo n1050v Service Manual - Page 133
Using a BIOS Floppy Disk, Boot-Block Jumper, Press and hold Fn+B
 |
View all Compaq Evo n1050v manuals
Add to My Manuals
Save this manual to your list of manuals |
Page 133 highlights
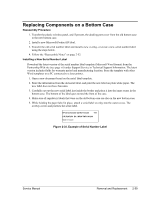
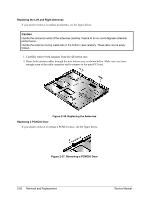
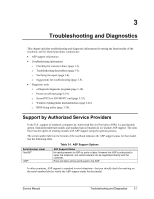
Using a BIOS Floppy Disk If you do not have a BIOS floppy disk, download the package from the Partnership Web site (see page vii) under Product Support Information in the Service and Support Library. Follow the instructions for creating the BIOS floppy disk. Caution Make sure to use the correct BIOS floppy disk for the notebook model you are repairing. The program does not verify the notebook model, so you could accidentally install the wrong BIOS. 1. Insert the BIOS floppy disk in the floppy disk drive. 2. Turn on the notebook and allow it to boot from the BIOS floppy disk. If the notebook does not turn on at all, do the following to boot from the BIOS floppy disk: a. Unplug the AC adapter. b. Press and hold Fn+B c. Plug in the AC adapter. d. Release Fn+B. Note If the notebook will not boot from the BIOS floppy disk, try plugging the boot-block jumper into the notebook's parallel port. See the wiring diagram below. 3. The display goes blank for a minute or more while the BIOS is reprogrammed. Note If you plugged in a boot block jumper, unplug it before the notebook automatically reboots. 4. After the BIOS reprograms itself, check the BIOS version to make sure it is the latest version. If necessary, download the latest BIOS version and reprogram the BIOS IC. 1 13 14 25 Figure 2-38. Boot-Block Jumper 2-62 Removal and Replacement Service Manual
-
 1
1 -
2
-
3
-
4
-
5
-
6
-
7
-
8
-
9
-
10
-
11
-
12
-
13
-
14
-
15
-
16
-
17
-
18
-
19
-
20
-
21
-
22
-
23
-
24
-
25
-
26
-
27
-
28
-
29
-
30
-
31
-
32
-
33
-
34
-
35
-
36
-
37
-
38
-
39
-
40
-
41
-
42
-
43
-
44
-
45
-
46
-
47
-
48
-
49
-
50
-
51
-
52
-
53
-
54
-
55
-
56
-
57
-
58
-
59
-
60
-
61
-
62
-
63
-
64
-
65
-
66
-
67
-
68
-
69
-
70
-
71
-
72
-
73
-
74
-
75
-
76
-
77
-
78
-
79
-
80
-
81
-
82
-
83
-
84
-
85
-
86
-
87
-
88
-
89
-
90
-
91
-
92
-
93
-
94
-
95
-
96
-
97
-
98
-
99
-
100
-
101
-
102
-
103
-
104
-
105
-
106
-
107
-
108
-
109
-
110
-
111
-
112
-
113
-
114
-
115
-
116
-
117
-
118
-
119
-
120
-
121
-
122
-
123
-
124
-
125
-
126
-
127
-
 128
128 -
 129
129 -
 130
130 -
 131
131 -
 132
132 -
 133
133 -
 134
134 -
 135
135 -
 136
136 -
 137
137 -
 138
138 -
139
-
140
-
141
-
142
-
143
-
144
-
145
-
146
-
147
-
148
-
149
-
150
-
151
-
152
-
153
-
154
-
155
-
156
-
157
-
158
-
159
-
160
-
161
-
162
-
163
-
164
-
165
-
166
-
167
-
168
-
169
-
170
-
171
-
172
-
173
-
174
-
175
-
176
-
177
-
178
-
179
-
180
-
181
-
182
-
183
-
184
-
185
-
186
-
187
-
188
 |
 |