Compaq Presario 8000 Compaq Presario S0000 / 8000 Series Computers User's Guid - Page 81
diskette floppy drive select models only, display monitor
 |
View all Compaq Presario 8000 manuals
Add to My Manuals
Save this manual to your list of manuals |
Page 81 highlights
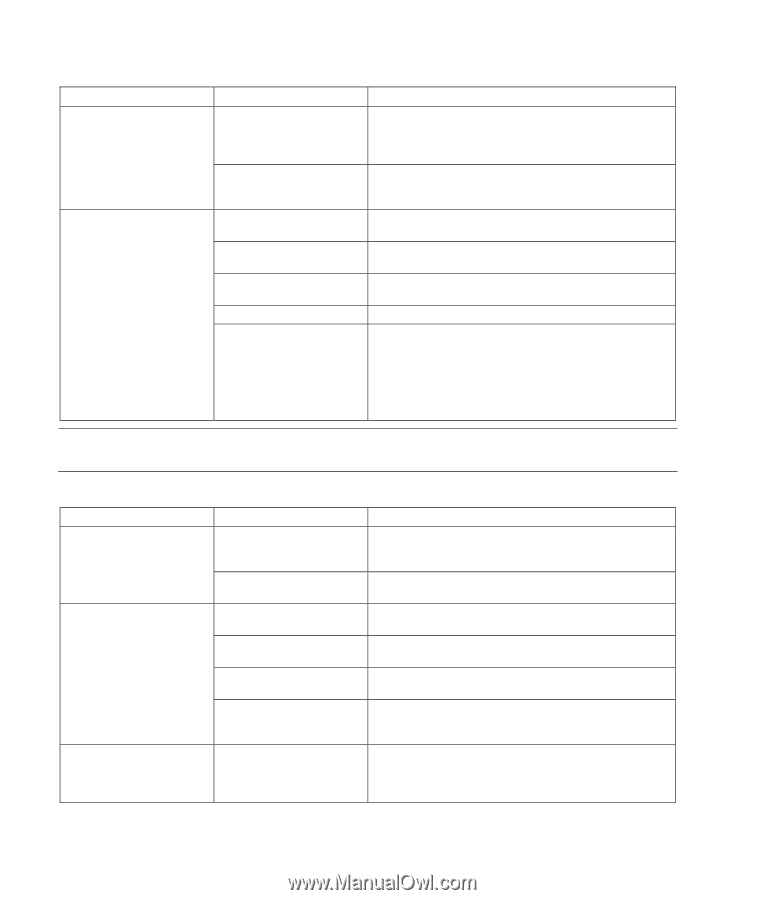
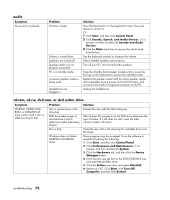
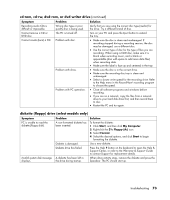
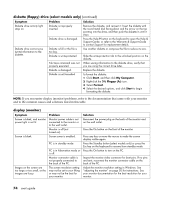
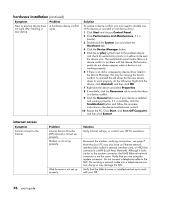
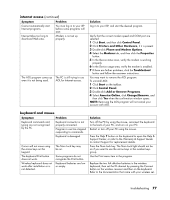
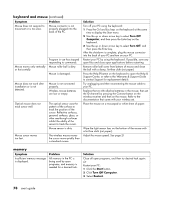
diskette (floppy) drive (select models only) (continued) Symptom Diskette drive activity light stays on. Problem Diskette is improperly inserted. Solution Remove the diskette, and reinsert it: Insert the diskette with the round metal disk facing-down and the arrow on the top pointing into the drive, and then push the diskette in until it stops. Diskette drive cannot save (write) information to the diskette. Diskette drive is damaged. Diskette is full or the file is too big. Diskette is write-protected. File Save command was not properly executed. Diskette is damaged. Diskette is not formatted. Press the Help ? button on the keyboard to open the Help & Support Center, or refer to the Warranty & Support Guide to contact Support for replacement details. Use another diskette or compress the file to reduce its size. Slide the write-protection tab to the unlocked position on the diskette. When saving information to the diskette drive, verify that you are using the correct drive letter. Replace the diskette. To format the diskette: 1 Click Start, and then click My Computer. 2 Right-click the 3½ Floppy (A:) icon. 3 Select Format. 4 Select the desired options, and click Start to begin formatting the diskette. NOTE: If you encounter display (monitor) problems, refer to the documentation that came with your monitor and to the common causes and solutions listed in this table. display (monitor) Symptom Problem Solution Screen is blank, and monitor Monitor power cable is not power light is not lit. connected to the monitor or to the wall outlet. Reconnect the power plug on the back of the monitor and on the wall outlet. Monitor is off (not turned on). Press the On button on the front of the monitor. Screen is blank. Screen saver is enabled. Press any key or move the mouse to make the screen display visible again. PC is in standby mode. Press the Standby button (select models only) or press the Esc key on the keyboard to resume from standby mode. PC is in hibernation mode or Press the On button to turn on the PC. is off. Monitor connector cable is not properly connected to the back of the PC. Inspect the monitor video connector for bent pins. If no pins are bent, reconnect the monitor connector cable on the back of the PC. Images on the screen are too large or too small, or the images are fuzzy. The screen resolution setting may not be set to your liking or may not be the best for your monitor. Adjust the monitor resolution setting in Windows. See "adjusting the monitor" on page 30 for instructions. See your monitor documentation for the best resolution for your monitor. 74 user's guide
-
 1
1 -
2
-
3
-
4
-
5
-
6
-
7
-
8
-
9
-
10
-
11
-
12
-
13
-
14
-
15
-
16
-
17
-
18
-
19
-
20
-
21
-
22
-
23
-
24
-
25
-
26
-
27
-
28
-
29
-
30
-
31
-
32
-
33
-
34
-
35
-
36
-
37
-
38
-
39
-
40
-
41
-
42
-
43
-
44
-
45
-
46
-
47
-
48
-
49
-
50
-
51
-
52
-
53
-
54
-
55
-
56
-
57
-
58
-
59
-
60
-
61
-
62
-
63
-
64
-
65
-
66
-
67
-
68
-
69
-
70
-
71
-
72
-
73
-
74
-
75
-
 76
76 -
 77
77 -
 78
78 -
 79
79 -
 80
80 -
 81
81 -
 82
82 -
 83
83 -
 84
84 -
 85
85 -
 86
86 -
87
-
88
-
89
-
90
-
91
-
92
-
93
-
94
-
95
-
96
-
97
-
98
-
99
-
100
-
101
-
102
-
103
-
104
-
105
-
106
-
107
-
108
-
109
-
110
-
111
-
112
-
113
-
114
-
115
-
116
-
117
-
118
-
119
-
120
-
121
-
122
-
123
 |
 |