Compaq Presario CQ5000 Getting Started - Page 210
Changing the settings, Video/Pictures
 |
View all Compaq Presario CQ5000 manuals
Add to My Manuals
Save this manual to your list of manuals |
Page 210 highlights
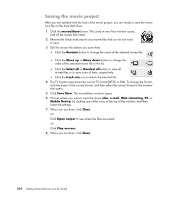
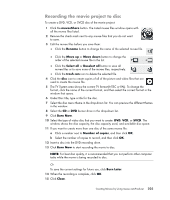
Changing the settings IMPORTANT: Each time that you make a change to a movie project, you must click the make muvee button again to add that change to the movie. To adjust the audio and video project settings for the movie: 1 Click the Personalize button. The Personalize window opens. 2 Click the Duration tab to set preferences for the length of the video production. Click one of the following settings: Fit to music: The produced version may reuse or drop some video and pictures. This option automatically selects material from the video and pictures to fit the total duration of the music track(s). Best fit for videos and pictures: The produced version may repeat or trim music. This option uses as much of the material as possible. User defined: Use this option to select the duration for each picture (2, 3, 4, 5, or 6 seconds). 3 Click the Video/Pictures tab to set preferences for the video and still images (pictures). Click one of the following settings: Style default: Select this style to sequence still images and video clips. Keep shots in sequence: Select this style to use the sequence of still images and video clips as they appear in the Add Video/Pictures area. Shuffle settings: Select this style to determine the frequency of sequencing still images and video clips by moving the slider. Place a check in the Interleave pictures check box to blend still images with video clips at intervals. Place a check in the Use every picture once check box to prevent pictures from being dropped. 4 Click the Audio tab to set the sound preferences. Click one of the following settings: Use every music track: Select this style to use the sequence of sound files in the Add Music window. Seamlessly transition between multiple music tracks: Select this style to automatically remove silence between music tracks. Sound check: Select this style to automatically adjust audio playback volume to the same level. 5 Click the Superstyle tab to customize the style that you selected in the main muvee autoProducer window. You can select the following settings: Response to music Cutting rate Film color 200 Getting Started (features vary by model)
-
 1
1 -
2
-
3
-
4
-
5
-
6
-
7
-
8
-
9
-
10
-
11
-
12
-
13
-
14
-
15
-
16
-
17
-
18
-
19
-
20
-
21
-
22
-
23
-
24
-
25
-
26
-
27
-
28
-
29
-
30
-
31
-
32
-
33
-
34
-
35
-
36
-
37
-
38
-
39
-
40
-
41
-
42
-
43
-
44
-
45
-
46
-
47
-
48
-
49
-
50
-
51
-
52
-
53
-
54
-
55
-
56
-
57
-
58
-
59
-
60
-
61
-
62
-
63
-
64
-
65
-
66
-
67
-
68
-
69
-
70
-
71
-
72
-
73
-
74
-
75
-
76
-
77
-
78
-
79
-
80
-
81
-
82
-
83
-
84
-
85
-
86
-
87
-
88
-
89
-
90
-
91
-
92
-
93
-
94
-
95
-
96
-
97
-
98
-
99
-
100
-
101
-
102
-
103
-
104
-
105
-
106
-
107
-
108
-
109
-
110
-
111
-
112
-
113
-
114
-
115
-
116
-
117
-
118
-
119
-
120
-
121
-
122
-
123
-
124
-
125
-
126
-
127
-
128
-
129
-
130
-
131
-
132
-
133
-
134
-
135
-
136
-
137
-
138
-
139
-
140
-
141
-
142
-
143
-
144
-
145
-
146
-
147
-
148
-
149
-
150
-
151
-
152
-
153
-
154
-
155
-
156
-
157
-
158
-
159
-
160
-
161
-
162
-
163
-
164
-
165
-
166
-
167
-
168
-
169
-
170
-
171
-
172
-
173
-
174
-
175
-
176
-
177
-
178
-
179
-
180
-
181
-
182
-
183
-
184
-
185
-
186
-
187
-
188
-
189
-
190
-
191
-
192
-
193
-
194
-
195
-
196
-
197
-
198
-
199
-
200
-
201
-
202
-
203
-
204
-
 205
205 -
 206
206 -
 207
207 -
 208
208 -
 209
209 -
 210
210 -
 211
211 -
 212
212 -
 213
213 -
 214
214 -
 215
215 -
216
-
217
-
218
-
219
-
220
-
221
-
222
 |
 |