Compaq Presario CQ5000 Getting Started - Page 211
Making the movie, Title, Use image, Use Font, Credits, Cancel, make muvee, IMPORTANT
 |
View all Compaq Presario CQ5000 manuals
Add to My Manuals
Save this manual to your list of manuals |
Page 211 highlights
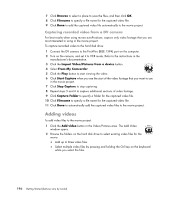
6 Click the Title tab to type in the movie title. Select the animation style of the title. Choose the background color or image style. Click the Use image button to browse for an image that you want to use with the title. Type in the title. Select Use Font, and then click the Use Font button to open the Font window. Select a font, and then click OK. 7 Click the Credits tab to type in the movie credits. Select the animation style of the credits. Choose the background color or image style. Click the Use image button to browse for an image that you want to use with the credits. Type in the credits. Select Use Font, and then click the Use Font button to open the Font window. Select the font, and then click OK. 8 When you are done adjusting the settings for the movie project, click OK. Or Click Cancel to undo any settings. Making the movie After you have added at least one video or picture file to the movie project, you can have muvee autoProducer make the movie. The muvee autoProducer program makes a movie by combining the video, picture, and music files that you have selected, along with the style of movie, to produce a professional-looking movie in just a few steps. 1 Click the make muvee button. 2 Click OK, as required. 3 After making a movie, you can preview it in the muvee autoProducer Preview window. Use the controls in the Preview window to play, pause, and stop the movie preview. You can revise and preview the movie as often as you want, to experiment with different styles and with the content of the movie. IMPORTANT: Each time that you make a change to a movie project, you must click the make muvee button again to add that change to the movie. Creating Movies by Using muvee autoProducer 201
-
 1
1 -
2
-
3
-
4
-
5
-
6
-
7
-
8
-
9
-
10
-
11
-
12
-
13
-
14
-
15
-
16
-
17
-
18
-
19
-
20
-
21
-
22
-
23
-
24
-
25
-
26
-
27
-
28
-
29
-
30
-
31
-
32
-
33
-
34
-
35
-
36
-
37
-
38
-
39
-
40
-
41
-
42
-
43
-
44
-
45
-
46
-
47
-
48
-
49
-
50
-
51
-
52
-
53
-
54
-
55
-
56
-
57
-
58
-
59
-
60
-
61
-
62
-
63
-
64
-
65
-
66
-
67
-
68
-
69
-
70
-
71
-
72
-
73
-
74
-
75
-
76
-
77
-
78
-
79
-
80
-
81
-
82
-
83
-
84
-
85
-
86
-
87
-
88
-
89
-
90
-
91
-
92
-
93
-
94
-
95
-
96
-
97
-
98
-
99
-
100
-
101
-
102
-
103
-
104
-
105
-
106
-
107
-
108
-
109
-
110
-
111
-
112
-
113
-
114
-
115
-
116
-
117
-
118
-
119
-
120
-
121
-
122
-
123
-
124
-
125
-
126
-
127
-
128
-
129
-
130
-
131
-
132
-
133
-
134
-
135
-
136
-
137
-
138
-
139
-
140
-
141
-
142
-
143
-
144
-
145
-
146
-
147
-
148
-
149
-
150
-
151
-
152
-
153
-
154
-
155
-
156
-
157
-
158
-
159
-
160
-
161
-
162
-
163
-
164
-
165
-
166
-
167
-
168
-
169
-
170
-
171
-
172
-
173
-
174
-
175
-
176
-
177
-
178
-
179
-
180
-
181
-
182
-
183
-
184
-
185
-
186
-
187
-
188
-
189
-
190
-
191
-
192
-
193
-
194
-
195
-
196
-
197
-
198
-
199
-
200
-
201
-
202
-
203
-
204
-
205
-
 206
206 -
 207
207 -
 208
208 -
 209
209 -
 210
210 -
 211
211 -
 212
212 -
 213
213 -
 214
214 -
 215
215 -
 216
216 -
217
-
218
-
219
-
220
-
221
-
222
 |
 |