Compaq Presario CQ5000 Getting Started - Page 36
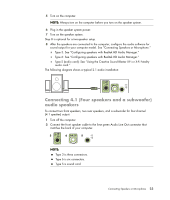
Connecting 7.1 (Seven speakers and a subwoofer) audio speakers
 |
View all Compaq Presario CQ5000 manuals
Add to My Manuals
Save this manual to your list of manuals |
Page 36 highlights
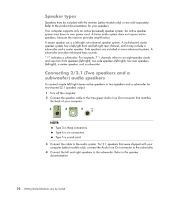
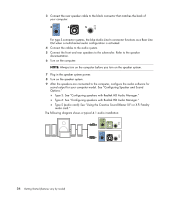
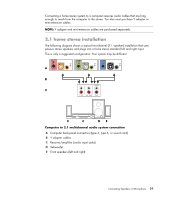
8 Plug in the speaker system power. 9 Turn on the speaker system. 10 After the speakers are connected to the computer, configure the audio software for sound output for your computer model. See "Configuring Speaker and Sound Options." Type 3: See "Configuring speakers with Realtek HD Audio Manager." Type 6: See "Configuring speakers with Realtek HD Audio Manager." Type 6 - multistreaming: See "Configuring multistreaming audio." Type S (audio card): See "Using the Creative Sound Blaster X-Fi or X-Fi Fatality audio card." The following diagram shows a typical 5.1 audio installation: Connecting 7.1 (Seven speakers and a subwoofer) audio speakers (Select models only) To connect two front speakers, two side speakers, two rear speakers, a center speaker, and a subwoofer for eight-channel (7.1 speaker) output: 1 Turn off the computer. 2 Connect the front speaker cable to the lime green Audio Line Out connector on the back of your computer. 3 Connect the rear speaker cable to the black Audio Line Rear connector on the back of your computer. 26 Getting Started (features vary by model)
-
 1
1 -
2
-
3
-
4
-
5
-
6
-
7
-
8
-
9
-
10
-
11
-
12
-
13
-
14
-
15
-
16
-
17
-
18
-
19
-
20
-
21
-
22
-
23
-
24
-
25
-
26
-
27
-
28
-
29
-
30
-
 31
31 -
 32
32 -
 33
33 -
 34
34 -
 35
35 -
 36
36 -
 37
37 -
 38
38 -
 39
39 -
 40
40 -
 41
41 -
42
-
43
-
44
-
45
-
46
-
47
-
48
-
49
-
50
-
51
-
52
-
53
-
54
-
55
-
56
-
57
-
58
-
59
-
60
-
61
-
62
-
63
-
64
-
65
-
66
-
67
-
68
-
69
-
70
-
71
-
72
-
73
-
74
-
75
-
76
-
77
-
78
-
79
-
80
-
81
-
82
-
83
-
84
-
85
-
86
-
87
-
88
-
89
-
90
-
91
-
92
-
93
-
94
-
95
-
96
-
97
-
98
-
99
-
100
-
101
-
102
-
103
-
104
-
105
-
106
-
107
-
108
-
109
-
110
-
111
-
112
-
113
-
114
-
115
-
116
-
117
-
118
-
119
-
120
-
121
-
122
-
123
-
124
-
125
-
126
-
127
-
128
-
129
-
130
-
131
-
132
-
133
-
134
-
135
-
136
-
137
-
138
-
139
-
140
-
141
-
142
-
143
-
144
-
145
-
146
-
147
-
148
-
149
-
150
-
151
-
152
-
153
-
154
-
155
-
156
-
157
-
158
-
159
-
160
-
161
-
162
-
163
-
164
-
165
-
166
-
167
-
168
-
169
-
170
-
171
-
172
-
173
-
174
-
175
-
176
-
177
-
178
-
179
-
180
-
181
-
182
-
183
-
184
-
185
-
186
-
187
-
188
-
189
-
190
-
191
-
192
-
193
-
194
-
195
-
196
-
197
-
198
-
199
-
200
-
201
-
202
-
203
-
204
-
205
-
206
-
207
-
208
-
209
-
210
-
211
-
212
-
213
-
214
-
215
-
216
-
217
-
218
-
219
-
220
-
221
-
222
 |
 |
