Compaq ProLiant 1000 DIMM Installation Instructions
Compaq ProLiant 1000 Manual
 |
View all Compaq ProLiant 1000 manuals
Add to My Manuals
Save this manual to your list of manuals |
Compaq ProLiant 1000 manual content summary:
- Compaq ProLiant 1000 | DIMM Installation Instructions - Page 1
outlet. 7. Power up the computer. The installation is complete. Troubleshooting For all troubleshooting issues during or after the memory installation process, see the computer-specific user documentation. For additional information about HP products, see the HP website (http://www.hp.com/support).
-
 1
1
 |
 |
DIMM
Installation Instructions
Installation Guidelines
Some computers are equipped with an Advanced Memory Protection
feature that enables the addition or replacement of memory while the
computer is running. If your computer is equipped with this feature,
see the documentation supplied with the computer for memory
installation, replacement, and configuration procedures.
IMPORTANT:
This computer may not support mixing RDIMMs
and UDIMMs. Attempting to mix these two types can cause the
computer to halt during BIOS initialization. For more information,
see the computer product documentation.
Installing a DIMM
WARNING:
Turn off the computer and disconnect the power
cord from the computer before installing the DIMM. Failure to do
so can damage the equipment and expose you to the risk of
electric shock. To reduce the risk of personal injury, allow the
DIMMs to cool before removing them.
WARNING:
Always comply with all electrostatic and thermal
guidelines to prevent bodily injury and ensure a properly
functioning system when performing hot-plug operations.
1.
Back up all data, power down the computer, and then
disconnect the computer from all electrical outlets.
2.
Access the DIMM slots. See the computer-specific
documentation.
Use a nonmagnetic-tip screwdriver to remove any screws.
3.
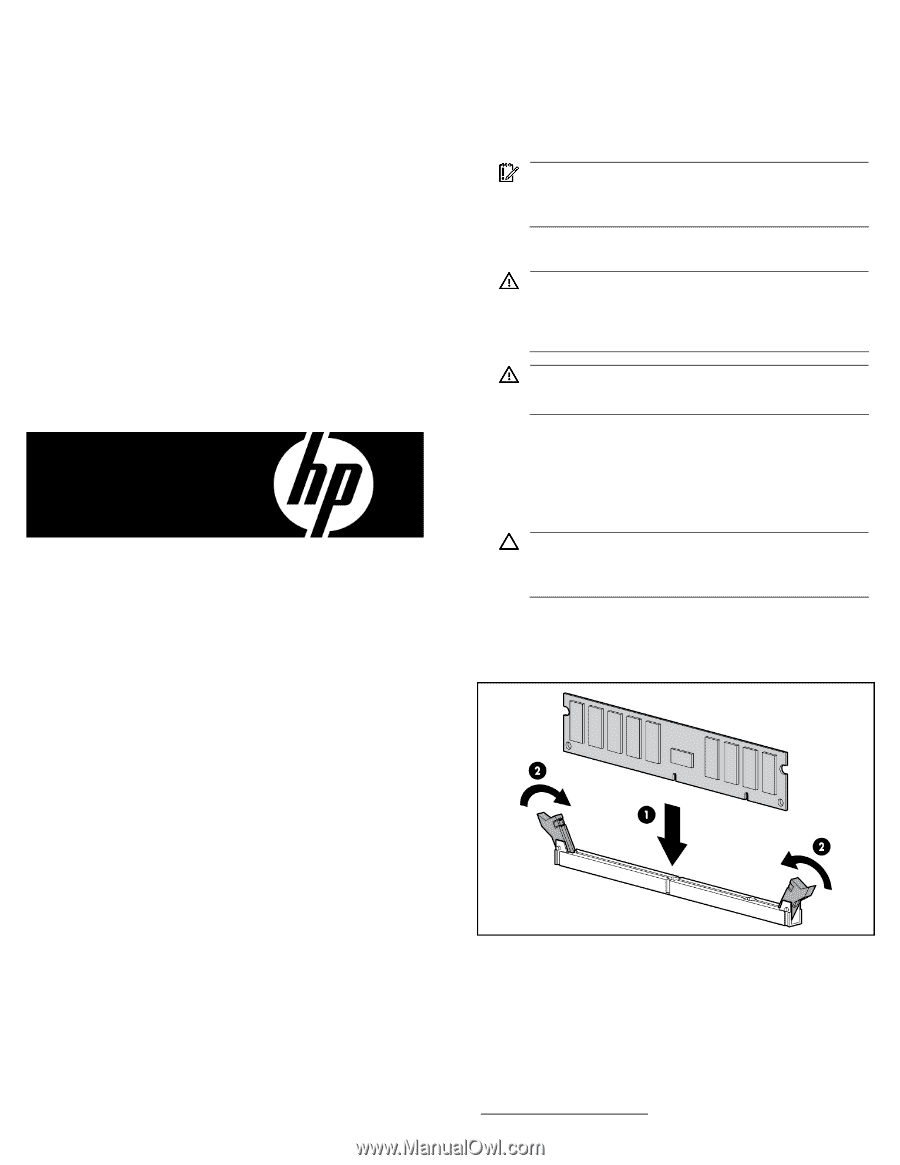
Open the DIMM slot latches.
CAUTION:
DIMMs are keyed for proper alignment. Align
notches in the DIMM with the corresponding notches in the DIMM
slot before inserting the DIMM. Do not force the DIMM into the
slot.
4.
Insert the DIMM, applying equal pressure on both ends until
the latches click into place.
If the latches do not click into place, press them inward to
secure the DIMM in the slot.
5.
Install all components removed to access the DIMM slots.
6.
Connect the computer to an electrical outlet.
7.
Power up the computer.
The installation is complete.
Troubleshooting
For all troubleshooting issues during or after the memory installation
process, see the computer-specific user documentation.
For additional information about HP products, see the HP website
).
© Copyright 2009 Hewlett-Packard Development Company, L.P.
The information contained herein is subject to change without notice. The only
warranties for HP products and services are set forth in the express warranty
statements accompanying such products and services. Nothing herein should
be construed as constituting an additional warranty. HP shall not be liable for
technical or editorial errors or omissions contained herein.
Part Number 284399-0
2
March 2009 (First Edition)
0