Compaq dc7800 AHCI and RAID on HP Compaq dc7800
Compaq dc7800 - Convertible Minitower PC Manual
 |
View all Compaq dc7800 manuals
Add to My Manuals
Save this manual to your list of manuals |
Compaq dc7800 manual content summary:
- Compaq dc7800 | AHCI and RAID on HP Compaq dc7800 - Page 1
and Redundant Array of Independent Disks (RAID) on HP Compaq dc7800 Business PCs Using Intel Matrix Storage Manager Introduction 3 Basics supported configurations 13 Unsupported configurations 13 Configuring RAID on non-factory preinstalled configurations 14 Enabling RAID through F10 System BIOS - Compaq dc7800 | AHCI and RAID on HP Compaq dc7800 - Page 2
using Intel Matrix Storage Console 32 Migration to RAID Matrix Mode (0 + 1) from two non-RAID hard drives using Matrix Storage Console 41 Installation 41 Language support table 42 2 - Compaq dc7800 | AHCI and RAID on HP Compaq dc7800 - Page 3
Serial Advanced Technology Attachment (SATA) and the integration of RAID into the Intel Q35/ICH9-D0 chipset. This white paper provides a basic overview of RAID technology, supported factory configurations of HP Compaq dc7800 Business PCs, other supported RAID configurations, and basic instructions - Compaq dc7800 | AHCI and RAID on HP Compaq dc7800 - Page 4
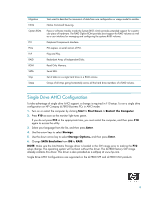
members of a RAID volume. Single Drive AHCI Configuration To take advantage of single drive AHCI support, a change is required in F10 setup. To run a single drive configuration on HP Compaq dc7800 Business PCs in AHCI mode: 1. Turn on or restart the computer by clicking Start > Shut Down > Restart - Compaq dc7800 | AHCI and RAID on HP Compaq dc7800 - Page 5
supported RAID configurations for HP Compaq dc7800 Business PCs. RAID 0 with two hard drives (Striped) Even though HP supports RAID 0, it is not the recommended configuration for business PC the concept of RAID 0 and striping, the following graphic shows how a sequence of data "ABCD..." is stored in - Compaq dc7800 | AHCI and RAID on HP Compaq dc7800 - Page 6
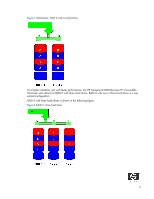
with two hard drives At a higher reliability cost with faster performance, the HP Compaq dc7800 Business PC Convertible Minitower also allows for RAID 0 with three hard drives. RAID 0 with two or three hard drives is a supported configuration. RAID 0 with three hard drives is shown in the following - Compaq dc7800 | AHCI and RAID on HP Compaq dc7800 - Page 7
1 is the only RAID configuration that HP preconfigures for HP Compaq dc7800 Business PCs. RAID 1 provides high availability with segmentation, and striping have no real meaning in RAID 1. In the table and graphic, the data is arranged in rows for representation of different pieces of data. Table - Compaq dc7800 | AHCI and RAID on HP Compaq dc7800 - Page 8
Figure 3 Reliability: RAID 1 - Mirroring RAID 5 with three hard drives RAID 5 has been used in servers for many years and is one of the most common types of RAID. RAID 5 uses striping with parity data in distributed blocks across all member disks. Therefore, the mass storage controller can - Compaq dc7800 | AHCI and RAID on HP Compaq dc7800 - Page 9
Table 4 RAID 5 with 3 hard drives (Parity) First Disk Data Segment 1 Data Segment 3 Parity for 5 and 6 Data Segment 7 Data Segment 9 Parity for 11 and 12 Data Segment 13 Data Segment 15 Parity for 17 and 18 Second Disk Data Segment 2 Parity for 3 and 4 Data Segment 5 Data Segment 8 Parity for 9 - Compaq dc7800 | AHCI and RAID on HP Compaq dc7800 - Page 10
from a hard drive failure and faster access to digital photo, video, and music files by supporting NCQ as well as RAID 0, 1, 5, and 10. Using Intel Matrix Storage technology, you can configure the HP Compaq dc7800 Business PC Convertible Minitower with two RAID volumes using three hard drives - - Compaq dc7800 | AHCI and RAID on HP Compaq dc7800 - Page 11
RAID combining reliability and performance with same three hard drives Configurations Recommended configurations HP recommends factory configurations of the preinstalled RAID offerings for HP Compaq dc7800 Business PCs. The preinstalled RAID offering is a RAID 1 volume of two identical SATA hard - Compaq dc7800 | AHCI and RAID on HP Compaq dc7800 - Page 12
, with different device ID, class code, and driver support. NOTE: HP recommends and only supports Microsoft's IDE driver stack based on the ATAPI.SYS driver for HP Compaq Business PC products including all supported RAID configurations. WARNING: The PCI Device ID of the mass storage controller - Compaq dc7800 | AHCI and RAID on HP Compaq dc7800 - Page 13
on HP Compaq dc7800 Business PC Convertible Minitowers). • Three equal size/type SATA hard drive RAID configurations in RAID 0 or RAID 5 or Matrix Mode of RAID and RAID 5. • Maximum of one SATA optical drives. Unsupported configurations HP Compaq dc7800 Business Desktop PC products only support the - Compaq dc7800 | AHCI and RAID on HP Compaq dc7800 - Page 14
with any operating system other than Microsoft XP Pro (SP2) using Microsoft's IDE driver stack based on ATAPI.SYS Configuring RAID on non-factory preinstalled configurations The remaining sections of this white paper describe steps to set up supported RAID configurations where customers have not - Compaq dc7800 | AHCI and RAID on HP Compaq dc7800 - Page 15
CAUTION: Do NOT turn the computer power off while the ROM is saving the F10 Computer Setup changes as the CMOS could become corrupted. Only turn the computer off after exiting the - Compaq dc7800 | AHCI and RAID on HP Compaq dc7800 - Page 16
Configuring RAID Volume using the Option ROM 1. Once you are in the Option ROM, if there are no previous RAID member hard drives, press Ctrl + I to enter the RAID configuration utility. 16 - Compaq dc7800 | AHCI and RAID on HP Compaq dc7800 - Page 17
2. With Create RAID Volume selected, press Enter to access the Create Volume screen. 3. Select or enter the desired RAID Level. Use the information on the bottom half of the screen if necessary. 17 - Compaq dc7800 | AHCI and RAID on HP Compaq dc7800 - Page 18
the operating system. • HP provides a download for the required F6 disk for Windows XP CD installation. • Customer- driver after enabling the RAID controller (with or without cre- ating a volume) will result in a Windows boot failure (blue screen) for inaccessible boot device. WARNING: The PCI - Compaq dc7800 | AHCI and RAID on HP Compaq dc7800 - Page 19
Storage Manager software. The configuration steps are for application usage and supported RAID migrations. Console Software Installation The Intel Matrix Storage Manager Software is preloaded in all HP Compaq dc7800 Business desktops at "C:\Intel\Intel MSM". To execute the software, run the setup - Compaq dc7800 | AHCI and RAID on HP Compaq dc7800 - Page 20
at View/System Report. The reports contains information about the driver, operating system, language, and hard drive. 2. Select View non-RAID hard drives using Intel Matrix Storage Console NOTE: HP Compaq dc7800 Business PC products only support RAID based on two identical SATA hard drives in either - Compaq dc7800 | AHCI and RAID on HP Compaq dc7800 - Page 21
Improve storage performance with RAID 0. 2. In the right pane, select Protect data from a hard drive failure with RAID 1. 3. Click Create a RAID 1 volume to open a verification window. 4. Select Yes to begin the migration process. 5. Click OK after the migration completes. 21 - Compaq dc7800 | AHCI and RAID on HP Compaq dc7800 - Page 22
on the system experiencing a degradation to identify the hard drive that failed and to which port it is connected. 2. After identifying the hard drive, close all applications, shut down the operating system, power down the unit, unplug the power cord, and replace the defective hard drive. 22 - Compaq dc7800 | AHCI and RAID on HP Compaq dc7800 - Page 23
redundancy begins immediately after the system is powered up and operating system starts. The following message appears: Migration to RAID 0 from two non-RAID hard drives using Intel Matrix Storage Console NOTE: HP Compaq dc7800 Business PC products only support RAID based on two identical SATA hard - Compaq dc7800 | AHCI and RAID on HP Compaq dc7800 - Page 24
. Migration to RAID 0 from three non-RAID hard drives using Intel Matrix Storage Console NOTE: Back up all data before proceeding. NOTE: HP Compaq dc7800 Business PC products only support RAID based on three identical SATA hard drives RAID in either RAID 0 or RAID 5 or Matrix Mode of RAID 0 and RAID - Compaq dc7800 | AHCI and RAID on HP Compaq dc7800 - Page 25
3. Click Next. 4. Type the RAID Volume Name, select the RAID Level (for three hard drive RAID 0 or RAID 5 only), and select the Strip Size. NOTE: HP currently supports only the default Strip Size (in this case 128KB). There is a performance relation between the type of data and the strip sizes. 25 - Compaq dc7800 | AHCI and RAID on HP Compaq dc7800 - Page 26
5. Click Next to display the selection of hard drives that will be part of this RAID volume. 6. Select all three hard drives (Port 0, Port 1, and Port 2), and then click the right arrow to place them in the Selected box. 7. Click Next. 26 - Compaq dc7800 | AHCI and RAID on HP Compaq dc7800 - Page 27
8. Select all hard drive members of the RAID volume, and then click the right arrow to place all three hard drives in the Selected box. 9. Click Next. 10. Complete the volume size selection screen, and then click Next. NOTE: If users consume all available storage for this RAID volume, there will be - Compaq dc7800 | AHCI and RAID on HP Compaq dc7800 - Page 28
to RAID 5 from three non-RAID hard drives using Intel Matrix Storage Console NOTE: Back up all data before proceeding. NOTE: HP Compaq dc7800 Business PC products only support RAID based on three identical SATA hard drives in either RAID 5 or RAID 0 or Matrix Mode of RAID 0 and RAID 5. 1. Open - Compaq dc7800 | AHCI and RAID on HP Compaq dc7800 - Page 29
/Create RAID Volume from Existing Hard Drive to open a verification window. 3. Click Next. 4. Type the RAID Volume Name, select the RAID Level (for three hard drive RAID 0 or RAID 5 only), and select the Strip Size. NOTE: HP currently supports only the default Strip Size (in this case 64KB). 29 - Compaq dc7800 | AHCI and RAID on HP Compaq dc7800 - Page 30
5. Click Next to see the selection of hard drives that will be part of this RAID volume. 6. Select all three hard drives (Port 0, Port ,1 and Port 2), and then click on the arrow to move them to the Selected window. 7. Click Next. 30 - Compaq dc7800 | AHCI and RAID on HP Compaq dc7800 - Page 31
8. After the selection of the all hard drive members of the RAID volume, complete the volume size selection screen, and then click Next. NOTE: If users consume all available storage for this RAID volume, there will be no space to create another RAID volume for this hard drive, thereby not allowing - Compaq dc7800 | AHCI and RAID on HP Compaq dc7800 - Page 32
5 and RAID 0 from three non-RAID hard drives using Intel Matrix Storage Console NOTE: Back up all data before proceeding. NOTE: HP Compaq dc7800 Business PC products only support RAID based on three identical SATA hard drives in either RAID 5 or RAID 0 or Matrix Mode of RAID 0 and RAID 5. 1. Open - Compaq dc7800 | AHCI and RAID on HP Compaq dc7800 - Page 33
/Create RAID Volume from Existing Hard Drive to open a verification window. 3. Click Next. 4. Type the RAID Volume Name, select the RAID Level (for three hard drive RAID 0 or RAID 5 only), and select the Strip Size. NOTE: HP currently supports only the default Strip Size (in this case 128KB). 33 - Compaq dc7800 | AHCI and RAID on HP Compaq dc7800 - Page 34
5. Click Next to see the selection of hard drives that will be part of this RAID volume. 6. Select all three hard drives (Port 0, Port ,1 and Port 2), and then click on the arrow to move them to the Selected window. 7. Click Next. 34 - Compaq dc7800 | AHCI and RAID on HP Compaq dc7800 - Page 35
8. After the selection of the all hard drive members of the RAID volume, complete the volume size selection screen, and then click Next. NOTE: If users consume all available storage for this RAID volume, there will be no space to create another RAID volume for this hard drive, thereby not allowing - Compaq dc7800 | AHCI and RAID on HP Compaq dc7800 - Page 36
11. Click Finish to start the migration process, which can take a few hours. 12. Reboot the system after the migration finishes. NOTE: Back up all data before proceeding. 13. After the first RAID volume has been created, create the second RAID volume by opening the Intel Matrix Storage Console, - Compaq dc7800 | AHCI and RAID on HP Compaq dc7800 - Page 37
and type the RAID Volume Name, select the RAID Level (for three hard drive RAID 0 or RAID 5 only), and select the Strip Size. NOTE: HP currently supports only the default Strip Size (in this case 64KB). 16. Click Next to see the selection of hard drives that will be part of this - Compaq dc7800 | AHCI and RAID on HP Compaq dc7800 - Page 38
for adjusting the size; the second volume will take any remaining space. 19. While creating the second RAID volume, click Next to open the completion window. 38 - Compaq dc7800 | AHCI and RAID on HP Compaq dc7800 - Page 39
20. Select Finish to start the migration process, which can take a few hours. The following screen appears. 39 - Compaq dc7800 | AHCI and RAID on HP Compaq dc7800 - Page 40
21. Reboot the system after the migration finishes. After the second reboot and both migrations are complete, you can see the state of the Matrix mode created by opening the Intel Matrix Storage Console and clicking View>Advanced Mode. The matrix mode of three hard drives is illustrated in the - Compaq dc7800 | AHCI and RAID on HP Compaq dc7800 - Page 41
necessary, use setup in combination with the following supported flags: -?: The installer presents a dialog showing all the supported setup flags (shown here) and their usage. -A: Extracts all files (does not install driver) to if -P is also supplied. Otherwise, the files are extracted to the - Compaq dc7800 | AHCI and RAID on HP Compaq dc7800 - Page 42
Language support table ara Arabic (Saudi Arabia) chs Chinese (Simplified services. Nothing herein should be construed as constituting an additional warranty. HP shall not be liable for technical or editorial errors or omissions contained herein. Microsoft, MS-DOS, Windows, Windows NT, and Windows
-
 1
1 -
 2
2 -
 3
3 -
 4
4 -
 5
5 -
 6
6 -
 7
7 -
8
-
9
-
10
-
11
-
12
-
13
-
14
-
15
-
16
-
17
-
18
-
19
-
20
-
21
-
22
-
23
-
24
-
25
-
26
-
27
-
28
-
29
-
30
-
31
-
32
-
33
-
34
-
35
-
36
-
37
-
38
-
39
-
40
-
41
-
42
 |
 |

1
Advanced Host Controller Interface (AHCI) and Redundant
Array of Independent Disks (RAID) on HP Compaq dc7800
Business PCs
Using Intel Matrix Storage Manager
Introduction
. . . . . . . . . . . . . . . . . . . . . . . . . . . . . . . . . . . . . . . . . . . . . . . . . . . . . . . . . . . .3
Basics of AHCI and RAID Technology
. . . . . . . . . . . . . . . . . . . . . . . . . . . . . . . . . . . . . . . . . .3
Definitions
. . . . . . . . . . . . . . . . . . . . . . . . . . . . . . . . . . . . . . . . . . . . . . . . . . . . . . . . . .3
Single Drive AHCI Configuration
. . . . . . . . . . . . . . . . . . . . . . . . . . . . . . . . . . . . . . . . . . . . .4
Basic RAID Types
. . . . . . . . . . . . . . . . . . . . . . . . . . . . . . . . . . . . . . . . . . . . . . . . . . . . . . . .5
RAID 0 with two hard drives (Striped)
. . . . . . . . . . . . . . . . . . . . . . . . . . . . . . . . . . . . . . .5
RAID 1 with two hard drives (Mirror) . . . . . . . . . . . . . . . . . . . . . . . . . . . . . . . . . . . . . . . .7
RAID 5 with three hard drives . . . . . . . . . . . . . . . . . . . . . . . . . . . . . . . . . . . . . . . . . . . . .8
Intel Matrix Storage Technology
. . . . . . . . . . . . . . . . . . . . . . . . . . . . . . . . . . . . . . . . . .10
Configurations
. . . . . . . . . . . . . . . . . . . . . . . . . . . . . . . . . . . . . . . . . . . . . . . . . . . . . . . . .11
Recommended configurations . . . . . . . . . . . . . . . . . . . . . . . . . . . . . . . . . . . . . . . . . . . .11
HP Backup and Recovery interactions
. . . . . . . . . . . . . . . . . . . . . . . . . . . . . . . . . . . . . .13
Other supported configurations . . . . . . . . . . . . . . . . . . . . . . . . . . . . . . . . . . . . . . . . . . .13
Unsupported configurations
. . . . . . . . . . . . . . . . . . . . . . . . . . . . . . . . . . . . . . . . . . . . .13
Configuring RAID on non-factory preinstalled configurations . . . . . . . . . . . . . . . . . . . . . . . . . .14
Enabling RAID through F10 System BIOS . . . . . . . . . . . . . . . . . . . . . . . . . . . . . . . . . . . .14
Configuring RAID Option ROM . . . . . . . . . . . . . . . . . . . . . . . . . . . . . . . . . . . . . . . . . . .15
Configuring RAID Volume using the Option ROM
. . . . . . . . . . . . . . . . . . . . . . . . . . . . . .16
Notes for operating system installation . . . . . . . . . . . . . . . . . . . . . . . . . . . . . . . . . . . . . .18
Intel Matrix Storage Manager software installation
. . . . . . . . . . . . . . . . . . . . . . . . . . . . . . . .19
Console Software Installation
. . . . . . . . . . . . . . . . . . . . . . . . . . . . . . . . . . . . . . . . . . . .19
Using the Intel Matrix Storage Console interface . . . . . . . . . . . . . . . . . . . . . . . . . . . . . . . . . .20