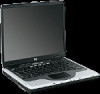
Compaq nx9010 Reference Guide
Compaq nx9010 - Notebook PC Manual
 |
View all Compaq nx9010 manuals
Add to My Manuals
Save this manual to your list of manuals |
Compaq nx9010 manual content summary:
- Compaq nx9010 | Reference Guide - Page 1
HP Notebook PC Reference Guide - Compaq nx9010 | Reference Guide - Page 2
Packard Company 2003. All rights reserved. Reproduction, adaptation, or translation of this manual is prohibited without prior written permission of Hewlett- Macrovision Corporation. Reverse engineering or disassembly is prohibited. Microsoft®, MS-DOS®, and Windows® are U.S. registered trademarks of - Compaq nx9010 | Reference Guide - Page 3
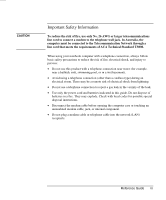
gas leak in the vicinity of the leak. • Use only the power cord and batteries indicated in this guide. Do not dispose of batteries in a fire. They may explode. Check with local codes for possible special disposal instructions. • Disconnect the modem cable before opening the computer case or touching - Compaq nx9010 | Reference Guide - Page 4
. IF YOU DO NOT AGREE WITH THE TERMS OF THE LICENSE AGREEMENT, YOU MUST NOW EITHER REMOVE THE SOFTWARE FROM YOUR HARD DRIVE AND DESTROY THE MASTER DISKETTES, OR RETURN THE COMPLETE HP PRODUCT AND SOFTWARE FOR A FULL REFUND. PROCEEDING WITH CONFIGURATION SIGNIFIES YOUR ACCEPTANCE OF THE LICENSE TERMS - Compaq nx9010 | Reference Guide - Page 5
and/or support utility software may only be used for restoring the hard disk of the HP product with updates and upgrades which may be available from Hewlett-Packard under a separate support agreement. EXPORT CLAUSE. Customer agrees not to export or re-export the software or any copy or adaptation - Compaq nx9010 | Reference Guide - Page 6
involved. SUPPORT POLICY FOR MICROSOFT OPERATING SYSTEMS SERVICE PACK. HP will provide end user support for HP PCs that use Microsoft Operating Systems, including its latest service packs. This support will be available 30 days after the service pack being released by Microsoft. vi Reference Guide - Compaq nx9010 | Reference Guide - Page 7
10 Step 1: Insert the battery 10 Step 2: Connect AC power 11 Step 3: Connect a phone line 12 Step 4: Turn on the notebook 13 Step 5: Set up Windows 13 Basic Operation ...15 Operating Your Notebook 16 Default power settings 16 To reset the notebook 17 To change the boot device 17 To use the - Compaq nx9010 | Reference Guide - Page 8
To protect your hard drive 27 To maintain your notebook 27 To safeguard your data 28 To extend the life of the display 28 To clean your notebook 28 Batteries and Power Management 29 Managing Power Consumption 30 How the notebook manages power automatically 30 Using Battery Power 32 To check - Compaq nx9010 | Reference Guide - Page 9
Memory problems 73 Modem problems 73 PC Card problems 76 Performance problems 76 Power and battery problems 77 Printing problems 79 Serial, parallel, and USB problems 80 Startup problems 81 Wireless problems 82 Configuring Your Notebook 84 To run the BIOS Setup utility 84 To change video - Compaq nx9010 | Reference Guide - Page 10
Regulatory Information 101 U.S.A...101 Canada ...103 European Union 104 Japan ...106 New Zealand 107 Russia...108 International 108 Index ...111 x Reference Guide - Compaq nx9010 | Reference Guide - Page 11
Getting Started with Your Notebook Reference Guide 1 - Compaq nx9010 | Reference Guide - Page 12
, and an on-off button 6 Main status lights (left to right): power mode, hard drive activity, and battery 7 Hard drive 8 Infrared port (select models only) 9 Wireless on-off button and indicator light (select models only) 10 Battery 11 CD-ROM, DVD, or other drive 12 PS/2 port 2 Reference Guide - Compaq nx9010 | Reference Guide - Page 13
, plus on-off button 6 Main status lights (left to right): power mode, hard drive activity, and battery 7 Infrared port (select models only) 8 Wireless on-off button and indicator light (select models only) 9 Battery 10 Audio mute button, audio mute light, and volume control 11 Audio jacks (left to - Compaq nx9010 | Reference Guide - Page 14
Left panel and back panel components 1 AC adapter jack 8 Cable lock slot (security connector) 2 Universal serial bus ports (USB) 9 RJ-11 jack: connects the modem cable 3 RJ-45 jack: connects a network cable 10 PC Card and CardBus slot and button 4 S-Video out jack 11 IEEE 1394 port (select - Compaq nx9010 | Reference Guide - Page 15
a parallel printer or other parallel device 6 External monitor port 7 S-Video out jack 8 Cable lock slot (security connector) 9 RJ-11 jack: connects a modem cable 10 IEEE 1394 port (select models only) 11 PC Card and CardBus slot and buttons 12 Diskette drive (select models only) Reference Guide 5 - Compaq nx9010 | Reference Guide - Page 16
Getting Started with Your Notebook Identifying Parts of the Notebook Bottom panel components 1 Hard drive 2 Battery latch 3 RAM (memory) cover 4 Reset button 5 Docking port (select models only) 6 Mini PCI cover (no user parts inside) 6 Reference Guide - Compaq nx9010 | Reference Guide - Page 17
Getting Started with Your Notebook Identifying Parts of the Notebook 1 Hard drive 2 Battery latch 3 Mini PCI cover (no user parts inside) 4 RAM (memory) cover 5 Docking port (select models only) 6 Reset button Reference Guide 7 - Compaq nx9010 | Reference Guide - Page 18
is accessing the hard drive 3 Battery status • Green-AC adapter is connected and the battery is fully charged • Amber-AC adapter is connected and the battery is charging • Blinking-AC adapter is connected and the battery is missing or has a fault • Off-AC adapter is not connected 8 Reference Guide - Compaq nx9010 | Reference Guide - Page 19
Getting Started with Your Notebook Identifying Parts of the Notebook The keyboard status lights, located above the keyboard, indicate the states of the keyboard locks. 1 Caps Lock On. Caps Lock is active. 2 Num , cursor control is active (as marked on an external keyboard). Reference Guide 9 - Compaq nx9010 | Reference Guide - Page 20
it with a full-sized keyboard, monitor, and mouse. Docking Guide on this CD included with your notebook. When you set up your notebook for the first time, you will charge the battery, connect the AC adapter, turn on the notebook, and run the Windows setup program. WARNING Step 1: Insert the battery - Compaq nx9010 | Reference Guide - Page 21
Plug the power cord into a wall outlet. The notebook battery starts charging. When unplugging the power cord, unplug it from the wall outlet before unplugging it from the AC adapter. While the battery is charging, you can continue with the "Step 3: Connect a phone line" section. Reference Guide 11 - Compaq nx9010 | Reference Guide - Page 22
the telephone line is an analog line, sometimes called a data line. (Do not use a digital line.) 2. Connect the telephone cord (RJ-11) into a telephone jack. 3. Plug the other end of the telephone cord into the RJ-11 modem jack on the notebook. For details about using the modem, see "Using the Modem - Compaq nx9010 | Reference Guide - Page 23
out of power. Plug in the AC adapter, then press the power button again. Leave the AC adapter plugged in for several hours to fully charge the battery. Charge times will vary. Step 5: Set up Windows Your notebook has the Microsoft Windows operating system preinstalled on its hard drive. The first - Compaq nx9010 | Reference Guide - Page 24
Basic Operation Reference Guide 15 - Compaq nx9010 | Reference Guide - Page 25
session in RAM. • Restarts quickly. • Restores network connections. • Saves maximum power. • Saves current session to disk, then shuts down. • Restores network connections. You can also customize the way these power modes work. See the "Batteries and Power Management" chapter in this guide. 16 - Compaq nx9010 | Reference Guide - Page 26
, you can press the reset button on the left side of the port replicator. To change the boot device The notebook normally boots from its internal hard drive. You can also boot the notebook from a diskette drive, a CD-ROM drive, or an internal network interface card. 1. Select Start > Turn Off - Compaq nx9010 | Reference Guide - Page 27
. 1 Click buttons. The Click buttons work like the left and right buttons on a standard mouse. 2 TouchPad (touch-sensitive pointing device). 3 TouchPad on-off button and indicator light. 4 Scroll pad. The scroll pad scrolls vertically to display the contents of the active window. 18 Reference Guide - Compaq nx9010 | Reference Guide - Page 28
then the numeric functions are active. Otherwise, cursor control is active (as marked on an external keyboard). Enters Hibernation. Toggles Scroll Lock on and off. Increases the audio volume and cancels the mute setting. Decreases the audio volume. Mutes/unmutes the audio output. Reference Guide 19 - Compaq nx9010 | Reference Guide - Page 29
button 1. Select Start > All Programs > Utilities > One Touch. 2. On the One-Touch tab, select the button you want to reprogram. 3. Type a label for the button , then select the application, document, folder, or Web site you want the button - Compaq nx9010 | Reference Guide - Page 30
+F1 Windows key+F Windows key+M Shift+Windows key+M Windows key+R Does this Runs Windows Explorer Runs Windows Help Runs Windows Find: Search Minimizes all displayed windows Returns all minimized windows to original size Runs the Windows Run dialog box To use the ALT GR key Non-U.S. keyboards have - Compaq nx9010 | Reference Guide - Page 31
. 3. Slide the tray back into the module to close it. If your notebook loses power, you can manually open the drive to remove a CD. Insert a straightened paper clip into the recessed hole on the front of the drive to open it. The location of the CD or DVD drive varies by model. 22 Reference Guide - Compaq nx9010 | Reference Guide - Page 32
drive, it also includes a DVD player software that lets you play DVD movies. Select Start > All Programs > Multimedia > DVD Player > InterVideo WinDVD. For best performance while playing movies on battery power, set the Control Panel power scheme to Portable/Laptop be hard-coded on the DVD drive, and - Compaq nx9010 | Reference Guide - Page 33
Setup utility. See "Configuring Your Notebook" in the "Troubleshooting and Maintenance" chapter. For complete protection, set passwords in Windows as well as through BIOS Setup. To cancel password protection, set an empty password. Windows 1. Select Start > Control Panel > User Accounts, then select - Compaq nx9010 | Reference Guide - Page 34
comes equipped with the Norton AntiVirus software. You can get detailed instructions from the Norton online Help. Because new viruses appear frequently, you will also want to update the program virus definitions periodically. Norton AntiVirus updates are on the Web at www.symantec.com. Reference - Compaq nx9010 | Reference Guide - Page 35
Start > Turn Off Computer > Restart. 2. When the logo screen appears, press F2 to enter the BIOS Setup utility. 3. From the Security menu, enable Password Required to Boot. 4. From the Security menu, enable Internal hard drive lock. 5. Press F10 to save and exit BIOS Setup. 26 Reference Guide - Compaq nx9010 | Reference Guide - Page 36
prevent potential physical damage or data loss. To protect your hard drive Hard drives, as well as other internal components, are not indestructible and gradually to avoid condensation. • Maintain your battery for best performance. See the "Batteries and Power Management" chapter. Reference Guide 27 - Compaq nx9010 | Reference Guide - Page 37
media or network drives. • Use a tab in the disk Properties window. To extend the life button at the top of the keyboard). • If you are not using an external monitor, set the Turn off monitor timeouts (for both AC and battery operation) to the shortest comfortable interval. • Avoid using a screen - Compaq nx9010 | Reference Guide - Page 38
Batteries and Power Management Reference Guide 29 - Compaq nx9010 | Reference Guide - Page 39
to suit your working habits. How the notebook manages power automatically Your notebook enters Hibernation and Standby automatically, and turns off the hard drive and display based on values set in Windows. When this occurs No keyboard, pointing device, or other input activity occurs for the - Compaq nx9010 | Reference Guide - Page 40
Never. See Windows Help for details. If you want to save the settings as a power scheme, select Save As and enter a name for the scheme. Do not disable Hibernate support in the Power Options settings, or you will lose any unsaved data if the notebook battery runs down completely. Reference Guide 31 - Compaq nx9010 | Reference Guide - Page 41
. The Alarms and Advanced tabs provide additional Windows power-information options. On the battery 1. Remove the battery from the notebook. See the "Getting Started with Your Notebook" chapter in this guide. 2. Press the contact pad on the side of the battery. The number of lights that turn on - Compaq nx9010 | Reference Guide - Page 42
again until you restore power by doing one of the following procedures: • Replace the battery with a charged one. • Plug in the AC adapter. If you plug in the AC adapter, you can continue to work while your battery recharges. To recharge the battery The AC adapter is normally warm whenever plugged - Compaq nx9010 | Reference Guide - Page 43
Batteries and Power Management Using Battery Power To get the most from your batteries Follow these suggestions to make your battery power last as long as possible: • Plug in the AC adapter, especially when using a CD-ROM or DVD drive, or any external connections such as a PC Card or a modem. • Set - Compaq nx9010 | Reference Guide - Page 44
Modem and Network Connections Reference Guide 35 - Compaq nx9010 | Reference Guide - Page 45
browsing the World Wide Web • Outlook Express, for sending and receiving e-mail messages • Windows Fax Console software for sending and receiving faxes For best performance, you can connect to any Internet Service Provider (ISP) or modem network that has V.90 or V.92 interoperable modems. Check with - Compaq nx9010 | Reference Guide - Page 46
certain countries • Many countries impose a blackout period after a modem repeatedly fails to connect to a service provider. The number of failed attempts and the period you must wait before trying again differ from surge protector to the modem cable when you are using the modem. Reference Guide 37 - Compaq nx9010 | Reference Guide - Page 47
using modem AT commands. AT commands are special strings of characters sent to the modem to set up specific conditions. Those command strings normally start with "AT." For a list of AT commands for the built-in commands on the Advanced tab in the space for extra settings. 38 Reference Guide - Compaq nx9010 | Reference Guide - Page 48
connect to a LAN: 1. Check that the existing LAN supports Ethernet 10Base-T (10 Mbps) or 100Base-TX (100 Mbps) connections. 2. Plug the LAN cable (not supplied) into the built-in LAN port. The cable must have an RJ-45 connector. 3. Windows automatically detects and sets up a LAN connection. To edit - Compaq nx9010 | Reference Guide - Page 49
the notebook for the specific wireless connection. Connecting to an existing wireless network You can connect to an access point that gives you access to a local area network, or you can connect directly to other computers in an "ad hoc" network. 1. Right-click the wireless network connection icon - Compaq nx9010 | Reference Guide - Page 50
network. 4. On the Wireless Networks tab, view the wireless networks available within range 5. If the wireless network uses standard wireless communication is turned on. Creating a New Computer-to-Computer Network (Ad wireless connection to show its status, then select Properties. 3. On the Wireless - Compaq nx9010 | Reference Guide - Page 51
not on, turn it on. 2. If you normally press the wireless on-off button on the front of the notebook to turn wireless 802.11 communication on and off, press the button so the indicator light turns on. This restores your previous wireless configuration. -or- Select Start > Control Panel > Network and - Compaq nx9010 | Reference Guide - Page 52
. 2. To turn off the wireless 802.11 communication without turning off the notebook, press the wireless on-off button. This also turns off Bluetooth communication if it was enabled. -or- Right-click the wireless network connection - Compaq nx9010 | Reference Guide - Page 53
communication on and off, press the button so the indicator light turns on. This restores your previous wireless configuration. -or- If the Wireless Configuration icon is present in the taskbar, select the icon, then select the Bluetooth button to turn on Bluetooth communication. 44 Reference Guide - Compaq nx9010 | Reference Guide - Page 54
Wireless wireless on-off button. This also turns off 802.11 communication if it was enabled. -or- If the Wireless Configuration icon is present in the taskbar, select the icon, then select the Bluetooth button the computer type to Laptop. • Select the security your business card file so you - Compaq nx9010 | Reference Guide - Page 55
your business card directory. To send or receive files using Bluetooth If your notebook includes Bluetooth wireless capabilities, it supports the open the other device to view files in its shared directory. 3. Use Windows Explorer or other software to copy or move files between your notebook and the - Compaq nx9010 | Reference Guide - Page 56
Add-On Devices Reference Guide 47 - Compaq nx9010 | Reference Guide - Page 57
capabilities of the notebook. The notebook supports standard Type II and III PC Cards (PCMCIA and CardBus). To insert or remove a PC Card Note The location and number of the PC Card slots vary by model series. Inserting a PC Card 1. Hold the PC Card label-side up with its connectors facing - Compaq nx9010 | Reference Guide - Page 58
in the taskbar, then select the card you want to remove. This protects your data and helps avoid unexpected problems. If needed, you can restart the card by removing and then reinserting it. 2. Press the eject button to pop the button out, then press it in to eject the PC Card. Reference Guide 49 - Compaq nx9010 | Reference Guide - Page 59
CAUTION To connect an audio device You can plug in CD player) or a device that accepts digital audio (such as a digital audio recorder). The headphone and line-in jacks are jacks may damage the notebook. Attach the audio cable to the corresponding audio port on the notebook or port replicator. - Compaq nx9010 | Reference Guide - Page 60
) 2 External microphone connector (pink) When you plug a device into the headphone port, the built-in speakers automatically turn off. When you plug a device into either audio port on the notebook, any device connected to the corresponding port on the port replicator is ignored. Reference - Compaq nx9010 | Reference Guide - Page 61
tab. 4. To enable the TV, select the red button next to TV. If the S-Video cable is not plugged into your notebook and TV, the red button will not be displayed. 5. Select Apply to accept the changes. 6. If you are prompted to restart Windows, select Yes. Switching the display to the external monitor - Compaq nx9010 | Reference Guide - Page 62
adjust the Screen area. Other , select the Advanced button, then the Displays graphics require extra video memory, so you audio and video equipment, disk drives, printers, and other notebooks. Attach the device cable to the IEEE 1394 port. Windows automatically recognizes the device. Reference Guide - Compaq nx9010 | Reference Guide - Page 63
adapter if the device is unpowered, or a hub if the device requires power. If you have problems making this connection, contact the device manufacturer Web site for the latest version of the driver Wireless Link. See the Windows online Help for instructions on using Wireless Link. 54 Reference Guide - Compaq nx9010 | Reference Guide - Page 64
remove the notebook from your desk. Instead of disconnecting and reconnecting peripheral devices, you can simply undock and dock the notebook. Use only the AC adapter included with your notebook (or other approved adapter that meets the power against an unlikely docking problem. Reference Guide 55 - Compaq nx9010 | Reference Guide - Page 65
AC adapter, then connect it to the back of the port replicator. You can also operate the port replicator using power from the notebook battery. 2. Remove security connector next to the undock button. This will also lock the undock button. If a device is connected to an audio port on the notebook, any - Compaq nx9010 | Reference Guide - Page 66
Add-On Devices Connecting External Devices To undock from the port replicator 1. Press down the undock button on the right side of the port replicator. 2. Lift the notebook out of the port replicator. Reference Guide 57 - Compaq nx9010 | Reference Guide - Page 67
shielding around the connectors on the back of the notebook. 1. Select Start > Turn Off Computer > Turn Off. 2. Important: unplug the AC adapter, if present, and remove the battery. 3. Turn the unit bottom-side up, loosen the screws holding the RAM cover, and remove the cover. 58 Reference Guide - Compaq nx9010 | Reference Guide - Page 68
RAM (Memory) 4. Insert the RAM board into the connector at about a 30 degree angle until it is fully inserted. Then press down at both sides until both latches snap closed. Match your notebook to one of the following illustrations. 5. Replace the cover. 6. Insert the battery. To remove the RAM - Compaq nx9010 | Reference Guide - Page 69
Add-On Devices Installing Additional RAM (Memory) To remove a RAM expansion module You may want to remove a RAM module so you can the AC adapter, if present, and remove the battery. 3. Turn the unit bottom-side up, loosen the screws holding the RAM cover, and remove the cover. 60 Reference Guide - Compaq nx9010 | Reference Guide - Page 70
Installing Additional RAM (Memory) 4. Release the two latches at the sides of the RAM board, so the free edge of the board pops up. Match your notebook to one of the following illustrations. 5. Pull the board out of the connector. 6. Replace the cover. 7. Insert the battery. Reference Guide 61 - Compaq nx9010 | Reference Guide - Page 71
Add-On Devices Replacing the Hard Drive Replacing the Hard Drive To replace the hard drive You will need a small Phillips screwdriver for this procedure. 1. Unplug the AC adapter, if connected. 2. Remove the battery. 3. Turn the unit bottom side up. 4. Use a pointed tool to remove the plugs from the - Compaq nx9010 | Reference Guide - Page 72
Add-On Devices Replacing the Hard Drive To replace the hard drive holder If you are installing a new hard drive that does not have a holder, you can remove the holder parts from the old hard drive. You will need a small Phillips screwdriver for this procedure. 1. Remove the four screws from the - Compaq nx9010 | Reference Guide - Page 73
you install a new hard drive, you also need to prepare it to be able to work with your notebook. If you want to restore the Windows software and operating system that were originally installed on your notebook, use the QuickRestore System Recovery CD included with your notebook. 64 Reference Guide - Compaq nx9010 | Reference Guide - Page 74
Troubleshooting and Maintenance Reference Guide 65 - Compaq nx9010 | Reference Guide - Page 75
> Help and Support. • See the Microsoft Windows manual shipped with the notebook. • Select the question mark on the One-Touch key located at the top of the keyboard. • Refer to the Worldwide Telephone Numbers booklet to contact a Customer Care Center for help and support. Audio problems If no sound - Compaq nx9010 | Reference Guide - Page 76
Troubleshooting CD-ROM and DVD problems If you can't boot from a CD or the CD-ROM/DVD drive is selected as the boot device. See the " you are playing the DVD on battery power, try changing the power scheme. If you get a make sure the disc is placed in the drive with the label facing up. • Clean the - Compaq nx9010 | Reference Guide - Page 77
Troubleshooting Your Notebook • Restart the system. Remove the disc from the drive, then select Start > Turn Off Computer > Restart. • If you created the CD on a CD/DVD RW combo drive, try using a different media brand. Read and write quality may vary by media. If a DVD movie doesn't fill the screen - Compaq nx9010 | Reference Guide - Page 78
monitor may not be detected. In the BIOS Setup utility, try setting Video Display Device to Both in the System Devices menu. Hard drive problems If the notebook hard drive doesn't spin • Make sure the notebook has power. If necessary, connect the AC adapter, then make sure it is fully plugged - Compaq nx9010 | Reference Guide - Page 79
and Maintenance Troubleshooting Your Notebook Heat problems Your notebook normally gets Keep in mind that games and other programs that drive CPU usage toward 100 percent can increase the notebook temperature. Infrared problems By default, the infrared port is not enabled, port. 70 Reference Guide - Compaq nx9010 | Reference Guide - Page 80
and Maintenance Troubleshooting Your Notebook Keyboard and pointing device problems Use these suggestions • The TouchPad must be disabled for the mouse scroll feature to work. In the BIOS Setup utility, make sure the External Pointing Devices option in the System Devices menu is Reference Guide 71 - Compaq nx9010 | Reference Guide - Page 81
Troubleshooting Your Notebook Local area network (LAN) problems If the built-in network adapter • Select Start > Help and Support, then use the Networking troubleshooter. • Open the hardware Device Manager. proxy server, try enabling the option for bypassing the proxy server for local addresses. You - Compaq nx9010 | Reference Guide - Page 82
says you are out of memory • Make sure drive C is not running low on free space. • If you are having memory problems while running MS-DOS programs, use the MS-DOS or Application and Software troubleshooter in Windows Help: select Start > Help and Support. • The full amount of RAM in your notebook is - Compaq nx9010 | Reference Guide - Page 83
Troubleshooting • If you have call-waiting, disable it-your telephone company can provide instructions. If the modem dials but doesn't connect • Make sure you're machine or modem. • The modem at the other end may have a problem. Try dialing to a different modem. If the modem isn't detected • Check - Compaq nx9010 | Reference Guide - Page 84
Troubleshooting If your model has an audio mute light, make sure it is turned off. If it's on, press the audio mute button. • Check the speaker volume 've selected the fax printer. • Try turning off power management features temporarily. If excessive line current is detected . Reference Guide 75 - Compaq nx9010 | Reference Guide - Page 85
Maintenance Troubleshooting Your Notebook PC Card problems If the notebook doesn't recognize a PC Card • Remove and reinsert the PC Card. • Restart the notebook: select Start > Turn Off Computer > Restart. • Try the card in another computer to see whether the card functions properly. • Zoomed Video - Compaq nx9010 | Reference Guide - Page 86
problems If the notebook turns off immediately after it turns on Battery power is probably extremely low. Plug in the AC adapter or insert a charged battery. If the notebook keeps beeping The notebook beeps repeatedly or displays a warning when battery power is low. Save your work, shut down Windows - Compaq nx9010 | Reference Guide - Page 87
and Maintenance Troubleshooting Your Notebook If the battery doesn't charge • Make sure the AC adapter is fully plugged into the power source and the notebook, and that the light on the Adapter is on. • If you're using a power strip, remove the AC adapter from the power strip and plug - Compaq nx9010 | Reference Guide - Page 88
. Make sure the Hibernate timeouts for both AC power and battery power are not set to Never. Printing problems Hint You will usually be able to solve most printing problems by using the Print troubleshooter in Windows Help: select Start > Help and Support. If a serial or parallel printer doesn - Compaq nx9010 | Reference Guide - Page 89
/2 keyboard connected, use a PS/2 Y adapter (HP accessory F1469A). • Check the port settings in Control Panel. Open the hardware Device Manager, then select Ports (COM & LPT). If a serial modem doesn't work properly • Make sure the port connection is secure. • Use the Modem troubleshooter in Windows - Compaq nx9010 | Reference Guide - Page 90
notebook still doesn't respond, remove the battery and AC adapter, remove any PC Cards, and undock the notebook if docked. Then plug in the AC adapter again, and reset the notebook using the reset button. If the notebook won't boot from battery power • Make sure the battery is properly inserted and - Compaq nx9010 | Reference Guide - Page 91
network card installed. While the operating system is loading drivers and checking hardware and network connections, you will see a blinking cursor on your display. As soon as the hardware has been re-initialized, the Windows desktop will appear. Wireless problems If you have problems with wireless - Compaq nx9010 | Reference Guide - Page 92
closer to the access point (for an infrastructure connection) or other wireless computer (for an Ad Hoc connection). You could be too far away for high-speed Wireless Configuration, then select the Bluetooth button if it's not turned on. If no Bluetooth button is shown, your notebook does not support - Compaq nx9010 | Reference Guide - Page 93
how the notebook operates. 1. Select Start > Turn Off Computer > Restart. 2. When the logo screen appears, press F2 to enter BIOS Setup. 3. The pointing devices are not active in BIOS Setup, so you will need to use the keyboard to navigate: • Press the LEFT and RIGHT arrow keys to move among menus - Compaq nx9010 | Reference Guide - Page 94
language for BIOS Setup. Sets the hard drive type and various parameters. Sets the video memory size allocated from total installed memory (RAM). Shows the extended memory size. Displays the serial number as shown on the back of the unit. Displays an identifier used for repair service. Displays the - Compaq nx9010 | Reference Guide - Page 95
BIOS support for USB mouse, keyboard, and diskette disk drive during startup. Lets the notebook be turned on via the LAN port. If this option is enabled, the notebook uses increased power while it is shut down. Default Auto Auto Enabled Disabled Setting User Password is Administrator Password - Compaq nx9010 | Reference Guide - Page 96
Setting Hard Drive +Removable Devices CD-ROM Drive Built-in LAN Troubleshooting and Maintenance Configuring Your Notebook Boot Menu Description Shows the order of boot devices. Move the entries to change the order. If the notebook has more than one device in a + category, you can select the one - Compaq nx9010 | Reference Guide - Page 97
Troubleshooting and Maintenance Reinstalling and Updating Software Reinstalling and Updating Software Your notebook includes two features that allow you to install individual software applications or to restore the entire original contents of your hard drive: • QuickRestore System Recovery CD, - Compaq nx9010 | Reference Guide - Page 98
Reference Information Reference Guide 89 - Compaq nx9010 | Reference Guide - Page 99
tone; * ("star"); # ("pound sign"); +; !=flash; @=wait for silence; $ or &=wait for credit card dialing tone; ,=return to command state; '=dial pause; ^=toggle calling tone. Parentheses, hyphens, and spaces can be on, 3=off when dialing and receiving carrier, on when answering. 90 Reference Guide - Compaq nx9010 | Reference Guide - Page 100
result code on connecting. Dial tone and busy signal reported if detected (default). Reset to default configuration. Select error control protocol: NONE=no data compression, V42B=42bis in both size of history buffer to be negotiated in receive direction (default=4096). Reference Guide 91 - Compaq nx9010 | Reference Guide - Page 101
procedures, 2=use full startup procedures on all subsequent connections. Set caller ID reporting: 0=disable (default), 1=enable with formatted presentation, 2=enable with unformatted presentation. 92 Reference Guide - Compaq nx9010 | Reference Guide - Page 102
connection. Enable reporting of modulation connection (+MCR: and +MRR: are transmitted) (default). Enable reporting of modulation connection (+MCR: and Receive Rate Only: are transmitted). Reference Guide 93 - Compaq nx9010 | Reference Guide - Page 103
and discards data. FAX Class 1 Data/fax auto answer: 0=disable (default), 1=enable. 0=disable adaptive reception (default), 1=enable. Set loss-of-carrier delay in units of 100 ms (n=0 to 255). Set active service class: 0=data mode (default), 1=Fax Class 1, 1.0=Fax Class 1.0 mode, 8=voice mode. Set - Compaq nx9010 | Reference Guide - Page 104
(1 to 500 x 0.01 sec). Start voice transmission and reception. Send voice tones. Start voice transmission. AT* Commands Display black-listed numbers. Display delayed numbers. Reference Guide 95 - Compaq nx9010 | Reference Guide - Page 105
(Conexant) Meaning OK CONNECT RING NO CARRIER ERROR CONNECT 1200 NO DIAL TONE BUSY NO ANSWER DELAYED BLACKLISTED FAX DATA LINE IN USE 96 Reference Guide - Compaq nx9010 | Reference Guide - Page 106
Safety Information Reference Information Safety Information Power cords The power cord supplied with the notebook AC adapter should match the plug and voltage requirements for your local area. Regulatory approval for the AC adapter has been obtained using the power cord for the local area. However - Compaq nx9010 | Reference Guide - Page 107
pack, do not allow a metal object to touch the battery contacts. • Do not disassemble the battery. There are no serviceable parts inside. Do not dispose of the battery pack in fire or water. • Handle a damaged or leaking battery with extreme care. If you come in contact with the electrolyte, wash - Compaq nx9010 | Reference Guide - Page 108
is not considered harmful, but the following precautions are recommended: • If the unit requires service, contact an authorized service center. • Do not attempt to make any adjustment of the unit. • Avoid direct eye crystal display, and may require special handling at end-of-life. Reference Guide 99 - Compaq nx9010 | Reference Guide - Page 109
power of the IEEE 802.11 and Bluetooth internal wireless radio is far below the FCC radio frequency exposure limits. Nevertheless, the wireless The internal wireless radio operates within believe the internal wireless radio is safe wireless devices such as mobile phones. However, the use of wireless - Compaq nx9010 | Reference Guide - Page 110
instructions removing the unit's batteries and AC adapter), try the following: • Reorienting or relocating the receiving antenna. • Relocating the computer with respect to the receiver. • Connecting the computer's AC adapter to another power Problems printing of this manual, the telephone Guide 101 - Compaq nx9010 | Reference Guide - Page 111
company may request that you disconnect the equipment until the problem is resolved. You should only perform repairs to the equipment specifically discussed in the troubleshooting section of the user guide. Connection to party line service is subject to state tariffs. Contact the state public - Compaq nx9010 | Reference Guide - Page 112
regulations of the Canadian Department of Communications. This equipment meets the applicable Industry Canada technical specifications. The Ringer Equivalence Number, REN, is an indication of the maximum number of devices exceed five. The REN for this terminal equipment is 1.0. Reference Guide 103 - Compaq nx9010 | Reference Guide - Page 113
wireless radio complies with RSS 210 of Industry Canada. To prevent radio interference to the licensed service, this device is intended to be operated indoors and away from windows on every PSTN network termination point. In event of problems, you should contact your equipment supplier in the Guide - Compaq nx9010 | Reference Guide - Page 114
Geräte bei Anschluss an jeder beliebigen Telefonbuchse funktionieren. Sollten Probleme auftreten, wenden Sie sich zunächst an den Gerä singoli terminali alla rete telefonica pubblica commutata (PSTN) e alla rete wireless in radio frequenza. Tuttavia, a causa delle differenze esistenti tra - Compaq nx9010 | Reference Guide - Page 115
una rete telefonica diversa. Japan Japan Telecommunications Approval Name of Equipment: AMC20493-001-KT5 TELEC approval number: D02-0005JP Name of Equipment: T60H424 106 Reference Guide - Compaq nx9010 | Reference Guide - Page 116
problem should not be referred to the Telecom Faults Service. within the following limits for compliance with Telecom's specifications: The S0 register must contain a value of within any 30-minute period for any single manual call initiation. The equipment shall go on- Service. Reference Guide 107 - Compaq nx9010 | Reference Guide - Page 117
International Products sold internationally by the manufacturer and its authorized dealers meet the specifications listed on the following page. For regulatory identification purposes, your product is regulatory number is different from the marketing name and product number. 108 Reference Guide - Compaq nx9010 | Reference Guide - Page 118
IEC Guide 22 301 489-17: 2000 Specific conditions for wideband data HYPERLAN : CETECOM ICT Services GmbH, Untertuerkheimer HP F1454, F1781, F4600, F4814, F4813, F5104, 5950-4334, and 5950-4359 ac/dc adapters used with this product are designed to operate on all power systems, other than IT power - Compaq nx9010 | Reference Guide - Page 119
, 3 audio mute button, 3 B battery best use of, 34 checking status, 32 extending life of, 34 installing, 10 location, 2, 3 low power warning, 33 operating time, 34, 78 release latch, 6, 7 safety, 98 saving power, 34 status lights, 32 troubleshooting, 77 BIOS password, 24 BIOS Setup utility Boot menu - Compaq nx9010 | Reference Guide - Page 120
, 20, 22 PC card, 48 installing battery, 10 hard drive, 62 hard drive holder, 63 Internet Service Provider, 36 K keyboard ergonomic precautions, 10 non US, 21 status lights, 2, 3, 9 troubleshooting, 71 Keypad Lock, 2, 3, 9 L LAN connecting to, 39 troubleshooting, 72 wireless, 40 LAN port indicator - Compaq nx9010 | Reference Guide - Page 121
device, 87 temporary boot device, 17 region code, 23 regulatory information, 101 removing CD, 20, 22 DVD, 20, 22 hard drive, 62 hard drive holder, 63 PC card, 49 reset button, 17 resetting, 17 S safety battery use, 98 infrared port, 99 laser, 98 power cords, 97 wireless communication, 42, 44 safety
-
 1
1 -
 2
2 -
 3
3 -
 4
4 -
 5
5 -
 6
6 -
 7
7 -
8
-
9
-
10
-
11
-
12
-
13
-
14
-
15
-
16
-
17
-
18
-
19
-
20
-
21
-
22
-
23
-
24
-
25
-
26
-
27
-
28
-
29
-
30
-
31
-
32
-
33
-
34
-
35
-
36
-
37
-
38
-
39
-
40
-
41
-
42
-
43
-
44
-
45
-
46
-
47
-
48
-
49
-
50
-
51
-
52
-
53
-
54
-
55
-
56
-
57
-
58
-
59
-
60
-
61
-
62
-
63
-
64
-
65
-
66
-
67
-
68
-
69
-
70
-
71
-
72
-
73
-
74
-
75
-
76
-
77
-
78
-
79
-
80
-
81
-
82
-
83
-
84
-
85
-
86
-
87
-
88
-
89
-
90
-
91
-
92
-
93
-
94
-
95
-
96
-
97
-
98
-
99
-
100
-
101
-
102
-
103
-
104
-
105
-
106
-
107
-
108
-
109
-
110
-
111
-
112
-
113
-
114
-
115
-
116
-
117
-
118
-
119
-
120
-
121
 |
 |

HP Notebook PC
Reference Guide