Craftsman 18178 Operation Manual
Craftsman 18178 - Full Head Framing Nailer Manual
 |
View all Craftsman 18178 manuals
Add to My Manuals
Save this manual to your list of manuals |
Craftsman 18178 manual content summary:
- Craftsman 18178 | Operation Manual - Page 1
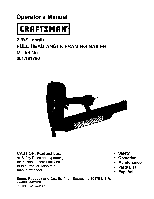
31/"2 Length FULL HEAD ANGLE Model No, 351.1 81780 FRAMING NAILER CAUTION: Read and follow all Safety Rules and Operating Instructions before First Use of this Product. Keep this manual with tool. • Safety • Operation • Maintenance • Parts List • Espa_ol Sears, Roebuck and Co., Hoffman Estates - Craftsman 18178 | Operation Manual - Page 2
Operation Maintenance Troubleshooting Parts Illustration and operating instructions in this manual and on warning label of tool before using this tool. Keep this manual with the repair personnel must perform tool service. • When servicing a tool, use only identical repair parts. • Store tool out - Craftsman 18178 | Operation Manual - Page 3
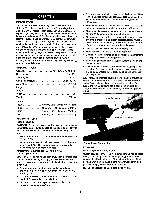
Craftsman Full Head Framing Nailer drives nailsfrom .113" to .131" diameter and from 2" to 3'h" long. Magazine is angled at 21 ° for nailing for setting nail depth. Pusher mechanism supports shorter fasteners Always disconnect tool from air supply when servicing or adjusting tool and when tool is not - Craftsman 18178 | Operation Manual - Page 4
is in the nose (see Figure 3). Pusher Housing NAILING OPERATION Refer to Figures 5-11 (pages 4, 5 and 6). WARNING: Read and follow all safety rules and operating instructions in this manual and on warning label of tool before using this tool. Keep this manual with the tool. WARNING; Do not use this - Craftsman 18178 | Operation Manual - Page 5
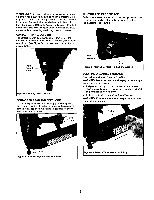
attempt. ing to clear jammed fasteners. • Pull pusher housing back until pusher is clear of nails. Then depress latch and allow housing to slide to the front of the magazine (see Figure 9). • Slide nail strip back and remove from magazine. WARNING: Fasteners are under spring pressure and may shoot - Craftsman 18178 | Operation Manual - Page 6
nail Service Center. Replace any damaged or missing parts. Use the parts list to order parts. REBUILD KITS Rebuild kits are available as spare parts, (see page 9). Tools should be rebuilt if tool fails to operate properly after extended use. See troubleshooting to determine required replacement parts - Craftsman 18178 | Operation Manual - Page 7
(Fig. 12, No. 18) 3. Check and replace damaged O-ring (Fig. 12, No. 18) 4. Check and replace damaged bumper (Fig. 12, No. 21 5. Check and replace guide (Fig. 12, No. 44) 1. Insufficient air supply 2. Damaged or worn head valve O-ring or seal 3. Damaged head valve spring 4. Head valve binding in cap - Craftsman 18178 | Operation Manual - Page 8
Model 351.181780 Figure 12 - Replacement Parts Illustration For Framing Nailer 11 21 38 _._33 24 27 22 23 / / 67 46 50 58._ 8 - Craftsman 18178 | Operation Manual - Page 9
PART 1 Nail Guide 1 Spring Nail Stop t End Cover 1 5-0.8mm Fiber Hex Nut t 6-1.0ram Fiber Hex Nut 1 Spring 1 ContactTrip Bracket 1 Depth Control Knob 1 Spring 1 2ram Steel Ball 1 3CM1-10 E-Ring 1 Contact Trip 1 Contact Trip Pad 1 Pad 4 Warning Label 1 Operator's Manual - Craftsman 18178 | Operation Manual - Page 10
reglas de seguridad e instrucciones de operaci6n antes de utilizar este producto por primera vez. Mantenga este manual junto con la herramienta. Ingles Ilustraci6n y Lista de Partes Garantfa Reglas de Seguridad Operaci6n Mantenimiento Identificaci6n de Problemas 2-7 8-9 10 10 11-14 15 16 - Craftsman 18178 | Operation Manual - Page 11
mantenimientode la herramienta debe set realizado _nicamenta por personalde reparaci6ncualificado, Cuando le haga el servicioala herramienta,utilicednicamente partes de reparaci6nid_nticas. Almacene la herramientafuera del alcance de losnitrosy de personasque no han reciPidocapacitaci6npare su uso - Craftsman 18178 | Operation Manual - Page 12
gatillode la herramienta. Conector macho \ Deslice la banda de clavoshacia la parte frontaldel dep6sito hasta que la banda de clavos quede en la oreja ( todas las reglas de seguridade instruccionesde operaci6n incluidasen este manual yen la etiqueta de advertencia de la herramientaantes de utilizareste - Craftsman 18178 | Operation Manual - Page 13
Realice la "Verificaci6n del Mecanismode Seguridad"tal como se describe en la secci6nMantenimiento(v_ase la p_gina 15) antes de utilizerla herramientapor primeray luegodiariamente. La herramientaviene equipada con un interruptorgiratorioque puede ajustarsea modo de disparo rSpidoo a modo de disparo - Craftsman 18178 | Operation Manual - Page 14
ALMACENAMIENTO DEL SOPORTE DE DISPARO POR CONTACTO El soporte puede extraeree y almacenarse en el bolsillo de almacenamiento ubicado en la tapa posterior del dep6sito. La Ilave hexagonal se almacena en el dep6sito (vdase le Figura 8). Llave Hexagonal Soporte Flgura 8 - Almecenamiento del Soporte de - Craftsman 18178 | Operation Manual - Page 15
si dejan de operar de manera correcta despu_s de mucho uso. V_ase la secci6n de Identificaci6n de Problemas para determinar las partes de repuesto necesarias. Desconecte la herrsmlenta del abasteclmlento de aire antes de intentar repararla o aJustarla. AVISO: Cuanclo reemplace los cilindros o los - Craftsman 18178 | Operation Manual - Page 16
SINTOMA Se fuga aire per la tapa del gatillo Se fuga aire per la tapa Se fuga aire per la oreja La herramienta no funciona La herramientaopera de forma lenta o pierde potencia La herramientasalta sujetadoreso no opera de manera consistente CAUSAS(S) POSIBLE(S) 1, Anillo0 dafiado 2. V_stago de la - Craftsman 18178 | Operation Manual - Page 17
NOTAS 17 - Craftsman 18178 | Operation Manual - Page 18
NOTAS 18 - Craftsman 18178 | Operation Manual - Page 19
NOTAS 19 - Craftsman 18178 | Operation Manual - Page 20
and garden equipment, or heating and cooling systems, no matter who made it, no matter who sold it! For the replacement parts, accessories and owner's manuals that you need to do-it-yourself. For Sears professional installation of home appliances iii_i_!ill and items like garage door openers
-
 1
1 -
 2
2 -
 3
3 -
 4
4 -
 5
5 -
 6
6 -
 7
7 -
8
-
9
-
10
-
11
-
12
-
13
-
14
-
15
-
16
-
17
-
18
-
19
-
20
 |
 |

Operator's Manual
2-31/2
"
Length
FULL HEAD ANGLE
FRAMING
NAILER
Model No,
351.181780
CAUTION:
Read
and follow
all Safety Rules and
Operating
Instructions
before
First Use
of this Product. Keep this
manual with tool.
Sears, Roebuck
and Co., Hoffman
Estates,
IL 60179 U.S.A.
www.sears.condcraftsman
21066.00
Draft (07/22/03)
•
Safety
•
Operation
•
Maintenance
•
Parts List
•
Espa_ol