Craftsman 18180 Operation Manual
Craftsman 18180 - to Coil Roofing Nailer Manual
 |
UPC - 026420181808
View all Craftsman 18180 manuals
Add to My Manuals
Save this manual to your list of manuals |
Craftsman 18180 manual content summary:
- Craftsman 18180 | Operation Manual - Page 1
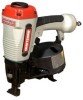
Operator's Manual 3/4- 13/" Length ROOFING NAILER Model No. 351.1 81800 CAUTION: Read and follow all Safety Rules and Operating Instructions before First Use of this Product. Keep this manual with tool. • Safety • Operation • Maintenance • Parts List • EspaSol Sears, Roebuck and Co., Hoffman - Craftsman 18180 | Operation Manual - Page 2
Operation Maintenance Troubleshooting Parts Illustration and operating instructions in this manual and on warning label of tool before using this tool. Keep this manual with the repair personnel must perform tool service. • When servicing a tool, use only identical repair parts. • Store tool out - Craftsman 18180 | Operation Manual - Page 3
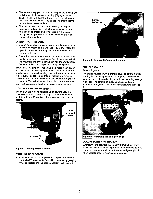
DESCRIPTION The Craftsman Roofing Nailer drives full size, full head roofing nails from _/,"to 13/", long. Magazine holds 120 nails in a coil so that area of tool when connecting air supply. Always disconnecttool from air supply when servicing or adjusting tool and when tool is not in use. • Air - Craftsman 18180 | Operation Manual - Page 4
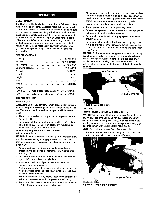
Holder for Length of Nail • Remove rubber band or tape holding nail coil. Place coil over the spindle of nail holder in magazine (see Figure 4), Second Nail rules and operating instructionsin this manual and on warning label of tool before using this tool, Keep this manual with the tool. WARNING: - Craftsman 18180 | Operation Manual - Page 5
The air tool is equipped with contact trip safety mechanism that disables tool unless contact trip (Fig. 7) is pushed against work. Hold body firmly and press contact trip on workpiece where fastener is to be applied. Pull trigger to drive fastener into workpiece. The tool can also be operated by - Craftsman 18180 | Operation Manual - Page 6
Service Center. Replace any damaged or missing parts. Use the parts list to order parts. REBUILD KITS Rebuild kits are available as spare parts, (see page 9). Tools should be rebuilt if tool fails to operate properly after extended use. See troubleshooting to determine required replacement parts - Craftsman 18180 | Operation Manual - Page 7
valve poorly lubricated 1. Feed piston not lubricated 2. Damaged feed piston O-rings 3, Jaws binding 4. Nail holder improperly adjusted 5. Defective coil nails, welded wires on coil breaking 6. Worn or damaged bumper 7. Build-up on ram or nose 8. Insufficient air supply 9. Damaged or worn piston - Craftsman 18180 | Operation Manual - Page 8
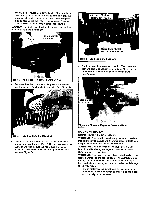
Model 351.1 81800 Figure 10 - Replacement Parts Illustration For Nailer 21 /22 _ _j23 • _e.....J24 25 _p--.-.- 26 27 28 i ._....._ 29 ;_ao 33 6 90 89 ._......._ 32 34 35 39 f 12-.....Q 48 \ 53 / 55 54 \\ 56 - Craftsman 18180 | Operation Manual - Page 9
PART Gasket Ram Guide Nose 5-0.8 Manual QTY. 1 1 1 4 1 4 1 1 1 1 1 1 1 1 1 7 1 1 1 1 1 1 1 1 1 1 1 1 1 1 1 3 1 2 1 1 1 1 1 1 1 1 1 1 1 1 1 Standard hardware item available locally A Not Shown Rebuild Kits Recommended Accessories /, Galvanized Roofing Nails, .120" dia. x 1" A GaJvanized Roofing - Craftsman 18180 | Operation Manual - Page 10
producto por primera vez. Ingles Ilustraci6n y Lista de Partes Garantfa Reglas de Seguridad Operaci6n Mantenimiento Identificaci6n de Problemas 2-7 antes de utilizar este produeto pot primera vez. Mantenga este manual junto con la herramienta. Mantenga el drea de trabajo limpia - Craftsman 18180 | Operation Manual - Page 11
le haga el servicio a la herramienta, utilice enicamente partes de reparacidn id_nticas. Almacene la herramisnta fusra del alcancs de qus no han recibido capscitacidn para su uso. DESCRIPCION La clavadorapara tejado Craftsman impulsa clavospara tejado de tamado y cabeza natural de '/," a 1'/," - Craftsman 18180 | Operation Manual - Page 12
, No. 16 en la pdgiea 8) para poder colocar el primer clavo. AsegOrese que las cabezas de los clavos queden ubicadas en la ranura de la parte superior de la cremallera de avarice de clavos (v_ase la Figura 5, p_gina 13). 12 - Craftsman 18180 | Operation Manual - Page 13
Dep6sito y la Puerta OPERACION DE CLAVADO Consulte las Figures 7 ala 9 (pdginas13 y 14). ADVERTENCIA: Lea y siga todas las reglasde seguridade instruccionesde operacidnincluidasen este manual yen la etiqueta de advertenciade la herramienta antes de utilizareste productopor primeravez. Mantenga este - Craftsman 18180 | Operation Manual - Page 14
deberdn reconstruirsesi dejan de operar de manera correcta despudsde muchouso.Vdase la secci6n de Identificaci6nde Problemaspara determinarlas partes de repuestonecesarias. Desconecte le herramienta del abaeteclmlento de airs antes de Intentar repararle o ajustarla. AVISO: Cuando reemplacelos - Craftsman 18180 | Operation Manual - Page 15
SINTOMA Se fuga airs per la tapa del gatillo CAUSA(S) POSIBLE(S) 1, Anillo O dai_ado 2. Anillos O daSados Se fuga aire per la tapa Se fuga airs per la oreja La herramienta no funciona 1. Los pernos de la tapa estan sueltos 2. Empaquetadura de la tapa da_ada 1. Empaquetadura de la oreja dahada 2. - Craftsman 18180 | Operation Manual - Page 16
® Registered Trademark / TM Trademark / su Service Mark of Sears, Roebuckand Co. ® Marca Registrada / TM Mama de FSbrica/ 8M Marca de Serviciode Sears, Roebuck and CO. MC Marque de commerce / MD Marque ddpos_,e de Sears, Roebuckand Co. © Sears, Roebuckand Co.
-
 1
1 -
 2
2 -
 3
3 -
 4
4 -
 5
5 -
 6
6 -
 7
7 -
8
-
9
-
10
-
11
-
12
-
13
-
14
-
15
-
16
 |
 |

Operator's
Manual
3/4
-
13/" Length
ROOFING
NAILER
Model No.
351.1 81800
CAUTION:
Read and follow
all Safety Rules and Operating
Instructions
before First Use
of this Product. Keep this
manual with tool.
Sears, Roebuck
and Co., Hoffman
Estates,
IL 60179 U.S.A.
www.sears.com/cra
ftsman
21031.00 Draft (06/09/03)
•
Safety
•
Operation
•
Maintenance
•
Parts List
•
EspaSol