Craftsman 21237 Operation Manual
Craftsman 21237 - 10 in. Sliding Miter Saw Manual
 |
View all Craftsman 21237 manuals
Add to My Manuals
Save this manual to your list of manuals |
Craftsman 21237 manual content summary:
- Craftsman 21237 | Operation Manual - Page 1
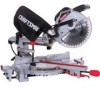
SLiDiNG COMPOUND MITER SAW WiTH LASER TRAC ® Model No. 137.212370 CAUTION: Before using this Miter Saw, read this manual and follow all its Safety Rules and Operating instructions • Safety Instructions • installation • Operation • Maintenance e Parts List Customer Help Line For Technical Support - Craftsman 21237 | Operation Manual - Page 2
Miter Saw Safety 4 Electrical Requirements and Safety 4 Accessories and Attachments 6 Tools Needed for Assembly 6 Carton Contents 7 SECTION Know Your Sliding Compound Miter Saw ..... Glossary of Terms Assembly Adjustments Operat ion Maintenance Troubleshooting Guide Parts - Craftsman 21237 | Operation Manual - Page 3
this Operator's Manual for recommended accessories. The use of improper accessories may cause injury to yourself or others. 18. NEVER STAND ON THE TOOL. Serious injury. could occur if the tool is tipped or if the cutting tool is unintentionally contacted. 19. CHECK FOR DAMAGED PARTS. Check for - Craftsman 21237 | Operation Manual - Page 4
adequate support to the sides of the saw table for long workpieces. 24. NEVER use the miter saw in areas with flammable liquids or gases. 25. NEVER use solvents to clean plastic parts. Solvents could possibly dissolve or otherwise damage the material. 26. SHUT OFF the power before servicing or - Craftsman 21237 | Operation Manual - Page 5
between you and tool's electrical system. All exposed metal parts are isolated from the internal metal motor components with protecting insulation: Replacement parts - When servicing use only identical replacement parts. Polarized plugs = This saw has a plug that looks like the one shown below - Craftsman 21237 | Operation Manual - Page 6
[AWARNING[ • Use only accessories recommended for this miter saw. Follow instructions that accompany accessories. Use of improper accessories may cause hazards. • The use of any cutting tool except 10 inch saw blades which meet the requirements under recommended accessories is prohibited. Do not - Craftsman 21237 | Operation Manual - Page 7
attempt to assemble the miter saw, or plug in the power cord until the missing or damaged part is correctly replaced. To avoid electric shock, use only identical replacement parts when servicing double insulated tools. Call 1-800-4-MY-HOME e for replacement parts. Miter Saw Blade Wrench Dust Bag - Craftsman 21237 | Operation Manual - Page 8
CarryingHandle BevelDetenPt in Hold-DowCn lamp,..,, Fence MountingHoles UpperBladeGuard LaserGuide CarryingHandle LaserON/OFFswitch SwitchHandle Table Base LeftExtensioTnable SlideCarriage ON/OFFTriggerSwitch LowerBladeGuard Blade CarryingHandle Motor TableInsert PositiveStopLockingLever - Craftsman 21237 | Operation Manual - Page 9
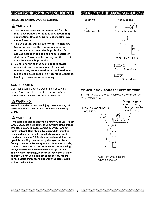
replacement or removal. BASE - Supports the table, holds accessories and allows for workbench or leg set mounting. BEVEL LOCKING HANDLE - Locks the miter saw the travel of the blade or the part of the workpiece that will be cut. SET - The distance between two saw blade tips, bent outward in opposite - Craftsman 21237 | Operation Manual - Page 10
for cutting operations. Fig, C UNLOCKING THE SLIDE CARRIAGE (FIG. B) After removing the saw from the carton, loosen the slide carriage lock knob (1). When transporting or storing the miter saw, the slide carriage should always be locked in position. The slide carriage lock knob (1) is located on - Craftsman 21237 | Operation Manual - Page 11
insert prior to performing a cutting operation. • Do not start the sliding compound miter saw without checking for interference between the blade and table insert. Damage could visitors to stand near the saw during any cutting operation. = Support the saw on a level work surface. = Bolt or clamp the - Craftsman 21237 | Operation Manual - Page 12
in the desired location, directly on a workbench where there is room for handling and proper support of the workpiece. The base of the saw has four mounting holes. Bolt the base of the miter saw (1) to the work surface (5), using the fastening method as shown in Fig G. Fig. G 12.. MHeitxer hseaawd - Craftsman 21237 | Operation Manual - Page 13
the base or the miter table by spinning the blade manually. [A WAR.INIG For your own safety, never connect the plug to power source outlet until all the adjustment steps are complete and you have read and understood the safety and operational instructions. THE LASER GUIDE (FIG. K) [A WARNINI G Make - Craftsman 21237 | Operation Manual - Page 14
table with the ruler against the table and the heel of the square against the saw blade. 3. If the blade is not 90 ° (0°) square with the miter table (5), loosen the bevel lock handle (I), tilt the cutting head to the left, loosen the Iocknut (4) on the bevel angle adjustment bolt (3) and use a 10 - Craftsman 21237 | Operation Manual - Page 15
The sliding compound miter saw scale can be easily read, showing miter angles from 0 ° to 45 ° to the left, and 0 _'to 45 ° to the right. The miter saw table has the table insert, and does not touch the control arm throat or any part of the base or table. If the maximum depth needs readjusting: I. - Craftsman 21237 | Operation Manual - Page 16
latch, bevel lock handle and cover plate screws. • Review and understand all safety instructions and operating procedures in this Operator's Manual. (SEE SAFETY AND OPERATIONS SECTIONS) • Reviewthe MAINTENANCE AND TROUBLESHOOTING GUIDE for your miter saw. • To avoid injury or possible death from - Craftsman 21237 | Operation Manual - Page 17
cut. • Properly support round material such as dowel rods or tubing, which have a tendency to roll when cut, causing the blade to "bite." [,&WARNIN] G To avoid injury, follow all applicable safety instructions when cutting non-ferrous metals: • Use only saw blades specifically recommended for non - Craftsman 21237 | Operation Manual - Page 18
, unplug the saw and follow the instructions in TROUBLESHOOTING GUIDE section for adjusting the blade brake before using the saw again. Before freeing jammed material: 6 Release trigger switch. o Wait for all moving parts to stop. • Unplug the miter saw. Fig. R BASIC SAW OPERATIONS [AWARNINJG - Craftsman 21237 | Operation Manual - Page 19
. I. For chop cutting operations on small workpieces, slide the cutting head assembly completely toward the rear of the miter table lock handle before performing every cutting operation. Fig. U BEFORE LEAVING THE SAW , Never leave tool running unattended. Turn power OFF. Wait for all moving parts - Craftsman 21237 | Operation Manual - Page 20
the desired angle. Release the positive stop locking lever and lock the miter handle. Fig. X SLIDE CUTTING WIDE BOARDS UP TO 12 in. WIDE (FIG. Y) IAWA" the center of the saw blade is over the front of the workpiece (4). 5. Engage the trigger to turn the saw on. 6. When the saw reaches full speed, - Craftsman 21237 | Operation Manual - Page 21
WORKPIECE SUPPORT AND REPETiTiVE CUTTING USING THE STOP PLATE (FIG, BB) Long pieces need extension table support. 1. Loosen the knob (1) then slide the this, an auxiliary wood fence can be mounted to your saw. Holes are provided in the saw fence to attach an auxiliary wood fence. This fence is - Craftsman 21237 | Operation Manual - Page 22
Splintering typically happens due to wrong blade application and thinness of the material. Fig. DD Workpiece F e Workpiece Miter saw table C .... e °4 ] I Miter saw table Miter at 45 °, bevel at 0 ° Miter at 0 °, bevel at 45 ° NOTE: Always perform a dry run cut so you can determine if the - Craftsman 21237 | Operation Manual - Page 23
CROWN MOLDING CHART Compound Miter Saw Miter and Bevel Angle Settings Wall to Crown Molding Angle Angle Between 185 1 54 1 23 092 0662 031 315 275 286 1 97 1 668 I 18 079 039 45/45" CF@/Sn Molding Miter Setting Bevel Settin 9 20 61 20 2I I9¸81 19 42 !9 03 18 64 !825 i7 866 !748 17 09 I66 7! - Craftsman 21237 | Operation Manual - Page 24
miter saw. • To avoid injury from unexpected starting or electrical shock, unplug the power cord before working on the saw. • For your safety, this saw is double insulated. To avoid electrical shock, fire or injury, use only parts To inspect or replace brushes, first unplug the saw. Then remove the - Craftsman 21237 | Operation Manual - Page 25
worn. 2. Other. 1. Replace Brushes. See MAINTENANCE section. 2. Contact Sears Service Center. TROU BLESHOOTING GUIDE - SAW OPERATION PROBLEM PROBLEM CAUSE SUGGESTED CORRECTIVE ACTION Blade hits table. Angle of cut not accurate. Can not adjust miter. 1. Misalignment. 1. Miter table unlocked - Craftsman 21237 | Operation Manual - Page 26
MODEL.O137.212370 IA WARNINI G When servicing use only CRAFTSMAN replacement parts. Use of any other parts many create a HAZARD or cause product damage. Any attempt to repair or replace electrical parts on this Miter Saw may create a HAZARD unless repair is done by a qualified service technician - Craftsman 21237 | Operation Manual - Page 27
10 IN. SLIDING COMPOUND MITER SAW SCHEMATIC FOR SAW MODEL NO. 137.212370 OJXT, 2 DUY _DXO 2DXA 0 OJBO K96 @2ESH _DX5 OCM3 EJL3 {]TWD _DWL 27 @2C37 - Craftsman 21237 | Operation Manual - Page 28
10 IN. SLiDiNG COMPOUND MITER SAW PARTS LIST AND SCHEMATIC FOR MOTOR I.D No. OHVS OHVU OHX9 OJX2 0K43 0K44 OKCP OKLA BOX Size 6201ZLU 6200Z M5'0.8-6 M5'0.8 1,5 M5'0.8 12 MS* 12-60 M5"0,8-6 M5"0.8_35 #AW MODEL NO. 137.212370 Qfy I ) 1 2 2 1 2 2 1 1 1 1 1 1 2 2 2 1 1 1 1 1 4 1 1 OQMY £ETO 0K44 - Craftsman 21237 | Operation Manual - Page 29
29 _ - Craftsman 21237 | Operation Manual - Page 30
it! For the replacement parts, accessories and owner's manuals that you need to do-it-yourself. For Sears professional installation of Canada pour service en frangais: 1 =800=LE-FOYER M_' (1-800-533-6937) www.sears.ca ® Registers] Trademark / _A Trademaik / SM Service Mark of Sears Brands LLC
-
 1
1 -
 2
2 -
 3
3 -
 4
4 -
 5
5 -
 6
6 -
 7
7 -
8
-
9
-
10
-
11
-
12
-
13
-
14
-
15
-
16
-
17
-
18
-
19
-
20
-
21
-
22
-
23
-
24
-
25
-
26
-
27
-
28
-
29
-
30
 |
 |

Operator's
Manual
CRSFrSMSN
°
10
in. SLiDiNG
COMPOUND
MITER SAW WiTH LASER TRAC
®
Model
No.
137.212370
CAUTION:
Before
using this Miter Saw,
read this manual
and follow
all its Safety
Rules and
Operating
instructions
•
Safety
Instructions
•
installation
•
Operation
•
Maintenance
e
Parts List
Customer
Help
Line
For Technical
Support
1-800-843-1682
Sears
Parts
&
Repair
Center
1-800-488-1222
Sears,
Roebuck
and
Co., Hoffman
Estates,
IL 60179
USA
Visit
our Craftsman
website:
www.sears.condcraftsman
Part
No.
137212370001