Craftsman 21419 Operation Manual
Craftsman 21419 - 9 in. Band Saw Manual
 |
View all Craftsman 21419 manuals
Add to My Manuals
Save this manual to your list of manuals |
Craftsman 21419 manual content summary:
- Craftsman 21419 | Operation Manual - Page 1
perator's nual ® tP BENCH TOP BAND SAW Model No. 351.214190 CAUTION: Read and follow all Safety Rules and Operating instructions before First Use of this Product. Sears, Roebuck and Co., Hoffman www.sears.comlcraftsman 25126,03 Draft (01/18/08) Estates, IL 60179 U.S.A. - Craftsman 21419 | Operation Manual - Page 2
Troubleshooting Parts Illustrations and Lists Espa5ol 2 2-3 3 3 3-4 4-8 8 9 10-13 14-23 ONE-YEAR FULL WARRANTY ON CRAFTSMAN PROFESSIONAL TOOL If this Craftsman Sears, instructions and precautions before operating tool. CAUTION: Always follow proper operating procedures as defined in this manual - Craftsman 21419 | Operation Manual - Page 3
solvents are recommended to avoid possible fire hazard. CAUTION: Do not attempt assembly if parts are missing. Use operator's manual to order replacement parts. MOUNT BAND SAW TO WORK SURFACE • Band saw is designed to be portable so it can be moved to job site, but should be mounted to stable, level - Craftsman 21419 | Operation Manual - Page 4
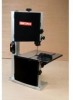
with a qualified electrician if grounding instructions are not understood or if in doubt damaged, have them repaired by an authorized service facility. Green (or green and yellow) 4 - 7, pages 5 and 6. The Craftsman 9" Bench Top Band Saw features welded steel frame construction and a solid - Craftsman 21419 | Operation Manual - Page 5
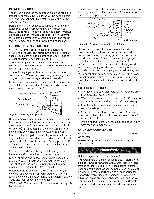
when handling band saw blades. Never wear gloves when operating saw. + Turn blade tension lever on the back of the tool counterclockwise all the way until it locks in position to release blade tension (see Figure 5). Tension Knob_ Blade Tension Lever Tracking Window Upper Guide Adjusting Knob - Craftsman 21419 | Operation Manual - Page 6
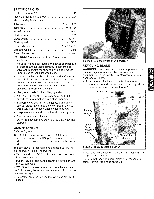
. Do not perform tracking adjustment while band saw is running. • Disconnect band saw from power source. • To check guides as described in following section. UPPER BLADE GUIDES = Upper blade guides employ guide pins for side support and a ball bearing for rear support. Loosen screws and adjust guide - Craftsman 21419 | Operation Manual - Page 7
curved shapes. • Beveled cutting is done by tilting saw table and using proper work guide method. Regardless of which work guiding method is used, a workpiece which overhangs table by more than 5" needs proper support. CONTOUR SAWING When contour sawing, use both hands to keep workpiece flat against - Craftsman 21419 | Operation Manual - Page 8
. WARNING: Make certain that unit is disconnected from power source before attempting to service or remove any component. CLEANING • Keep machine and workshop clean. Do not allow sawdust to accumulate on band saw. • Keep wheels clean. Debris on wheels will cause poor tracking and blade slippage - Craftsman 21419 | Operation Manual - Page 9
blade dulling POSSIBLE CAUSE(S) 1. Material not secure on table 2. Blade too coarse for material 3. Teeth in contact with work before sawing 4. Misaligned guides 5. Blade too thick for wheel diameter 6. Cracking at weld 1. Blade too coarse 2. Inadequate feed pressure 3. Hard spots or scale in - Craftsman 21419 | Operation Manual - Page 10
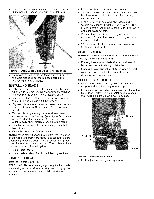
iVlodel 351.21 4190 Figure 10 - Replacement Parts illustration for Frame, Table and Guides 14 1 */ ° 4_ 117 /4 _9 18 25 15 2O ,/_ 19 22 44 24 2O 20 52 38 41 35 34 54 33 38 57 10 - Craftsman 21419 | Operation Manual - Page 11
.00 54 06177.00 55 25298.00 56 25099.00 57 25100.00 58 i25101.00 DESCRiPTiON QTY. Cabinet 1 Lower Guide Mount 1 5 x 14mm Dowel Pin 4 Lower Guide Block 1 Lower Bearing Bracket 1 606ZZ Ball Bearing* 2 Bearing Stud 2 6-1.0 x 10mm Socket 2 Pan Head Screw 4-0.7 x 6mm Flat Head Screw - Craftsman 21419 | Operation Manual - Page 12
Model 351.21 4190 Figure 11 - Replacement Parts illustration for Drive 16 8 23 11 14 € lO 26 3O 5 ! 43 ! 34 26 12 - Craftsman 21419 | Operation Manual - Page 13
80mm Carriage Bolt Tension Bracket 8mm Push Nut 8 x 90mm Dowel Pin lOmm Hex Nut* Upper Cabinet Support Tracking Adjustment Bracket Idler Shaft 6000ZZ Ball Bearing* 3BMI-26 Retaining Ring Idler Wheel Wheel Band 3AMI-IO Retaining Ring 6-1.0 x lOmm Hex Head Bolt* Driven Shaft Driven Pulley Lower Wheel - Craftsman 21419 | Operation Manual - Page 14
20 21 GARANTIA COMPLETA DE UN ANO PARA HERRAMIENTA CRAFTSMAN Siesta herramienta Craftsman fallara por causa de defectos en el material o derechos que varien de estado a estado. Sears, Roebuck and Co., Hoffman Estates, IL , tal como se definen en este manual, aun cuando est6 familiarizado con el - Craftsman 21419 | Operation Manual - Page 15
herramienta mecanica. Puede obtener gafas de seguridad a trav6s de su cat_.logo de Sears. Verifique que no hayan ocurrido daSos durante el envio. Si hay daSos, intente hacer el montaje si hay partes que faltan. V_lgase del manual de operador para solicitar partes de repuesto. MONTAJE DE LA SIERRA - Craftsman 21419 | Operation Manual - Page 16
INSTALE LA MESA Consulte la Figura 10. • Remuevaelconjuntodelamanilla(ClavesNo. 18) del bastidor de la sierra. 16, 17y Coloque el conjunto de la mesa sobre el bastidor de la sierra. Vuelva a instalar el conjunto de la manilla. Asegure la mesa en su posici6n con el conjunto de la manivela de - Craftsman 21419 | Operation Manual - Page 17
Figuras 4-17 en las pAginas 17-19. La sierra de banda de 9" Craftsman cuenta con un bastidor de acero y una s61ida superficie de mesa de hierro de la sierra. Para bloquear el interruptor: Abra el interruptor y desconecte la saw de la fuente de alimentaci6n. Extraiga la Ilave. No se puede Ilevar el - Craftsman 21419 | Operation Manual - Page 18
el bastidor. Baje la guia superior de la hoja completamente y destrabe el panel de la guia para Iograr acceso a la hoja Figura 6 = Open Upper Blade Guide to Access Blade (consulte la Figura 6). Retire el inserto de fijaci6n de la mesa ubicado en la parte delantera de la ranura de la mesa - Craftsman 21419 | Operation Manual - Page 19
Rodamiento Pasador de guia Figura 7 - Guias Superiores de la Hoja Asegure el ajuste apretando los tornillos. • Ajuste el rodamiento de bola en la parte posterior de la hoja aflojando el perno de cabeza hueca y cambiando la posici6n el eje del rodamiento (vea la Figura 8). Rodamiento Figura 8 - - Craftsman 21419 | Operation Manual - Page 20
• Cuando se corten materiales m_.s duros, en cuyo caso el golpe es mAs nocivo, se recomienda una hoja de 8 a 12 dientes por pulgada. Siempre debe haber al menos tres dientes en contacto con el corte para evitar el golpe de la hoja. La hoja se golpea cuando el paso es muy grande y el diente encuentra - Craftsman 21419 | Operation Manual - Page 21
SINTOMA Las hojas se rompen excesivamente La hoja se desafila prematuramente Cortes chuecos Cortes &speros La hoja se est& torciendo o est& desgastada anormalmente en su parte lateral/posterior Los dientes se est&n desgarrando de la hoja El motor esta funcionando muy caliente La sierra no arranca - Craftsman 21419 | Operation Manual - Page 22
Registro de Servicios Sierra de Banda de Banco de 9" Craftsman i FECHA IVIANTENllVIIENTO EFECTUADO PARTES DE REPUESTO NECESARIAS i 22 - Craftsman 21419 | Operation Manual - Page 23
NOTAS 23 - Craftsman 21419 | Operation Manual - Page 24
parts, accessories and owner's manuals that you need to do-it-yourself. For Sears professional installation of home Sears Parts & Repair Service Center 1-800-488-1222 (U.S.A.) 1-800-469-4663 (Canada) www.sears.com www.sears.ca To purchase a protection agreement on a product serviced by Sears
-
 1
1 -
 2
2 -
 3
3 -
 4
4 -
 5
5 -
 6
6 -
 7
7 -
8
-
9
-
10
-
11
-
12
-
13
-
14
-
15
-
16
-
17
-
18
-
19
-
20
-
21
-
22
-
23
-
24
 |
 |

perator's
nual
®
tP
BENCH
TOP
BAND
SAW
Model No.
351.214190
CAUTION:
Read and follow
all Safety
Rules and Operating
instructions
before
First
Use
of this Product.
Sears,
Roebuck
and
Co., Hoffman
Estates,
IL 60179
U.S.A.
www.sears.comlcraftsman
25126,03
Draft
(01/18/08)