Craftsman 21807 Operation Manual
Craftsman 21807 - 10 in. Table Saw Manual
 |
View all Craftsman 21807 manuals
Add to My Manuals
Save this manual to your list of manuals |
Craftsman 21807 manual content summary:
- Craftsman 21807 | Operation Manual - Page 1
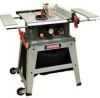
LEG SET Model No. 137.218070 C us CAUTION: Before using this Table Saw, read this manual and follow all its Safety Rules and Operating Instructions ® Safety Instructions ® Installation ® Operation ® Maintenance ® Parts List Customer Help Line For Technical Support 1-800-843-1682 Sears Parts - Craftsman 21807 | Operation Manual - Page 2
Requirements and Safety Accessories and Attachments Tools Needed for Assembly Carton Contents Know Your Table Saw Glossary of Terms Assembly Adjustments Operation Maintenance Troubleshooting Guide Parts List PAGE 2 3 4 5 8 10 12 12 13 15 16 18 28 34 43 45 48 CRAFTSMAN ONE YEAR FULL - Craftsman 21807 | Operation Manual - Page 3
BLADE SIZE Diameter Arbor size 10 in. 5/8 in. SAW Rip fence Miter gauge Rip Capacity Maximum Cut Depth @ 90 Maximum Cut Depth @ 45 Maximum Diameter Dado Maximum Dado if it is worn, cut or damaged in any way. Before using your tool, it is critical that you read and understand these safety - Craftsman 21807 | Operation Manual - Page 4
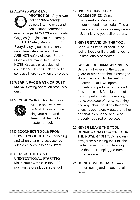
tool and its Operator's Manual may contain "WARNING iCONS" (a picture symbol intended to alert you to, and/or instruct you how to avoid, manual before using this product. KEEP HANDS AWAY FROM BLADE: Failure to keep your hands away from the blade will result in serious personal injury. SUPPORT - Craftsman 21807 | Operation Manual - Page 5
with the entire Operator's Manual. LEARN the tool's application, limitations and possible hazards. 2. KEEP GUARDS iN PLACE and in table on page 11 shows the correct size to use depending on cord length and nameplate ampere rating. If in doubt, use the next heavier gauge. The smaller the gauge - Craftsman 21807 | Operation Manual - Page 6
before servicing, and when changing accessories such as blades, bits and cutters. 16.REDUCE THE RISK OF UNINTENTIONAL STARTING. Make sure switch is in the OFF position before plugging the tool in. 17.USE RECOMMENDED ACCESSORIES. Consult this Operator's Manual for recommended accessories. The use of - Craftsman 21807 | Operation Manual - Page 7
for properdustremoval. 24"[,A DANGER 1 People with electronic devices, such as pacemakers, should consult their physician(s) before using this product. Operation of electrical equipment in close proximity to a heart pacemaker could cause interference or failure of the pacemaker. - Craftsman 21807 | Operation Manual - Page 8
AND FINGER/HAND AMPUTATIONS. NEVER USE THE MITER GAUGE AND FENCE SIMULTANEOUSLY. 5. NEVER STAND or have any part of your body in line with the path of the saw blade. Keep your hands out of the saw blade path. 12.PROVIDE ADEQUATE SUPPORT to the rear and the sides of the saw table for long or wide - Craftsman 21807 | Operation Manual - Page 9
19.NEVER LEAVE THE SAW RUNNING UNATTENDED. Do not leave the saw until the blade comes to a complete stop. 20.For proper operation follow the instructions in this Operator's Manual entitled OPERATION (Page 34). NOTE: On machines with no stand or if stand is not being used, a hole approximately 11 in - Craftsman 21807 | Operation Manual - Page 10
is necessary, do not connect the equipment grounding conductor to a live terminal. CHECK with a qualified electrician or service person if you do not completely understand the grounding instructions, or if you are not certain the tool is properly grounded. USE only three-wire extension cords that - Craftsman 21807 | Operation Manual - Page 11
to protect the operator electric shock. while from O" 0 O=t (When using 120 volts only) Ampere Rating Total length of Cord More Than Not More Than 25ft. 50ft. 100ft. 150ft. 0 6 18 16 16 14 6 10 18 16 14 12 10 12 16 16 14 12 CAUTION In all cases, make certain the receptacle - Craftsman 21807 | Operation Manual - Page 12
dado blades. e Only use stackable dadoes. e Maximum dado width is 1/2 in. e Do not use a dado with a diameter larger than 6 in. • Do not use molding head set with this saw. e Do not modify this power tool or use accessories not recommended by Sears. SUPPLIED NOT SUPPLIED Blade wrench Flat bladed - Craftsman 21807 | Operation Manual - Page 13
when pushing the workpeice. TABLE OF LOOSE PARTS ITEM DESCRIPTION QUANTITY A Table saw assembly 1 B Blade guard assembly 1 C Anti-kickback pawls assembly 1 D Handwheel handle 1 E Riving knife hardware bag assembly 1 F Rip fence 1 G Miter gauge 1 H Blade wrench 2 I Push stick - Craftsman 21807 | Operation Manual - Page 14
UNPACKING YOUR TABLE SAW A F Q B O D E % J G H I N L P O S T U V W X Y Z AA BB GO - Craftsman 21807 | Operation Manual - Page 15
Miter gauge Left extension table Overload reset switch Miter gauge-rip fence-push stick storac Lock Blade Table insert Hand Right extension Blade storac Blade guard _ip fence wing locking lever elevation and tilting handwheet ON/OFF switch with safety key Footpad Dustbag switch Riving knife - Craftsman 21807 | Operation Manual - Page 16
cuts. BLADE GUARD - Clear plastic cover that positions itself over the blade while cutting. KERF - The amount of material removed by the blade cut. MITER CUT - An angle cut made across the width of the workpiece. MITER GAUGE - A guide used for crosscutting operations that slides in the table top - Craftsman 21807 | Operation Manual - Page 17
. TABLE INSERT - Insert that is removed from the table to install/ remove blades. It is also removed for dado cutting. When dado cutting, a dado insert plate must be used. REVOLUTIONPSER MINUTE (RPM) - The number of turns completed by a spinning object in one minute. THROUGH SAWING - Craftsman 21807 | Operation Manual - Page 18
the parts list for correct quantities. 2. Attach four hooks (10) to the top corner of the four legs (2) as shown. The hooks (10) are used to hold the dust bag. NOTE: Make sure the hook (10) is securely fastened to the corner of the leg (2). Fig. A _. .... 10 5. Assemble the other upper supports - Craftsman 21807 | Operation Manual - Page 19
floor and are at similar angles to the floor, and detents in stand leg align with support brackets, then tighten all bolts. NOTE: Stand should not rock after all bolts are tightend. ASSEMBLE TABLE SAW TO STAND USING LEVER LOCK (FIG. G) 1. Attach the locking lever assembly (18) to the top of the leg - Craftsman 21807 | Operation Manual - Page 20
Place a washer on the bolt and insert thru the hole in saw base and slot in stand. Attach the nut and tighten using a 13 mm wrench. Repeat for used, the saw must be properly secured to a sturdy workbench using the four mounting holes at the base of the saw. 2. The surface of the table where the saw - Craftsman 21807 | Operation Manual - Page 21
the rear holding clamp (2) is fully extended. 2. Place the rip fence on the saw table, and attach the set plate (3) under the fence handle (1) to the rail first. 3. Push down on the fence handle (1) to lock. Fig. L Fig. K 1 INSTALLING THE BLADE (FIG. M, N, O) i_ WARNING] To avoid injury from an - Craftsman 21807 | Operation Manual - Page 22
TOWARD THE FRONT OF TABLE in the direction of the rotation arrow on the blade guard. [_, WARNING] o To avoid injury from an accidental start, make sure the switch is in the OFF position and the plug is disconnected from the power source outlet. o Never operate this saw without the riving knife - Craftsman 21807 | Operation Manual - Page 23
the bracket must be engaged in the riving knife slot and the two holes in the set plate. 7. Make sure the riving knife (7) is in its highest position. Tighten the lock knob (6). 8. Return the blade to 0 ° and place the table insert in position. 9. Before using the saw, please follow the instructions - Craftsman 21807 | Operation Manual - Page 24
. 10.Replactehetableinsertb, ladeguard andanti-kickbacpkawlassembly. Fig.Q 3 o When installing the blade guard, cover the blade teeth with a piece of folded cardboard to protect yourself from possible injury. o Never operate this machine without the blade guard in place for all through sawing - Craftsman 21807 | Operation Manual - Page 25
by keeping the riving knife, anti-kickback pawls and guards in place, aligned and functioning. Do not release work before passing it completely beyond the saw blade. Do not rip work that is twisted, warped or does not have a straight edge to guide it along the fence. Do not attempt to reverse out of - Craftsman 21807 | Operation Manual - Page 26
betweenthe extensionandthetubeit mounts onto.Seepage35. 3. Insert the rear table extension Fig. V tubes (2) into the two holes in the rear of the saw table, and into the extension tube brackets under the table. Position the rear table support so that the instruction labels are facing up. (Fig - Craftsman 21807 | Operation Manual - Page 27
activate the laser cutting guide. NOTE: See instructions on Adjusting The Laser Line on page 33. 3 STORAGE (FIG. Z, AA, BB) Rip fence, miter gauge (Fig. Z) Storage brackets for the rip fence (2) and miter gauge (3) are located on the left side of the saw housing. NOTE: Adjust the miter gauge to 45 - Craftsman 21807 | Operation Manual - Page 28
the two bolts (3) and lift up on the handle (2). o Hold the fence bracket (4) firmly against the front of the saw table. Move the fence until it is parallel with the miter gauge groove. o Push the handle down and tighten both bolts. 5. if fence is loose when the handle is in the locked (downward - Craftsman 21807 | Operation Manual - Page 29
distance from the side of the fence to nearest side of the blade. 2. Measure the actual distance with miter gauge, loosen the lock handle (1) and rotate the miter body to the desired angle as indicated by the scale. Secure in position by tightening the lock handle. Fig. FF ADJUSTING THE TABLE iNSERT - Craftsman 21807 | Operation Manual - Page 30
that will quickly position the saw blade at 90 ° and 45 ° to the table. Make adjustments only if necessary. 90 ° Stop 1. Disconnect the saw from the power source. 2. Raise the blade to the maximum elevation. 3. Loosen the blade bevel lock handle and move the blade to the maximum vertical position - Craftsman 21807 | Operation Manual - Page 31
the saw. 2. Remove the blade guard for this procedure but reinstall and realign after adjustment. 3. Raise the blade to the blade tooth having a "right set" and rotate the blade so the marked tooth is 1/2 in. above the table. 5. Place the combination square base (1) into the right side miter gauge - Craftsman 21807 | Operation Manual - Page 32
look directly into the laser beam. o If the Laser Line will not be used for Fig. KK 2 4 THE LASER LINE This tool is equipped with the Laser Trac®, which is a battery-powered laser cutting guide. The laser line allows the operator to anticipate the path of the saw blade on the workpiece before - Craftsman 21807 | Operation Manual - Page 33
is turned on. Do not stare into beam or look directly at it using optical instruments. Do not remove the warning label that is affixed to the blade guard. Do not direct the laser into the eyes. NOTE: All of the adjustments for the operation of this machine have been carried out at the - Craftsman 21807 | Operation Manual - Page 34
. When the saw blade is at the desired angle, tighten the bevel lock handle (2). ON/OFF SWITCH (FIG. NN) The ON / OFF switch has a safety removal key. With the key removed from the switch, unauthorized and hazardous use by children and others is minimized. 1. To turn the saw ON, insert the safety - Craftsman 21807 | Operation Manual - Page 35
TIME. I_ WARNING] Before using the saw each time, check the following: 1. The blade is tightened to the arbor. 2. The bevel angle lock knob is tightened. 3. If ripping, make sure the fence is locked into position and is parallel to the miter gauge groove. 4. The blade guard is in place and working - Craftsman 21807 | Operation Manual - Page 36
and must not be warped, twisted, or bowed when ripping. 1. Remove the miter gauge and store it in the "storage" compartment in the base of the saw. 2. Secure the rip fence to the table. 3. Raise the blade so it is about 1/8 in. higher than the top of the workpiece. 4. Place the workpiece flat on - Craftsman 21807 | Operation Manual - Page 37
are some templates for your reference. FEATHERBOARD (FIG. SS, TT) A featherboard is a device used to help control the workpiece by guiding it securely against the table or fence. Featherboards are especially useful when ripping small workpieces and for completing non-through cuts. The end is angled - Craftsman 21807 | Operation Manual - Page 38
FENCE be flat and smooth enough to rest on the saw table without rocking. Fig. UU 3/8 in. thick use the screws to fasten the base and bracket. Fig. VV The edge must be _I parallel with l PUSH BLOCK Use for ripping operation when the workpiece is too narrow to use a push stick. Always use - Craftsman 21807 | Operation Manual - Page 39
the rip fence and place the miter gauge in the miter gauge groove on the table. 2. Adjust the blade height so that miter gauge with screws. Make sure the facing does not interfere with the proper operation of the saw blade guard. When cutting long workpieces, you can make a simple outfeed support - Craftsman 21807 | Operation Manual - Page 40
ANGLE This sawing operation combines a miter angle with a bevel angle. groove because the bevel angle may cause the blade guard to interfere with the cut if used on the left side groove. 1. Set the miter gauge (3) to the desired angle. 2. Place the miter gauge in the right side groove of the table - Craftsman 21807 | Operation Manual - Page 41
3 To avoid the risk of personal injury. Always use push block, auxiliary fence and featherboard when making non-through cut. 1. Before starting the table saw, lower the blade and riving knife assembly to the down position. 2. Remove the blade guard assembly and anti-kickback pawls assembly for non - Craftsman 21807 | Operation Manual - Page 42
DO NOT use Adjustable or Wobble type dadoes. o The maximum dado cut width is 1/2 in. chippers as shown in the dado set's instruction manual. Blade/chippers must not exceed 1/2 in. total in width. Fig. dd 2 1. Remove the table insert, saw blade, anti-kickback pawl assembly, blade guard assembly and - Craftsman 21807 | Operation Manual - Page 43
cutting blades with pitch and gum remover. 4. A worn, cut, or damaged power cord should be replaced immediately. {,,_, WARNING] All electrical or mechanical repairs should be attempted only by a trained repair technician. Contact customer service for assistance. Use only identical replacement parts - Craftsman 21807 | Operation Manual - Page 44
time, or 10,000 ON/OFF cycles. Replace both carbon brushes when either has less than 1/4 in. length of carbon remaining, or if the spring or wire is damaged or burned. 1. Remove the blade guard, blade, rip fence, miter gauge and stand assembly from the table saw. 2. Lower the blade height to - Craftsman 21807 | Operation Manual - Page 45
OFF and unplug the tool before moving, replacing the blade or making adjustments. PROBLEM Saw will not start. Does not make accurate 45 ° and 90 ° rip cuts. POSSIBLE CAUSES CORRECTIVE ACTION 1. Saw is not plugged in. 1. Plug in saw. 2. Fuse blown or circuit breaker 2. Replace fuse or reset - Craftsman 21807 | Operation Manual - Page 46
fence with miter back from blade. 2. Riving knife not aligned with gauge slot. blade. 2. Align riving knife with blade. 3. Feeding stock without rip 3. Install and use rip fence. fence. 4. Install and use riving knife. 4. Riving knife not in place. (with guard) 5. Dull blade. 5. Replace - Craftsman 21807 | Operation Manual - Page 47
good quality plywood or solid wood ® Use 1/2 in. or 3/4 in. material ® Push stick MUST be thinner than the width of material being cut / / / / / / Drill Hole For Hanging 200 - Notch To / /" / / / Prevent Hand - Craftsman 21807 | Operation Manual - Page 48
10 in. TABLE SAW MODEL NO. 137.218070 i_ WARNING ] When servicing use only CRAFTSMAN replacement parts. Use of any other parts many create a HAZARD or cause product damage. Any attempt to repair or replace electrical parts on this Table Saw may create a HAZARD unless repair is done by a qualified - Craftsman 21807 | Operation Manual - Page 49
0o I 5' m >> 2TB9 rm > ] OKCX4 02J A F 12M _0KBQ 10K54 2SUS o m r- z o '-4 co o .,4 o - Craftsman 21807 | Operation Manual - Page 50
10 in. TABLE SAW MODEL NO. 137.218070 PARTS LiST FOR SAW SCHEMATIC B I.D. 0901 08VH 08VN 090Q 09JK 0AW8 0B3R 0B9P 0BA1 0BA4 0BA9 0BAC 0BAE 0BPA 0J3P 0J4F 0J5C 0J6K 0J6T 0J70 0J74 0J77 0J8D 0JAE 0JAF 0JB2 0JC9 0JD1 0JPJ 0JZY 0KOY 0K1G Description Size BUSH CORD CLAMP POINTER BRACKET PLUNGER - Craftsman 21807 | Operation Manual - Page 51
2815 2RVR4 08VH/_ OKA4_ _0KUX 0KTH 2 0KWU 2TDS_ 2TDL 29R6 OJ6K / OK J7 OBPA \ "_ _O_o_v_ 09018D_OJ OJAF 26E8 )J4F o o m ff- OB3R z o "q Co O _4 O - Craftsman 21807 | Operation Manual - Page 52
10 in. TABLE SAW PARTS LiST FOR MOTOR I.D. OHX9 OJX3 OK3Y OKTA OQM2 FLOW GULDE MOTOR COVER CUTTER SHAFT ASS'Y ARMATURE ASS'Y BALL BEARLNG BRACKET CR. RE. COUNTER-SUNK HEAD SCREW LABEL BALL BEARLNG FIELD ASS'Y zf J J J %.. \ MODEL NO, 137.218070 Size M5"0.8-8 M5"0.8-50 @27"26,5 M5"12-55 QTY 1 - Craftsman 21807 | Operation Manual - Page 53
10 in. TABLE SAW PARTS LiST FOR STAND MODEL NO. 137.218070 I.D, 0J4F 0JPS Description 2A92 SPRING PIN 2BUD BOTTOM SUPPORT BRACKET 2BUE BOTTOM SUPPORT BRACKET 2BV2 CUSHION 2RVD MAIN LEG BRACKET 2RW1 BRACKET 2RWE DUST BAG HOOK Size @8_16-2.5 M8_1.25-45 M8_1.25-16 M5_0.8-10 M5_0.8 T=5 M8_1.25 - Craftsman 21807 | Operation Manual - Page 54
- Craftsman 21807 | Operation Manual - Page 55
- Craftsman 21807 | Operation Manual - Page 56
expert troubleshooting and home solutions advice: www.managemyhome.com For repair - in your home - of all major brand appliances, lawn and garden equipment, or heating and cooling systems, no matter who made it, no matter who sold it! For the replacement parts, accessories and owner's manuals that
-
 1
1 -
 2
2 -
 3
3 -
 4
4 -
 5
5 -
 6
6 -
 7
7 -
8
-
9
-
10
-
11
-
12
-
13
-
14
-
15
-
16
-
17
-
18
-
19
-
20
-
21
-
22
-
23
-
24
-
25
-
26
-
27
-
28
-
29
-
30
-
31
-
32
-
33
-
34
-
35
-
36
-
37
-
38
-
39
-
40
-
41
-
42
-
43
-
44
-
45
-
46
-
47
-
48
-
49
-
50
-
51
-
52
-
53
-
54
-
55
-
56
 |
 |

Operator's lVlanual
ERRFrSNRN
°
10-in.
TABLE
SAW WiTH
LEG SET
Model
No.
137.218070
C
us
CAUTION:
Before
using
this Table
Saw,
read this
manual
and
follow
all its Safety
Rules
and
Operating
Instructions
®
Safety
Instructions
®
Installation
®
Operation
®
Maintenance
®
Parts
List
Customer
Help
Line
For
Technical
Support
1-800-843-1682
Sears
Parts
&
Repair
Center
1-800-488-1222
Sears,
Roebuck
and Co.,
Hoffman
Estates,
IL
60179 USA
Visit
our
Craftsman
website:
www.sears.comlcraftsman
Part No. 137218070001
Printed in Taiwan