Craftsman 21914 Operation Manual
Craftsman 21914 - 12 in. Drill Press Manual
 |
View all Craftsman 21914 manuals
Add to My Manuals
Save this manual to your list of manuals |
Craftsman 21914 manual content summary:
- Craftsman 21914 | Operation Manual - Page 1
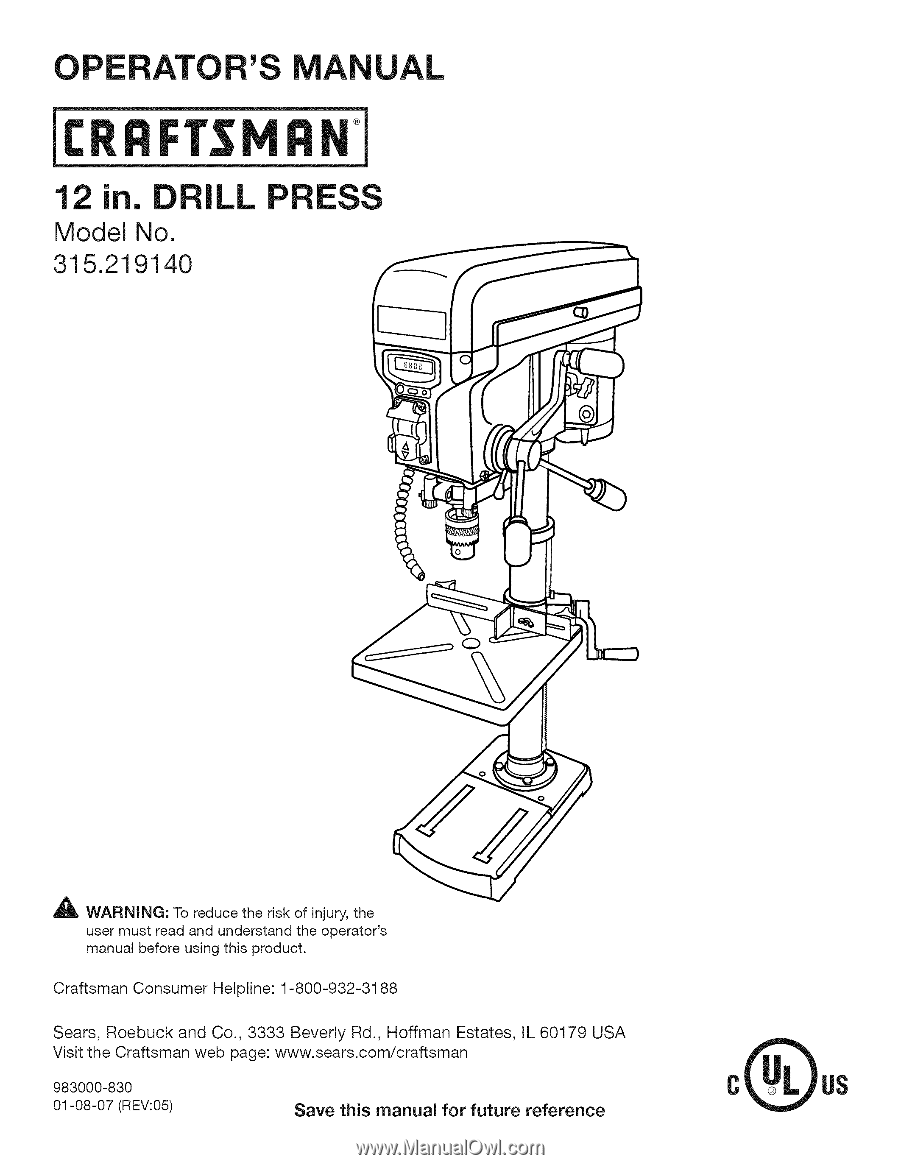
RATOR'S MANUAL 12 in. DRILL P Model No. 315.219140 _1_ WARNING: To reduce the risk of injury, the user must read and understand the operator's manual before using this product. Craftsman Consumer Hetptine: 1-800-932-3188 Sears, Roebuck and Co., 3333 Beverly Rd., Hoffman Estates, IL 60179 USA Visit - Craftsman 21914 | Operation Manual - Page 2
-11 [] Tools Needed ... 11 [] Loose Parts ... 12 [] Assembly ... 13-17 [] Operation ... 18-21 [] Adjustments ...[] Maintenance ... 21-22 23 [] Exploded View ... 24-25 [] Parts Ordering/Service ... Back Page ONE-YEAR FULL WARRANTY ON CRAFTSMAN TOOL If this Craftsman tool fails due to a defect - Craftsman 21914 | Operation Manual - Page 3
(NTA(N TOOLS W(TH CARE. Keep tools sharp and clean for better and safer performance. Follow instructions for lubricating and changing accessories. [] D(SOONNEOT TOOLS. When not in use, before servicing, or when changing attachments, blades, bits, cutters, etc., all tools should be disconnected from - Craftsman 21914 | Operation Manual - Page 4
. [] WHEN SERViCiNG use only identical replacement parts. Use of any other parts may create a hazard or cause product damage. [] USE ONLY RECOMMENDED ACCESSORIES listed in this manual or addendums. Use of accessories that are not listed may cause the risk of personal injury. Instructions for safe - Craftsman 21914 | Operation Manual - Page 5
is clamped tight to column and head and table support collars are correctly positioned. [] BEFORE ENGAGING THE POWER SWITCH, MAKE SURE THE BELT GUARD iS DOWN AND THE CHUCK iS iNSTALLED PROPERLY. [] LOCK THE MOTOR SWITCH OFF WHEN LEAVING THE DRILL PRESS. Do not perform layout, assembly, or set-up - Craftsman 21914 | Operation Manual - Page 6
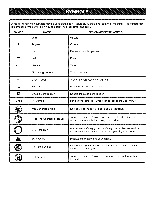
orbits etc., per minute Do not expose to rain or use in damp locations. 0 A ® Read The Operator's Manual To reduce the risk of injury, user must read and understand operator's manual before using this product. Eye Protection Safety Alert No Hands Symbol Hot Surface Always wear safety goggles or - Craftsman 21914 | Operation Manual - Page 7
replacement parts. ,_ WARNING: To avoid serious personal injury, do not attempt to use this product until you read thoroughly and understand completely the operator's manual. If you do not understand the warnings and instructions in the operator's manual, do not use this product. Call the Craftsman - Craftsman 21914 | Operation Manual - Page 8
14 12 **Used on 12 gauge - 20 amp circuit, NOTE: AWG = American Wire Gauge 7.1-12.0 12.1-16.0 14 14 14 12 support one power tool may not be able to support two or three tools. GROUNDING INSTRUCTIONS qualified electrician or service personnel if the grounding instructions are not completely - Craftsman 21914 | Operation Manual - Page 9
A cut removing a wedge from a block so the end (or part of the end) is angled rather than at 90 °. Compound Cut drill presses) A small hole drilled in a workpiece that serves as a guide for drilling blades when the workpiece is not properly supported. Through Sawing Any cutting operation where the - Craftsman 21914 | Operation Manual - Page 10
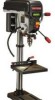
10 in. Motor 2/3 HP induction Table Movement 45 ° bevel, 360 ° swivel No Load Speed 500-3,000 r/min (RPM) Depth 12 in. Overall Height 37-1/2 in. WORKLIGHT ON/OFF SWITCH FEED CRANK WORKLIGHT DIGITAL DEPTH SWITCHAND CHUCK FEED HANDLE ADJUSTAgLE FENCE TAgLE ADJUSTMENT HANDLE Fig. 2 10 - Craftsman 21914 | Operation Manual - Page 11
the table is tilted. CHUCK Your drill press features a standard three-jaw type chuck with a self-ejecting chuck key, which prevents accidentally starting the drill press with the key still engaged in the chuck. CHUCK TOOL The chuck tool is used to remove the chuck and chuck spindle. DIGITAL DEPTH - Craftsman 21914 | Operation Manual - Page 12
TableAdjustmenHt andle 1........"AA"Batteries 2........... TableLockHandle 1........O..perator's Manual (not shown 1 FeedCrank 1............ HEXKEY (5) LASERASSEMBLY FEEDCRANK CHUCKTOOL FEED HANDLE(2) CHUCK CHUCK KEY HEXBOLT TABLELOCK HANDLE t% TABLAESSEMBLY HEXBOLTS (4) ADJUSTABLE - Craftsman 21914 | Operation Manual - Page 13
UNPACKING Thisproductrequiresassembly. [] Carefullyremovethetoolandanyaccessoriefsromthe box.Placeit ona levelworksurface. NOTET: histoolis heavyT. oavoidbackinjury,liftwith yourlegs,notyourback,andgethelpwhenneeded. [] Inspecthetoolcarefullyto makesurenobreakageor damageoccurredduringshipping. [] - Craftsman 21914 | Operation Manual - Page 14
column collar and gear rack from the column and set aside. [] Locate the worm gear and feed the D-shaft through the slot in the table support. [] Install table adjustment handle over the end of the D-shaft so that the flat side of the shaft aligns with the set screw. Tighten the - Craftsman 21914 | Operation Manual - Page 15
before beginning installation. [] Position the head assembly onto the column with the chuck positioned over the table. NOTE: The head assembly is heavy. Get help into place. Using a piece of scrap wood to protect the chuck, firmly tap the chuck into place using a mallet or hammer. NOTE: Wipe the - Craftsman 21914 | Operation Manual - Page 16
chuck and onto the quill. [] Secure in place by retightening the hex bolt. CHECKiNG/ADJUSTING LASER ALIGNMENT See Figures 12 on a piece of scrap wood. [] Insert a small drill bit into the chuck and align its tip to the intersection of the lines those specified in this manual could result in - Craftsman 21914 | Operation Manual - Page 17
sure they are long enough to go through holes in drill press base and material the drill press is being mounted to. If machine bolts are used, make washers and hex nuts from the underside of the workbench. Once the drill press is securely mounted on a sturdy surface, perform the following: [] Check - Craftsman 21914 | Operation Manual - Page 18
off: [] With the switch key inserted into the switch, push the switch down to turn OFF ( O ). To lock the drill press: [] Place the switch in the OFF ( O ) position. [] Remove the switch key from the switch and store in a secure location. A WARNING: Always remove the switch key - Craftsman 21914 | Operation Manual - Page 19
position. [] Retighten the table lock handle. SELF-EJECTING CHUCK KEY See Figure 18. The self-ejecting chuck key ensures the chuck key is removed from the chuck before the drill press is turned On. In order to loosen or tighten the chuck using the chuck key, push the key into the key hole located - Craftsman 21914 | Operation Manual - Page 20
a pilot hole first, using a smaller diameter bit. Insert and tighten the drill bit in the chuck. I] Set table assembly to desired height. I] Turn on the digital depth display by pressing the ON/OFF button. I] Press the in./mm button until the desired unit of mea- surement is set. WOBKLIGHT C-CLAMP - Craftsman 21914 | Operation Manual - Page 21
. [] Position the table to the desired height and retighten the table lock handle. ADJUSTING TABLE BEVEL See Figure 24. The drill press is equipped with a tilting table that allows you to drill angled holes. The table can be tilted left or right, from 0 ° to 45 ° after the pin has been removed. To - Craftsman 21914 | Operation Manual - Page 22
the head assembly. The speed chart located on the cover inside the head assembly shows the recommended speed and pulley configuration for each drilling operation. To change the pulley configuration: [] Lift head assembly cover from front to open. [] Loosen the tension knob. [] Remove the drive belt - Craftsman 21914 | Operation Manual - Page 23
can damage, weaken or destroy plastic which may result in serious personal injury. After using the drill press, clean it completely and lubricate all sliding and moving parts. Apply a light coat of automotive-type paste wax to the table and column to help keep the surfaces clean. LUBRICATION - Craftsman 21914 | Operation Manual - Page 24
CRAFTSMAN DRILL PRESS- MODEL NO. 219140 _ 20 Key PaN No. Number 1 089140301146 2 089140301001 3 089140301002 4 089140301145 5 089140301004 6 089140301005 7 089140301012 8 089140301010 9 089140301009 10 089140301008 11 089140301011 12 Hex Nut (MS 1 Arbor 1 Chuck 1 Laser Assembly 1 *Screw (M4 - Craftsman 21914 | Operation Manual - Page 25
CRAFTSMAN DRILL PRESS- MODEL NO. 219140 32 ,_ 33 34 35 3O I f4 _--=- 28 36 38 29 37 .._---- 27 23 "=_'--'- 25 13 12 20 19 Key Part 983000830 Description Qty. Chuck Tool 1 *Washer Handle 1 Support 1 Worm Gear 1 Table Adjustment Handle 1 Operator's Manual * Standard
-
 1
1 -
 2
2 -
 3
3 -
 4
4 -
 5
5 -
 6
6 -
 7
7 -
8
-
9
-
10
-
11
-
12
-
13
-
14
-
15
-
16
-
17
-
18
-
19
-
20
-
21
-
22
-
23
-
24
-
25
 |
 |
RATOR'S
MANUAL
12 in.
DRILL
P
Model
No.
315.219140
_1_
WARNING:
To reduce the risk of injury, the
user must read and understand
the operator's
manual before using this product.
Craftsman
Consumer
Hetptine:
1-800-932-3188
Sears,
Roebuck
and
Co.,
3333
Beverly
Rd.,
Hoffman
Estates,
IL 60179
USA
Visit the Craftsman
web
page:
www.sears.com/craftsman
983000-830
01-08-07
(REV:05)
Save
this
manual
for
future
reference