Craftsman 24838 Operation Manual
Craftsman 24838 - 42 in. Lawn Tractor Snow Thrower Manual
 |
View all Craftsman 24838 manuals
Add to My Manuals
Save this manual to your list of manuals |
Craftsman 24838 manual content summary:
- Craftsman 24838 | Operation Manual - Page 1
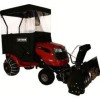
Operator's Manual CRQFTSNQ°N 42"= 2 STAGE SNOW THROWER TRACTOR ATTACHMENT Model No. 486.24838 DO NOT RETURN TO STORE For Missing Parts or Assembly Questions Call 1-866-576-8388 CAUTION: Before using this product, read this manual and follow all Safety Rules and Operating instructions. Sears, - Craftsman 24838 | Operation Manual - Page 2
29 STORAGE 30 TROUBLESHOOTING 30 REPAIR PARTS ILLUSTRATION 34,36,38 REPAIR PARTS LIST 35,37,38 SLOPE GUIDE 39 PARTS ORDERING/SERVICE BACK COVER ONE YEAR FULL WARRANTY When operated and maintained according to the instructions supplied with it, if this Snowthrower fails due to - Craftsman 24838 | Operation Manual - Page 3
without proper instruction. Keep trouble. • Stop the engine whenever you leave the operating position, before unclogging the snow thrower guide on page 39 of this manual. Never operate the snow thrower without guards, plates or other safety protection devices in place. Never operate the snow thrower - Craftsman 24838 | Operation Manual - Page 4
ii • A i i • iB SHOWN ACTUAL SiZE =: F ,, t ,, j i FF R L• • i • ,, ", W,X I i_ % j/" NOT SHOWN ACTUAL SiZE GG JJ /) ": KK LL :: _ ./ PP _ RR _ SS \/ HH i_• II NN ii[ O0 - Craftsman 24838 | Operation Manual - Page 5
REF. QTY. A 1 B 1 C 2 D 2 E 4 F 6 G 6 H 2 I 2 J 2 K 6 L 2 M 2 N 8 O 2 P 4 Q 2 R 2 S 7 T 7 U 6 V 8 W t DESCRIPTION Hex Bolt, 1/2" x 1-1/4" Hex Bolt, 3/8" x 3-1/4" Hex Bolt, 3/8" x 1" Hex Bolt, 8/16" x 1-3/4" Hex Bolt, 5/16" x 3/4" Hex Bolt, 1/4" x 1" Hex - Craftsman 24838 | Operation Manual - Page 6
1. CrossBrace(WeighTt ray) 2 SideBraces(2)(WeighTt ray) 3 LeftHandSidePlate 4 RightHandSidePlate 5 Anti-rotatioBn racket 6 EngagemenRtod(Notusedonsomemodels) 7 SuspensioAnrms(2) 8 EnginePulleyKeepe(rNotusedonsomemodels) 9 ChuteCrankRodAssembly 10. SupportTubeC,rankRod 11. LiftHandleandCable 12. - Craftsman 24838 | Operation Manual - Page 7
assemble the snow thrower, remove the spark plug wire(s), set the parking brake and remove the key from the tractor ignition TRACTOR PREPARATION Before performing these instructions, refer to the Service and Adjustments section of your tractor owner's manual for specific safety instructions. • Allow - Craftsman 24838 | Operation Manual - Page 8
INSTALL SIDE PLATES STEP 3: (BEE FIGURE 3) * Fasten the R.H Side Plate (bend facing out) to the front three holes in the tractor frame using three 3/8" x 1" carriage bolts (K), three 1/2" washers (V) (see note) and three 3/8" flange nuts (BB) For the rear hole, use a 5/16" x 1" cardage bolt (N), a - Craftsman 24838 | Operation Manual - Page 9
FIGURE 10) • Two different length drive belts are included with your snow thrower Tractors with manual attachment clutches and single front deck suspension brackets use the 56" drive belt with #48138 printed on the outside ol the belt. DO NOT USE the other belt. • Slightly loosen the hex bolt next - Craftsman 24838 | Operation Manual - Page 10
tractor * Attach the tractor's clutch cable to the cable bracket. Secure the cable housing guide (groove down) to the cable bracket using the original collar and a 5/84" hair (SEE FIGURE 13) • Assemble the drive belt onto the engine pulley first and then onto the large pulley on top of the - Craftsman 24838 | Operation Manual - Page 11
with a single front deck r ,' LEFT FRONT HOLE FIGURE 16 TENSIONING CHAIN (PP) STEP 17: (SEETABLE 1) Two different length drive belts are included with your snow thrower. Use the table below to select the correct drive belt for your type tractor The part number is printed on the outside of the - Craftsman 24838 | Operation Manual - Page 12
the chain will allow. Secure the chain in this position by inserting a 1/8" hairpin cotter (KK) through the chain. IMPORTANT: Do Not assemble the drive belt around the outside of the keeper bolt beside the large pulley • Go to step 48 Oh page 21. CLUTCH/IDLER ASSEMBLY PULLEY 1/8" HAIRPIN COTTER - Craftsman 24838 | Operation Manual - Page 13
iNSTRUCTiONS FORTRACTORSWITH DUAL FRONT DECK SUSPENSION BRACKETS FASTEN SIDE PLATES TO TRACTOR If your tractor resembles figure 20, go to step 21. If your tractor resembles - Craftsman 24838 | Operation Manual - Page 14
INSTALLING HANGER BRACKETS For better clearance, lower the tractor's suspension arms using the attachment lift lever STEP 26: (SEE FIGURE 25 or28) On Tractors With Foot Rest Brackets • Remove the bolt and nut that fasten the L.H. and R.H. foot rest brackets to the frame • Attach the L.H Hanger - Craftsman 24838 | Operation Manual - Page 15
FIGURE 31) • Two different length drive belts are included with your snow thrower. Tractors with manual attachment clutches and dual front deck suspension brackets use the 55" drive belt with #46989 printed on the outside of the belt. DO NOT USE timeother belt • SlightEy _oosen the hex bolt next to - Craftsman 24838 | Operation Manual - Page 16
when performing the next operation. You can temporarily support the rod using a rubber band tied to the the new pulley keeper supplied with the snow thrower, reusing the original bolt, washer and pulley iMPORTANT: Do Not assemble the "V" belt around the outside of the engine pulley keeper - Craftsman 24838 | Operation Manual - Page 17
FIGURE 37) • Two different length drive belts are included with your snow thrower Tractors with manual attachment clutcl_es and dual front deck suspension brackets use the 55" drive belt with #46989 pdnted on the outside of the belt DO NOT USE the other belt. / TRACTOR'S CLUTCH CABLE FIGURE 38 17 - Craftsman 24838 | Operation Manual - Page 18
nut that secure the keeper Attach the new pulley keeper supplied with the snow thrower, reusing the original bolt, washer and nut. NOTE: Some tractors bolt located beside the large pulley IMPORTANT: Do Not assemb}e the "V" belt around the outside of the engine pulley keeper or timekeeper bolt. • Go - Craftsman 24838 | Operation Manual - Page 19
LEFT SIDE VIEW OF BOTTOM _- _ / LEFT FRONT HOLE FIGURE 42 TENSIONING CHAIN (PP) STEP 44: (SEE TABLE 2) Two different length drive belts are included with your snow thrower• Use the table below to select the correct drive belt for your type tractor The part number is printed on the outside of the - Craftsman 24838 | Operation Manual - Page 20
cotter (LL) will allow Secure the chain in this position by inserting a 1/8" hairpin cotter (KK) through the chain IMPORTANT: Do Not assemble the "V" belt around the outside of the engine pulley keeper or the keepe_ bolt. CLUTCH/IDLER ASSEMBLY PULLEY Left Side of Tractor 1/8" HAIRPIN COTTER (KK - Craftsman 24838 | Operation Manual - Page 21
slack in the cable wire. Refer also to the Service and Adjustments section on page 29 in this manual. HINT: For easier assembly of the lift release cable, tilt the snow thrower forward onto the spiral auger •• CRANK ROD 5t16" NYLOCK NUT (CC) .SUPPORT TUBE FIGURE 49 LEFT SIDE ViEW STEP 51: (SEE - Craftsman 24838 | Operation Manual - Page 22
hex bolts holding the chute keepers to the chute flange • Secure the control cables to the crank rod support tube using a nylon tie (OO). 1/4" x 1" HEX BOLT (F) 1/4" FLAT WASHER (T) PLASTIC , remove timestop bolts from each side o1 the snow thrower frame• FIGURE 53 22 STOP BOLT RIGHT SIDE ViEW - Craftsman 24838 | Operation Manual - Page 23
the belt as instructed in steps 56 and 57 ATTACHMENT PIN (After it_sta//ingauger belt) 1/8" HAiRPiN X COTTER (KK) SHOULDER BOLT \ SIDE PLATE MOUNTING PLATE BEFORE INSTALLING THE AUGER BELT STEP 58: (SEE FIGURE 88) • The auger be_t comes preassembled to the pulleys on the snow thrower - Craftsman 24838 | Operation Manual - Page 24
FIGURE 54 ON PAGE 23) * Lift the front of the snow blower to align the holes in the mounting plates and the side plates the spring, securing it on the outside of the Clutch/Idler assembly IMPORTANT: For correct belt tension, the 1/8" hairpin cotter must attach to the end of the spring, not to the - Craftsman 24838 | Operation Manual - Page 25
ATTACHINTGO(GT)GARDEN TRACTORS WITH A SINGLE FRONT DECK SUSPENSION BRACKET STEP 61: (SEE FIGURE 59) • Locate the upper empty hole {n the right side o1 time tractor's draw bar. insert a 3/8" x 1" hex bolt (C) from inside the tractor frame through the hole Hook the stotted end of a side brace down - Craftsman 24838 | Operation Manual - Page 26
please review the following checklist to help ensure that you will obtain the best performance from your snow thrower. • Make sure air assembly instructions have been completed with aH bolts and nuts properly tightened. • Make sure the correct dbve belt was installed. • Make sure the drive belt and - Craftsman 24838 | Operation Manual - Page 27
ground clearance between the snow thrower and the type of surface to be cleared. (Refer to the Service and Adjustments section ) * Make sure the tractor engine has the correct oil for winter operation (SAE 5W-30). Refer to tractor owneCs manual HOWTO STARTYOUR SNOWTHROWER * The tractor should be - Craftsman 24838 | Operation Manual - Page 28
Check for loose tasteners Check scraper and shoes kJr wear Cleaning Lubrication Section _'__ I 11 Service Dates ! ' tI lI it II It LUBRICATION • Oil aH pivot points on the snow thrower. • Oil the pivot points of the two idler arms on the clutcW idler assembly • Apply penetrating oil to the - Craftsman 24838 | Operation Manual - Page 29
• Disengage the tractor's attachment clutch. • Lower the snow thrower to the ground. • Remove the attachment pin • Lock the snow thrower's lift handle in the down position to decrease belt tension • Release the spring tension from the auger belt idler arm on the bottom of the clutchddler assembly - Craftsman 24838 | Operation Manual - Page 30
) • Remove the drive belt from the engine pulley. If you replaced the engine pulley keeper on a manual attachment clutch tractor, reinsta{l PROBLEM Spiral augers don't turn Clogged discharge chute Snow thrower stalls tractor engine CAUSE 1. Upper or lower V belt too loose 2. Upper or lower V belt - Craftsman 24838 | Operation Manual - Page 31
NOTES 31 - Craftsman 24838 | Operation Manual - Page 32
NOTES 32 - Craftsman 24838 | Operation Manual - Page 33
NOTES 33 - Craftsman 24838 | Operation Manual - Page 34
REPAIR PARTS FOR MODEL 486.24838 42" SNOWTHROWER 28 29 "55 12 21 / 34 28 31 37 27 21 \ 66 / 8 30 2O 54 67 27 21_. 21 47 65 72 65 25 j_ 40, 59 35 30 21 58 42 34 - Craftsman 24838 | Operation Manual - Page 35
PARTS FOR MODEL 486.24838 42" SNOWTHROWER REE NO 24816 10 705-5226 1 Bracket, Chute Crank 1 Cover, Belt 1 Chute Reinforcement 11 708-5269 1 Spiral Assembly, L.H. ( Do_,m Stop 1 Washer, 6 Hex Lock Nut, 1/4" Flanged 1 Chute, Upper 1 Guide, Cable 2 Pulley, V Type 4" 1 Pulley, V Type 1 Hex Bolt, - Craftsman 24838 | Operation Manual - Page 36
REPAIR PARTS FOR MODEL 486.24838 42" SNOWTHROWER 41 40 45 42 43 \ I 4O 56 6 8 22 23 33 _,4 16 ! 28 69 5 32 31 24 5 18 8 20 63 58 66 59 76 \ 6O 78_79 \ 65 38 _ 36 - Craftsman 24838 | Operation Manual - Page 37
FOR MODEL 486.24838 42" SNOWTHROWER REF , Oval #10-24 x 1" Grip, Handle Tube, Crank Rod Support Bushing, 3/8" Plastic Bracket, Chute Crank REE NO. PART NO. 42 Rod t Handle, Chute Ti_t 1 Knob t Assembly, Chute Tilt Bracket 1 Guide, Cable 1 Cable, Chute Control t Cable, Chute Control with Clip 5 - Craftsman 24838 | Operation Manual - Page 38
REPAIR PARTS FOR MODEL 486.24838 42" SNOWTHROWER RER PART NO. t NO QT_t DESCRIPTION 1 43080 2 Carriage Bolt, 25 43063 3 Hex Bolt, 5/16-18 x 1" 26 46989 1 Belt, V Type Drive (55") 48138 27 47846 28 47044 29 47025 1 Belt, V Type Drive (56") 1 Belt, V Type Auger 1 Pulley, V Type 4" 1 Hex Bolt, - Craftsman 24838 | Operation Manual - Page 39
SUGGESTED GUIDE FOR SIGHTING SLOPES FOR SAFE OPERATION OF TRACTOR WiTH ATTACHMENT - - Lo 1, Fold this page along dotted line indicated above, 2. Hold page before you so that - Craftsman 24838 | Operation Manual - Page 40
the replacement parts, accessories and owner's manuals that you need to do-it-yourself. For Sears professional installation of home appliances and items ® (1-888-784-6427) Au Canada pour service en fran_ais: 1-800-LE-FOYER _° (1-800-533-6937) www.sears.ca (3 Registered Trademark / T_ Trademark /
-
 1
1 -
 2
2 -
 3
3 -
 4
4 -
 5
5 -
 6
6 -
 7
7 -
8
-
9
-
10
-
11
-
12
-
13
-
14
-
15
-
16
-
17
-
18
-
19
-
20
-
21
-
22
-
23
-
24
-
25
-
26
-
27
-
28
-
29
-
30
-
31
-
32
-
33
-
34
-
35
-
36
-
37
-
38
-
39
-
40
 |
 |
Operator's
Manual
CRQFTSNQN
°
42"= 2 STAGE
SNOW THROWER
TRACTOR
ATTACHMENT
Model
No.
486.24838
DO NOT
RETURN
TO STORE
For Missing
Parts
or Assembly
Questions
Call
1-866-576-8388
CAUTION:
Before
using this
product,
read
this
manual
and follow
all Safety
Rules
and
Operating
instructions.
Safety
Assembly
Operation
Maintenance
Parts
Sears,
Roebuck
and
Co.,
Hoffman
Estates,
IL 60179
U.S.A.
www sears.corn/craftsman
PRINTED
iN U.S.A.
FORM NO. 49812 (2/06)