Craftsman 88690 Operation Manual
Craftsman 88690 - 250cc 28" Path Two Stage Snow Thrower Manual
 |
View all Craftsman 88690 manuals
Add to My Manuals
Save this manual to your list of manuals |
Craftsman 88690 manual content summary:
- Craftsman 88690 | Operation Manual - Page 1
" SNOW THROWER Model No. 247.88690 CAUTION: Before using this product, read this manual and follow all safety rules and operating instructions. o SAFETY ASSEMBLY OPERATION MAINTENANCE PARTS LIST o ESPANOL Sears, Roebuck and Co., Hoffman Estates, IL 60179, U.S.A. Visit our website: www.craftsman - Craftsman 88690 | Operation Manual - Page 2
Operation Service& Maintenanc.e Page2 Pages3-6 Page7 Pages8-11 Pages12-15 Pages16-23 Off-SeasoSn torage Page24 Troubleshootin.g Page25 PartsList Pages26-38 RepairProtectionAgreemen..t.......... Page42 Espa_o..l Page43 CRAFTSMAN LiMiTED WARRANTY Two Years on Snow Thrower - Craftsman 88690 | Operation Manual - Page 3
This machinewas builtto be operatedaccordingto the safe operation practicesin this manual.As with any type of powerequipment, carelessnessor error on operatethis machinewithoutproper instruction. • Thrownobjectscan causeseriouspersonalinjury. Planyour snow-throwingpatternto avoiddischargeof - Craftsman 88690 | Operation Manual - Page 4
startercord(kickback)will pull hand and armtowardenginefasterthan youcan let go. Broken bones,fractures,bruisesor sprainscould result. If situationsoccur whichare notcoveredin this manual,use care and good judgment.ContactCustomerSupportfor assistance and the nameof your nearestservicingdealer. 4 - Craftsman 88690 | Operation Manual - Page 5
manual parts only."Useof parts whichdo not meetthe original equipmentspecificationsmay leadto improperperformanceand compromisesafety!" Checkcontrolleversperiodicallyto verifythey engageand disengage properlyand adjust,if necessary.Referto the adjustment sectioninthis operator'smanualfor instructions - Craftsman 88690 | Operation Manual - Page 6
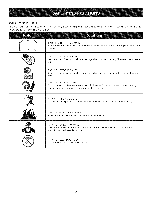
operate. i READ THE OPERATOR'S MANUAL(S) Read, understand, and follow all instructions in the manual(s) before attempting to assemble and AUGER Do not put hands or feet near rotating parts, in the auger/impeller Contact with the rotating parts can amputate hands and feet. housing or chute assembly - Craftsman 88690 | Operation Manual - Page 7
. 3.DISENGAGCELUTCHLEVERSS,TOPENGINE, AND REMAINBEHINDHANDLESUNTILALL MOVING PARTSHAVE STOPPEDBEFORE UNCLOGGING OR SERViCiNGMACHINE. TO AVOIDTHROWN OBJECTSiNJURiES, NEVERDIRECTDISCHARGAETBYSTANDERS. USEEXTRACAUTIONWHEN OPERATINOGN GRAVEL SURFACES. 5.BEAD OPERATOR'S MANUAL. CLEAN-OUT TOOL 7 - Craftsman 88690 | Operation Manual - Page 8
snowthrowerare determinedfrom behindthe unit in the operatingposition(standing directlybehindthe snow thrower,facingthe handlepanel). REMOVING FROM CARTON 1. Cut the cornersof discardingit. LOOSE PARTS Tworeplacementaugershearpinsare includedwith this manual.Refer to ReplacingShear - Craftsman 88690 | Operation Manual - Page 9
. b. Insertthe end of the chutedirectionalcontrolinto the lower bracketand securewith the flat washerand hairpinclipjust removed.See Figure5. If necessary,the lowerbracketcan be adjusted.Referto ChuteBracketAdjustmentin the Service& Maintenancesection. f F Figure4 Figure3 \ J Figure5 9 - Craftsman 88690 | Operation Manual - Page 10
fastenedto the top of the augerhousing with a mountingclip. See Figure6. The tool is designedto cleara chuteassemblyof ice and snow.This item is fastenedwith a cabletie at the factory.Cut thecable tie beforeoperatingthe snowthrower. loft _1 .allmovingpartshave stoppedbeforeusingthe clean-outtool - Craftsman 88690 | Operation Manual - Page 11
,carefullyreadand followall instructionsbelow. Performall adjustmentsto verifyyour snow throweris operatingsafelyand properly. Checktheadjustmentof the augercontrolas . 3. Whilestandingin the operator'sposition(behindthe snow thrower),engagethe auger. 4. Allowtheauger to remainengagedfor - Craftsman 88690 | Operation Manual - Page 12
ChuteAssembly \ \ Clean Out Tool '\ \ Gas Cap Auger Control Chute Directional Control Recoil Starter Handle Electric Start Button Augers _ Skid Shoe Outlet J Figure10 Nowthat youhaveset up yoursnowthrower,it'simportantto become acquaintedwith its controlsand features.Referto Figure10. SHIFT - Craftsman 88690 | Operation Manual - Page 13
RECOIL STARTER HANDLE This handleis usedto manuallystartthe engine. ELECTRIC STARTER BUTTON Pressingthe electricstarterbuttonengagesthe engine'selectric starterwhenpluggedintoa 120Vpowersource, DRIVE CONTROL/AUGER f CONTROL LOCK ELECTRIC STARTER OUTLET Requiresthe useof a three- - Craftsman 88690 | Operation Manual - Page 14
ignitionkey and startthe snow thrower'sengine. 6. Whilestandingin the operator'sposition(behindthesnow thrower),engagethe auger controlfora the engine.Checkoil levelbeforeeach operationto ensureadequateoil in the engine.Forfurther instructions, referto the stepson page 16. 1. Removethe dipstickfrom - Craftsman 88690 | Operation Manual - Page 15
and bringingthe snow throwerto a completestop.Doingsowill resultin prematurewearto the snow thrower'sdrivesystem. TO if the pins havesheared.See Figure 11. NEVERreplacethe augershearpinswith anythingotherthan Sears SKU#88389/OEM PartNo. 738-04124Areplacemenst hearpins. Anydamageto theauger gearboxor - Craftsman 88690 | Operation Manual - Page 16
maintenanceschedulegiven below.This chart describes serviceguidelinesonly. Usethe ServiceLog columnto keeptrackof completedmaintenancetasks.To locate the nearest Sears Service Centeror to scheduleservice,simplycontactSearsat 1-800-4-MY-HOME®. EachUse 1st5 to 8 hours Annuallyor 25 hours Annuallyor - Craftsman 88690 | Operation Manual - Page 17
Plug Checksparkplug yearlyor every 100operatinghours. 1. Removechokecontrolknoband safety key. 2. Loosenand removethe mountingscrewsfromthe snow hood. See Figure14. 3. Slowlyremovethe snow hood,makingsurethat the primerbulb hoseand ignitionwireremainconnected.See Figure14 inset. 4. Removeand - Craftsman 88690 | Operation Manual - Page 18
until it stops. 2. Carefullypivotthe snowthrowerup and forwardso that itrestson theauger housing. 3. Removethe lowerframecover fromthe undersideof the snow throwerby removingthe four self-tappingscrewswhichsecureit. 4. Applya lightcoatingof engineoil (or 3-in-1oil) to the hexshaft. See Figure16 - Craftsman 88690 | Operation Manual - Page 19
thedrivecontrol released,pushthe snowthrowergently forward.The unitshouldroll freely. f 2. Engagethe drivecontroland gently attemptto pushthe snow throwerforward.Thewheelsshouldnotturn. The unitshouldnot roll freely. 3. With thedrivecontrol released,movethe shift leverbackand forth betweenthe - Craftsman 88690 | Operation Manual - Page 20
auger beltoff theengine pulley.See Figure23. f 4. Carefullypivotthe snowthrowerup and forwardso that itrestson theauger housing. 5. Removethe frame coverfrom the undersideof the snow thrower by removingfourself-tappingscrewswhich secureit. See Figure 24. "_ J Figure22 Figure 23 f // J Figure24 2O - Craftsman 88690 | Operation Manual - Page 21
ofthismanual. NOTED:oNOTforgetot reinstathlleshouldsecrrewandreconnect thesprintgotheframeafteirnstallinagreplacemaeungt ebrelt. Drive Belt Toremoveand replaceyoursnow thrower'sdrivebelt, proceedas follows: 1. Topreventspillage,removeall fuel fromtank by runningengine untilit - Craftsman 88690 | Operation Manual - Page 22
and performingthe drivecontrolcableadjustmentfails to correct the problem,the frictionwheelmayneed to be replaced.Followthe theauger housing. 4. Removethe frame coverfrom the undersideof the snow thrower by removingfourself-tappingscrewswhich secureit. 5. Removethe right-handwheelby removingthe - Craftsman 88690 | Operation Manual - Page 23
NOTEB:ecarefunlotodamagtheethreadosntheshaft, 7. Carefupllyositiothnehexshafdtownwaarnddtotheleftbefore carefusllylidintghefrictiownheealssembolfyftheshaftS. ee Figur3e1. NOTEIf:you'rreeplacitnhgefrictiownheealssembalsyawhole, discartdhewornparat ndslidethenewparot ntothehexshaft. - Craftsman 88690 | Operation Manual - Page 24
performancefrom the snowthrowerfor manymoreyears. PREPARING ENGINE PREPARING SNOW THROWER Forenginesstoredover30 days: • 1. Topreventgum from formingin fuel systemor on essentialcarburetor parts: a. If fueltank containsoxygenatedor rdormulatedgasoline (gasolineblendedwithan alcoholor ether - Craftsman 88690 | Operation Manual - Page 25
wire.Tightenall boltsand nuts.If vibrationcontinues, haveunitservicedbya SearsParts & RepairCenter. 1. Connectand tightenspark plugwire. 2. Removeice and snow from gascap. Be certain vent hole is clear. 1. Adjustdrivecontrolcable. Referto Serviceand Maintenancesection. 2. Replacedrive belt - Craftsman 88690 | Operation Manual - Page 26
Craftsman Snow Thrower Model 247.88690 i ! Y _k t\ 7_ I L. --. i i\:/, 26 - Craftsman 88690 | Operation Manual - Page 27
Craftsman Snow Thrower IViodel 247.88690 731-2635 D= 0 Snow RemovalToolMount 2. 684-04057A-0637 ImpellerAssembly,12"Dia. 3. 710-0347 HexScrew,3/8-16, 1.75,Gr5 4. 710-0451 Bolt,Carriage,5/16-18,.750Grl 5. 710-04484 Screw, 5/16-18,0. - Craftsman 88690 | Operation Manual - Page 28
Craftsman Snow Thrower Model 247.88690 28 - Craftsman 88690 | Operation Manual - Page 29
Craftsman Snow Thrower IViodel 247.88690 631-04133A m= 0 HandleAssembly,ClutchLock, LH 2. 631-04134B HandleAssembly,ClutchLock, RH 3. 684-04111B 4. 684-04112B HandleAss'y, Engage,LH HandleAss'y, Engage,RH 5. J 631-04131B 6. 710-04326 _ ChuteAssembly( - Craftsman 88690 | Operation Manual - Page 30
Craftsman Snow Thrower Model 247.88690 / // 3O S // / / / - Craftsman 88690 | Operation Manual - Page 31
Craftsman Snow Thrower IViodel 247.88690 656-04025A D= 00 DiscAssembly,FrictionWheel 2. 684-04153 FrontGuideBracket,Auger Cable 32. 790-00180A-0721 Frame 33. 790-00206A-0637 Guide Bracket,AugerCable 34. 790-00207B Guide Bracket,Drive Cable 35. 790-00316-0637 Cover,Frame 36. 634-04147A-0911 - Craftsman 88690 | Operation Manual - Page 32
Craftsman Engine Model 15C103-0661 For Snow Thrower Model 247.88690 110580PERATOR'sMANUAL] I 48 SHORT BLOCK I I 1329 REPLACEMENT ENGINE I 1 1330 REPAIR MANUAL I 307A _ 684 t)_' 21 718 22U 742 % 46 177 ,:.C,_ 'i 24 0 598 287 G_ f 741 524 __?) 358 ENGINE GASKET SET 2O 12 1022 993 - Craftsman 88690 | Operation Manual - Page 33
Craftsman Engine Model 15C103-0661 For Snow Thrower Model 247.88690 635 1026 383 45 36 238 F-_ _ 1034 51 1095 VALVE GASKET SET 51 _-ii_L_ 993 1022 601 1022 957 1029 914 19o_? 33 - Craftsman 88690 | Operation Manual - Page 34
Craftsman Engine Model 15C103=0661 For Snow Thrower Model 247.88690 528 472 1196A ¢_ 11 i' 281 663_% \ ",\\ 604 =:_ o _ _, o 990 564 I_ 1196 x 731 \ .... 23 347 1070 (_ 1005 / / 455 332 1036 EMISSIONS LABEL ] 610 / 604 1251A 1252A _'> 65A_ 305 _> 1252 300 883 34 - Craftsman 88690 | Operation Manual - Page 35
Craftsman Engine IViodel 15C103-0661 For Snow Thrower IViodel 247.88690 562 '_'*_, 632 209 578 851 \ 1347 682 735 1009 334 _> 1o54 '_,_ ,, ,__ 459 108 51 186 13__4_,..Y_A __9- lo4_ 975_ _ 137 _I[_S .... '_I %.:::j:c - Craftsman 88690 | Operation Manual - Page 36
Craftsman Engine Model 15C103=0661 For Snow Thrower Model 247.88690 794188 2 399269 3 299819s• 5 791720 7 791716.+ 11 695745 12 699485• D= O CylinderAssembly Kit-Bushing/Sea(lMagnetoSide) Seal-Oil (MagnetoSide) Head-Cylinder Gasket-CylinderHead Tube-Breather Gasket-Crankcase - Craftsman 88690 | Operation Manual - Page 37
Craftsman Engine IViodel 15C103-0661 For Snow Thrower IViodel 247.88690 306 307 307A 307B 309 318 332 333 334 337 347 Screw(BreatherPassageCover) Spring-Friction Spring-Detent Pin-Locating(Cylinder) Hood-Snow Hood-Snow Gear-Timing Retainer-ERing Gear-Idler Stud-RockerArm Guard-Muffler Screw - Craftsman 88690 | Operation Manual - Page 38
Craftsman Engine Model 15C103-0661 For Snow Thrower Model 247.88690 794696 993 694088 996 794687 KeySet Gasket- -Flywheel Screw(Starter Motor) Gasket-RockeCr over Cover-Rocker Rod-Push Arm-Rocker Guide-PushRod Label-Emissions Tie-Cable 1058 _ 277104 1070 699201 1095 791798 _ Operator - Craftsman 88690 | Operation Manual - Page 39
39 - Craftsman 88690 | Operation Manual - Page 40
systemon your and labor. Sears Emission Control Defects Warranty Coverage Smalloff-roadenginesarewarrantedrelativeto emissioncontrol partsdefects fora periodof one year,subjectto provisionsset forth below.Ifany covered Owner's Warranty parton yourengineis defectivet,he part will be repairedor - Craftsman 88690 | Operation Manual - Page 41
information regarding the Emissions Durability Period and the Air Index. Sears, Roebuck and Co., U.S.A. makes this information available to , assuming proper maintenance in accordance with the Operating & Maintenance Instructions. The following categories are used: Moderate: Engine is certified - Craftsman 88690 | Operation Manual - Page 42
parts notcoveredby theagreement;also, 10%off regularpriceof preventivemaintenancecheck • Fast help by phone- we call it RapidResolution- phone support from a SearsrepresentativeT. hinkof usas a "talkingowner's manual Sears Canadaat 1-800-361-6665. Sears Installation Service - Craftsman 88690 | Operation Manual - Page 43
26 NOmero de servicio Cubierta posterior GARANTiA LIMITADA CRAFTSMAN Dos Ahos en Lanzador de Nieve Cuandohechofuncionary mantenidosegQntodas SAE 5W-30 20 onzas 3 cuartos Champion® RC12YC .030" © Sears Brands,LLC N_mero de modelo N_mero de serie Fechade compra Registrearriba el nOmerodel - Craftsman 88690 | Operation Manual - Page 44
.quinarueconstruidapara seroperadade acuerdocon las reglasde seguridadcontenidasen este manual.AI igualque concualquiertipo de equipo rnotorizadou, n utilicealhajas,bufandaslargasu otras prendassueltasque podrianenredarseen las partes rn6viles. Utiliceun calzadoespecialpara superficiesresbaladizas. • - Craftsman 88690 | Operation Manual - Page 45
montajedel canal mientrasel motorest,. en funcionamiento. Antes de destaparlo,apagueel motory permanezcadetr_.sde las manijashasta quetodas las partes m6vilesse hayandetenido. Uses61ounionesy accesoriosaprobadospor el fabricante(por ejemplo,pesaspara las ruedas,cadenaspara los neum_.ticos, cabinas - Craftsman 88690 | Operation Manual - Page 46
Y ALMACENAMIENTO Nuncaalterelos dispositivosde seguridad.Controleperi6dicarnenteque funcionencorrectarnenteR. ernitasea las secciones de rnantenirnientyo ajustede este manual. • Antesde realizarla lirnpieza,repararo revisarla rn_.quina, desengranetodaslas palancasde controly detengael motor. Esperea - Craftsman 88690 | Operation Manual - Page 47
DELOPERADOR(S) Lea,entienda, y siga todas lasinstrucciones en el manual (es)antes de intentar reunirse y funcionar. i LA ROTATIVO No ponga manos o pies cerca del giro de partes, en el alojamiento de taladro/aspa tolva. Contacto con las partes rotativas puede amputar manos y pies. o asamblea de - Craftsman 88690 | Operation Manual - Page 48
el piso Quitey descartetodos los insertosde ernpaque. 2. Saquela rn_.quinaquitanievede la caja. 3. AsegQresede vaciarcornpletarnentela cajaantes de tirarla. PARTES SU ELTAS Coneste manualse incluyendos pasadoresde cuchiNade barrenade repuesto.Consultela secci6n"Barrenas"en la secci6nde Servicioy - Craftsman 88690 | Operation Manual - Page 49
. SitOeel montajedel canalsobrela base.Vea la figura3. 5. Cierrelos fijadoresde la bridapara asegurarel montajedel canal a la basedel canal. Veala figura4. Losfijadoresde la brida emitenun chasquidocuandoest_.nbien asegurados. NOTA:si los fijadoresde la brida no seajustanen su lugarf_.cilmente, - Craftsman 88690 | Operation Manual - Page 50
de Limpieza del Canal Hay una herramientade limpiezadel canal iajustadaa la parte superiorde la caja de la barrenacon un pasadorde ensamNado.Vea la permanezcadetr_.sde las manijashasta que todas las partes m6vilesse hayandetenidoantesde utilizarla herramienta de limpiezaparalimpiarel montajedel - Craftsman 88690 | Operation Manual - Page 51
Ajuste de( montaje del cana( Es posibieajustar (adistanciaa (a cua(se arroja (anievecambiandoel &ngu(ode(montajede(canal. Parahacer(o: 1. Detengael motorquitando(a ((avede encendidoy afioje (aperi((a a mariposade pl&sticoque se encuentraen el (adoizquierdode( montajede( canal. 2. Gire el canal - Craftsman 88690 | Operation Manual - Page 52
f Control de Transmisi6n Montaje delcanal \ Tapbn de combustible \ Llendo de \ aceite Herramienta de limpieza del canal Control del ceba, _ebaclor Lenlacveenddid, c Manija del arrancador de retroceso Botbn del arrancador eldctrico Barrenas _ I_Zapatas antideslizantes Pare el Interruptoi - Craftsman 88690 | Operation Manual - Page 53
MANIJA DEL ARRANCADOR DE RETROCESO Esta manijase ufiliza paraarrancarel motor manualmente. CONTROL DE LA BARRENA J CLOANBTRAORRLENDAE BOTON DEL ARRANCADOR ELECTRICO Si oprimeel bot6ndel arrancadorel_ctricose engranael arrancador el_ctricodel motorcuandose Ioenchufaa unafuente de energiade 120V. - Craftsman 88690 | Operation Manual - Page 54
CONTROL DIRECClONAL DEL CANAL f CONTROL D|RI:CC|ONAL DI:L CANAL ANTES DE ENCENDER EL MOTOR DESCARGA IZQUIERDA Lea,cornprenday sigatodas las instruccionesy advertenciasque aparecenen la rn_quinay en este manualantesde operarla. Aceite El motorse envi6con aceiteen el motor.Controleel nivelde - Craftsman 88690 | Operation Manual - Page 55
Arrancador el_ctrico Determinesi el cableadode su hogares un sisternade tres cables conectadoa tierra. Consultecon un electricistarnatriculadosi no est,. seguro. El arrancadorel_ctricoopcionalest,. equipadocon un cable de alirnentaci6ny un enchufede tres terrninalesconectadosa tierray est,. - Craftsman 88690 | Operation Manual - Page 56
LISTA DE iVlANTENllVllENTO Antesde realizarcualquiertipo del rnantenirniento/servicios,uelte todos los rnandosy pare el motor.Esperehastaque todas las partes de rnovirnientohayanvenidoa una paradacornpleta.Desconecteel alarnbrede bujia y b_.selocontrael motorpara prevenirel cornienzo invohntarioS. - Craftsman 88690 | Operation Manual - Page 57
Cambio de aceite del motor ParaevitaqrueelmotorresultdeaSadeos,importanqtuee: • ControeJlneivedleaceitaentedsecadausoycadaochohoras deoperaci6n. • Cambeielaceitdeespu6dsehs5a8primerahsoradse operaciy6dnespu6dsecada50horadseoperacbonunavez portemporada, 1, ColoqueelnivedlemotoyrquitelaIhvedeseguridad - Craftsman 88690 | Operation Manual - Page 58
9. Unaelbot6dnecontrodleest_.rateler jedeest_.retenrel carburadSoier.lbot6dnecontrodleest_.rtneoresinstalado correctarneenletes,t_.rnteorfuncionar_.. 10. InstaleaIlavedeseguridad. NOTAP:araelreernplaszeodebeutilizaurnabujfaderesistor. ContacctoenuncentrdoeparteysreparaciS6enaros1-800-4-MYHOMEp® - Craftsman 88690 | Operation Manual - Page 59
2. Montelas nuevaszapatasantideslizantescon cuatrospernos de carro (dosen cada lado),arandelas,y las tuercasde brida hexagonalesC. onsultela figura17. Para retirarla placade raspado: 1. Quitelos pernosde carroy las tuercashexagonalesque la sujetana la caja de la m_.quinaquitanieve. 2. Montela - Craftsman 88690 | Operation Manual - Page 60
Soporte del canal f Si la espiralsituadaen la parteinferiordel controldireccionaldel canal no seenganchacompletarnenteconel rnontajedel canal,es posible ajustarel soportedel canal. Parahacerlo: 1. Aflojelas dostuercasque sujetanel soportedel canaly carnbie su posici6nligerarnenteV. ea la - Craftsman 88690 | Operation Manual - Page 61
6. a. AflojyeretireltornilcloonrebordqeueactOcaomgouarda delacorreaV.ealafigur2a4. b. Desenganeclhreesortdeelam_nsudlaesopordteel marco. 7. Retirleacorredaealrededdoerlapoledaelabarrenyadeslice lamismeantrelam_nsudlaesoporytelapoleadelabarrena. Vealafigur2a5. 8. - Craftsman 88690 | Operation Manual - Page 62
4. Gireconcuidadlaorn&quiqnuaitaniehvaeciarribyahacia delandteernaneqrauequedaepoyadsaobrleacajadela barrena. 5. Saquleacubiertdaeml arcdoesddeebajdoelarn&quiqnuaita nievreetirandlooscuatrtoorniNaoustorroscanqtueelsa aseguraVne.alafigur2a3. 6. Detr&lasparadsaeescappaaraaurnenltaarutorizacei6nntrel - Craftsman 88690 | Operation Manual - Page 63
NOTA:Tengacuidadode no daSarlas roscasdel eje. 7. Con cuidado,ubiqueel eje hexagonalhaciaabajoy haciala izquierdaantesde deslizarcon precauci6nel rnontajede la rueda de fricci6nfueradel eje.Vea la figura30. NOTA:Cuandosedesea reernplazarel conjuntode la ruedade fricci6ncornpleto,descartela - Craftsman 88690 | Operation Manual - Page 64
30 dfas: 1. Irnpedira gornaforrnarseen sisternade combustibleo en partes de carburadoresenciales: a. Si el dep6sitode combustiblecontienela . 3. Siga las recornendacionesde lubricaci6nen la secci6nde mantenirnientode este manual. 4. Alrnaceneel equipoen un _.readespejaday seca. b. Si el - Craftsman 88690 | Operation Manual - Page 65
necesarioajustarel carburador 4. Contactecon sucentro de partes y reparaciones Sears. 1. El carburadorno est,. _!r_managemy.com -isin cargo! _ En Iflqea podr_ er/contrar este manual y los rnanuales de todos los otros productos que posea. os_p_egt_ur_,er_ren_pondp_odnr_ueste_qou_dpeo_ped_st_, - Craftsman 88690 | Operation Manual - Page 66
Perdidade potencia 1. El cablede la bujfaest,.fiojo 2. El orificio de ventilaci6ndel tap6nde Ilenadodel combustibleest,.obstruido 1. Conectey ajusteel cablede la bujfa. 2. Retireel hieloy la nievedel tap6nde Ilenadodel combustible.Cornpruebeque el orificiode ventilaci6nno est_ obstruido. La - Craftsman 88690 | Operation Manual - Page 67
.Si una partede su motor de emisionespara defectosen piezasdurante un periodode dos a_os,sujeto cubiertapot la garanfiaesdefectuosa,Sears reparar_o sustituir_dicha parte. ResponsabJlidades del propietario en relacibn con la garantia Comopropietariodel motortodo terrenopeque_o,Ud.es responsablede la - Craftsman 88690 | Operation Manual - Page 68
de emisiones en la etiqueta de cumplimiento de las reglas de emisiones del motor Despu_s deJ 1 de julio de 2000 se certificar_, que determinados motores Sears, Roebuck and Co., de los Estados Unidos cumpien con los estAndares de emisiones de la fase 2 de la Agencia de Protecci6n Ambiental de los - Craftsman 88690 | Operation Manual - Page 69
el apoyotelef6nicode un Charnuscaal representanteP. ienseen nosotroscornoel manual"de un due_ohablador." Unavezadquiridoel Acuerdo,puedeprograrnarel serviciocon tan 1-800-361-6665. Servicio de instalaci6nde Sears Si deseasolicitarla instalaci6nprofesionadl e Searsde aparatos dorn_sticos, - Craftsman 88690 | Operation Manual - Page 70
70 - Craftsman 88690 | Operation Manual - Page 71
71 - Craftsman 88690 | Operation Manual - Page 72
the replacement parts, accessories and owner's manuals that you need to do-it-yourself. For Sears professional Sears Parts & Repair Service Center 1-800-488-1222 (U.S.A.) 1-800-469-4663 (Canada) www.sears.com www.sears.ca To purchase a protection agreement on a product serviced by Sears
-
 1
1 -
 2
2 -
 3
3 -
 4
4 -
 5
5 -
 6
6 -
 7
7 -
8
-
9
-
10
-
11
-
12
-
13
-
14
-
15
-
16
-
17
-
18
-
19
-
20
-
21
-
22
-
23
-
24
-
25
-
26
-
27
-
28
-
29
-
30
-
31
-
32
-
33
-
34
-
35
-
36
-
37
-
38
-
39
-
40
-
41
-
42
-
43
-
44
-
45
-
46
-
47
-
48
-
49
-
50
-
51
-
52
-
53
-
54
-
55
-
56
-
57
-
58
-
59
-
60
-
61
-
62
-
63
-
64
-
65
-
66
-
67
-
68
-
69
-
70
-
71
-
72
 |
 |

Operator's
Manual
CRRFTSMRN
28"
SNOW THROWER
Model
No. 247.88690
CAUTION:
Before
using
this
product,
read
this
manual
and
follow
all
safety
rules
and
operating
instructions.
o SAFETY
ASSEMBLY
OPERATION
MAINTENANCE
PARTS LIST
o ESPANOL
Sears,
Roebuck
and Co.,
Hoffman
Estates,
IL
60179,
U.S.A.
Visit
our
website:
www.craftsman.com
FORMNO.769-03973
2/4/2009