Creative Zen Nano Plus Setup Guide
Creative Zen Nano Plus - Zen Nano Plus Manual
 |
UPC - 054651100978
View all Creative Zen Nano Plus manuals
Add to My Manuals
Save this manual to your list of manuals |
Creative Zen Nano Plus manual content summary:
- Creative Zen Nano Plus | Setup Guide - Page 1
to as 'Sera Select'. SCE a 4R-GaC.E Step 2 : Set up Software 1. Go to httpd/www.creatIve.comisupport/ and click Downloads. 2. Select your region and click the Go! button. 3. In the page that appears, click MP3 Players Zen Zen Nano Plus or MP3 Players MuVo MuVo Micro N200 and click the Next
-
 1
1
 |
 |
CREATIVE
ZEN
NANO
PLUS
MUM"
.
N200
CREATIVE
Copyright
0
2007
Great.
Technology
Ltd.
All
rights
reserved.
The
Creative
Loge,
MuVo
logo,
2EN,
Muvo
and
Creel.
MediaSource
are
trademarks
or
registered
trademarks
of
Creative
Technology
Ltd.
in
the
United
States
and/or
other
countries.
Microsoft,
Windows
and
the
Windows
Logo
are
registered
trademarks
of
Microsoft
Corporation.
PM,
03PF163000005
Rev.A
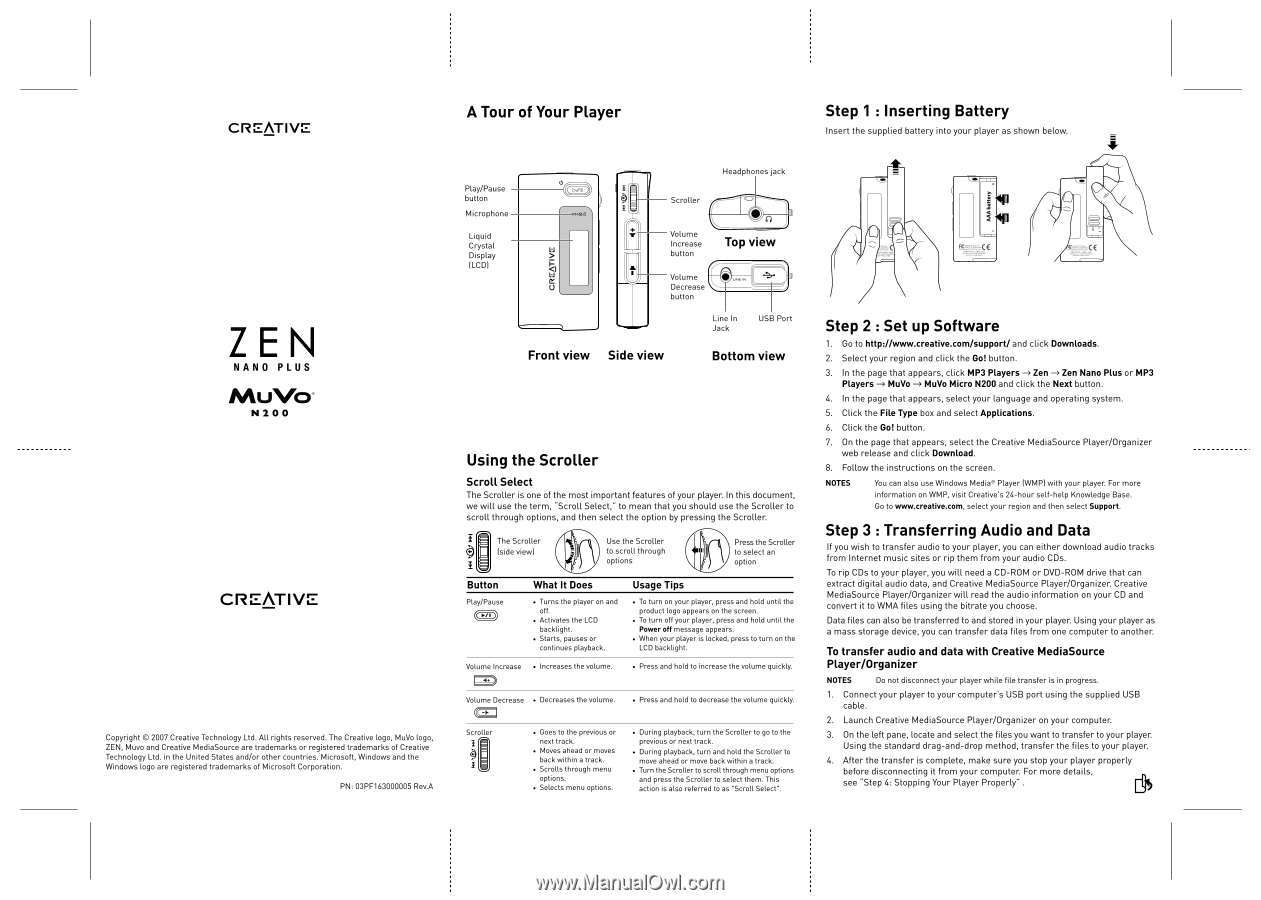
A
Tour
of
Your
Player
Step
1
:
Inserting
Battery
Headphones
jack
Insert
the
supplied
battery
into
your
player
as
shown
below.
Play/Pause
button
Scroller
0
0
Microphone
a
Liquid
Volume
SCE
4R
-
Ga.
CE
Crystal
Display
Increase
Top
view
button
[LCD)
Volume
•
Decrease
5
button
Line
In
USB
Port
Jack
Step
2
:
Set
up
Software
1.
Go
to
httpd/www.creatIve.comisupport/
and
click
Downloads.
Front
view
Side
view
Bottom
view
2.
Select
your
region
and
click
the
Go!
button.
3.
In
the
page
that
appears,
click
MP3
Players
Zen
Zen
Nano
Plus
or
MP3
4.
Players
MuVo
MuVo
Micro
N200
and
click
the
Next
button.
In
the
page
that
appears,
select
your
language
and
operating
system.
5.
Click
the
Flle
Ty
pe
box
and
select
Applications.
6.
Click
the
Oat
button.
Using
the
Scroller
7.
8.
On
the
page
that
appears,
select
the
Creative
MediaSource
Player/Organizer
web
release
and
click
Download.
Follow
the
instructions
on
the
screen.
Scroll
Select
The
Scroller
is
one
of
the
most
important
features
of
your
player.
In
this
document,
we
will
use
the
term,
"Scroll
Select,"
to
mean
that
you
should
use
the
Scroller
to
scroll
through
options,
and
then
select
the
option
by
pressing
the
Scroller.
C
The
Vomiter
(side
view)
Use
the
Scroller
to
scroll
through
options
•
Press
the
Scroller
to
select
an
option
Button
What
It
Does
Usage
Tips
•
Turns
the
player
on
and
•
To
tum
on
your
player,
press
and
hold
until
the
ofi.
product
logo
appears
on
the
screen.
•
Activates
the
LCD
•
To
turn
off
your
player.
press
and
hold
until
the
backlight.
Powaren
massage
appears.
•
Starts,
pauses
or
•
When
your
player
is
locked.
press
to
tum
on
the
continues
playback.
LCD
backlight.
Play/Pause
Volume
Increase
•
Increases
the
volume.
•
Press
and
hold
to
increase
the
volume
quickly
Volume
Decrease
•
Decreases
the
volume
•
Press
and
hold
to
decrease
the
volume
quickly
Serener
I
•
Goes
to
the
previous
or
next
rack.
•
Moves
ahead
or
moves
backwithin
a
track.
•
Scrolls
through
menu
options.
•
Selects
menu
options.
•
During
playback,
turn
the
Serener
to
go
to
the
previous
or
next
track.
•
During
playback,
turn
and
hold
the
Serener
to
move
ahead
or
move
back
within
a
track.
•
Turn
the
Scroller
to
scroll
through
menu
options
and
pre.
the
Scroller
touted
them
T.
action
is
also
referred
to
as
'Sera
Select'.
NOTES
You
can
also
use
Windows
Mediae
Player
(WMP)
with
your
player.
For
more
information
on
WM
P,
visit
Creative's
24
-hour
self-help
Knowledge
Base.
Go
to
vorrw.creathre.com,
select
your
region
and
then
select
Support.
Step
3
:
Transferring
Audio
and
Data
If
you
wish
to
transfer
audio
to
your
player,
you
can
either
download
audio
tracks
from
Internet
music
sites
or
rip
them
from
your
audio
CDs.
To
rip
CDs
to
your
player,
you
will
need
a
CD-ROM
or
DVD-ROM
drive
that
can
extract
digital
audio
data,
and
Creative
MediaSource
Player/Organizer.
Creative
MediaSource
Player/Organizer
will
read
the
audio
information
on
your
CD
and
convert
it
to
WMA
files
using
the
bitrete
you
choose.
Data
files
can
also
be
transferred
to
and
stored
in
your
player.
Using
your
player
as
a
mass
storage
device,
you
can
transfer
data
files
from
one
computer
to
another.
To
transfer
audio
and
data
with
Creative
MediaSource
Player/Organizer
NOTES
Do
not
disconnect
your
player
while
fi
le
transfer
is
in
progress.
1.
Connect
your player
to
your
computer's
USB
port
using
the
supplied
USA
cable.
2.
Launch
Creative
MediaSource
Player/Organizer
on
your
computer.
3.
On
the
left
pane,
locate
and
select
the
files
you
want
to
transfer
to
your
player.
Using
the
standard
drag
-and
-drop
method,
transfer
the
files
to
your
player.
4.
After
the
transfer
is
complete,
make
sure
you
stop
your player
properly
before
disconnecting
it
from
your
computer.
For
more
details,
see
'Step
4:
Stopping
Your
Player
Properly'
.